In this article, we are going to learn how to do a buy transaction of crypto with the Binance API. As usual, we will be using the rust programming language.
The full project’s repository can be found on my GitHub.
I also have another article related to the Binance API:
Prerequisites
To be able to follow this article you should have:
- Rust installed
- Some familiarity with Rust and programming against a REST API is helpful.
- A Binance account.
- Verification on your Binance account so that you can create an API key. To be able to do this, it requires a valid identification. Instructions here.
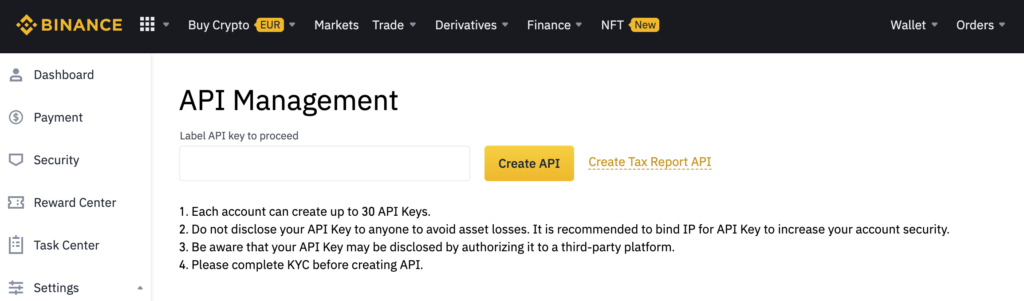
Then, an API key can be created in your profile under API management, when you create your key make sure to copy the secret as you will not be able to see it after confirming creation:
Make sure the API key allows spot trading, I (and Binance) also recommend restricting the access to trusted IPs only:

Creating the Binance API crypto transaction project
In this section we will set up the basic foundation for our project:
- project directory
- dependencies
- configuration
As always we start with creating our project using a cargo command: cargo new binance-api-transaction-tutorial.
Then, we add the dependencies the project will use to talk to the API, receive and parse data, Authenticate, etc. Add the following dependencies:
[package]
name = "binance-transactions-test"
version = "0.1.0"
edition = "2018"

# See more keys and their definitions at https://doc.rust-lang.org/cargo/reference/manifest.html

[dependencies]
tokio = { version= "1", features = ["full"] }
serde = { version = "1.0"}
serde_json = "1.0"
reqwest = { version = "0.11", features = ["json", "blocking"] }
hmac = "0.11.0"
sha2 = "0.9"
hex = "0.4"
dotenv = "0.15.0"
We will be using dotenv so that we can store our API key in a .env file and load it into the program. Putting the key in this .env allows us to add it to the .gitignore so that our keys don’t accidentally end up in a repository when we commit our code.
Then we have reqwest for making HTTP requests and hmac and sha2 will be used to generate a signature.
Create a .env file in the root of the project and add a line like:
BINANCE_API_KEY=xx
BINANCE_SECRET_KEY=xx
Where xx are the values you copied when you created a new API key.
To verify that we can load the environment variable update main.rs to look like:
use std::env;
fn main() {
    dotenv::dotenv().ok();

    println!("key: {}", env::var("BINANCE_API_KEY").unwrap());
}
If we run this program, we should see our API key printed to the console.
We now have the basic setup and configuration to start writing code for transactions.
Retrieving account information
Before we start with the crypto transaction project using the Binance API, let’s start with something basic. We are going to retrieve balance information from our Binance account. In this section, we will print out all the coins in our account that have a balance above 0.
To retrieve account information or do trades, we have to create a signature for our requests. To be able to create the signature we need the secret key we copied earlier. Information from the Binance documentation on this can be found here. However, we will walk through it together as well.
From the documentation:
Endpoints use
HMAC SHA256signatures. TheHMAC SHA256 signatureis a keyedHMAC SHA256operation. Use yoursecretKeyas the key andtotalParamsas the value for the HMAC operation.
We will use the sha2 and hmac crates to help create the signatures. The totalparams mentioned here are the query parameters plus timestamp and an optional recvWindow which determines how many milliseconds after timestamp the request is valid for. This value defaults to 5000.
Furthermore, we need to supply our API key in the request headers, in the x-mbx-apikey header.
In order to create and or configure this information, we will write some functions to make things simpler.
Reqwest client and API Key in request headers
In this section, we will write a function that creates the client object for our requests. Since we will be using this client to do only actions that require an API key, we will make the key part of the default headers.
The listing below shows the helper function and some other new additions to main.rs:
use reqwest::header;
use std::env;

static APP_USER_AGENT: &str = concat!(env!("CARGO_PKG_NAME"), "/", env!("CARGO_PKG_VERSION"));

fn get_client() -> reqwest::Client {
    let mut headers = header::HeaderMap::new();
    headers.insert(
        header::HeaderName::from_static("x-mbx-apikey"),
        header::HeaderValue::from_str(&env::var("BINANCE_API_KEY").unwrap()).unwrap(),
    );

    let client = reqwest::Client::builder()
        .default_headers(headers)
        .user_agent(APP_USER_AGENT)
        .build()
        .unwrap();

    client
}
We have added use reqwest::header to be able to use header related structs and things. Then we declare APP_USER_AGENT to give our client a user agent name. Finally, the get_client function builds the reqwest::Client object and returns it.
To add the API key with the x-mbx-apikey header, we have to create a new HeaderMap on line 7. We can then insert a new header using the HeaderName and HeaderValue structs. For the HeaderValue we get it from our BINANCE_API_KEY environment variable, we set up earlier.
At the end of the function, we use the builder() function to create a Client object with all the information we need, and then return it.
Timestamp helper function
The timestamp should be the time at which the request was created and sent. It needs to be the current time in milliseconds. Let’s write a function to help us convert a time to a milliseconds timestamp.
For that, we need to add some things from std::time:
use reqwest::header;
use std::env;
use std::time::{SystemTime, UNIX_EPOCH};
Then the function:
fn get_timestamp(time: SystemTime) -> u128 {
    let since_epoch = time.duration_since(UNIX_EPOCH).unwrap();
    since_epoch.as_millis()
}
Here we take a SystemTime parameter and calculate the time since the UNIX_EPOCH and convert that to milliseconds and return it.
Creating the signature
In this section, we will be creating a function to create the signature for our request, doing the signing with the secret key.
For this, we need to add additional use lines:
use hmac::{Hmac, Mac, NewMac};
use reqwest::header;
use sha2::Sha256;
use std::env;
use std::time::{SystemTime, UNIX_EPOCH};
The function looks like this:
fn get_signature(request: String) -> String {
    let secret_key = env::var("BINANCE_SECRET_KEY").unwrap();
    let mut signed_key = Hmac::<Sha256>::new_from_slice(secret_key.as_bytes()).unwrap();
    signed_key.update(request.as_bytes());
    let signature = hex::encode(signed_key.finalize().into_bytes());

    format!("{}", signature)
}
The request parameter should be the query parameters sent in the request, this includes the timestamp and optionally recvWindow. For example, buying 1 LTC with BTC: symbol=LTCBTC&side=BUY&type=LIMIT&timeInForce=GTC&quantity=1&price=0.1&recvWindow=5000×tamp=1499827319559.
In the case of getting account information, there are no query parameters except for timestamp and recvWindow. Meaning the signature would be based on recvWindow=5000×tamp=149982731955.
On line 32 we create a new Hmac object with Sha256 as the hash algorithm, as required by the Binance API, using the secret_key. Then we update the signed_key object with our request parameters string request. As the final step of creating the signature, the signature is finalized and encoded as hex.
At the end of the function, the signature is returned as a String.
Retrieving owned coin balances
Now that we have all these helper functions in place, we can finally send a request for account information. We will request the account information. Then loop through the balances to print out coins and their balance amount if the amount is above 0.
So, let’s update the main function in main.rs to do this:
#[tokio::main]
async fn main() {
    dotenv::dotenv().ok();
    println!("key: {}", env::var("BINANCE_API_KEY").unwrap());

    // Get the timestamp and the signature
    let timestamp = get_timestamp(SystemTime::now());
    let params = format!("timestamp={}", timestamp.to_string());
    println!("Request: {}", params);
    let signature = get_signature(params.clone());

    // Build the entire request URL including signature and timestamp
    let request = format!(
        "https://api.binance.com/api/v3/account?{}&signature={}",
        params.clone(),
        signature
    );

    // Send the request using the client
    let client = get_client();
    let result = client
        .get(request)
        .send()
        .await
        .unwrap()
        .json::<serde_json::Value>()
        .await
        .unwrap();

    // Print the results
    // println!("result: {:?}", result);
    println!("Positive coin balances: ");
    let balances = result["balances"].as_array().unwrap();
    for i in 0..balances.len() {
        let amount = balances[i]["free"]
            .as_str()
            .unwrap()
            .parse::<f32>()
            .unwrap();
        if amount > 0.0 {
            println!("{}: {}", balances[i]["asset"], amount);
        }
    }
}
Let’s go through it section by section.
Timestamp, query parameters, and signature
    // Get the timestamp and the signature
    let timestamp = get_timestamp(SystemTime::now());
    let params = format!("timestamp={}", timestamp.to_string());
    println!("Request: {}", params);
    let signature = get_signature(params.clone());
Here on line 45 we get the timestamp for SystemTime::now() we want to get the timestamp as close to the time we send the request as possible.
Then we concat a query String with the parameters. In this case, we only have the timestamp as a query parameter, recvWindow defaults to 5000, we don’t include it.
Finally, we get the signature.
Sending the request
Here we build the request URL and then send the request:
    // Build the entire request URL including signature and timestamp
    let request = format!(
        "https://api.binance.com/api/v3/account?{}&signature={}",
        params.clone(),
        signature
    );

    // Send the request using the client
    let client = get_client();
    let result = client
        .get(request)
        .send()
        .await
        .unwrap()
        .json::<serde_json::Value>()
        .await
        .unwrap();
On line 51 we build the request URL. The parameters are added after account which is the account information endpoint. Note that the signature is added as a query parameter signature=.
Then a get request is sent using the client object. Furthermore, the result is converted to a serde_json::Value, which is this generic construct for representing JSON data.
Printing the positive coin balances
Finally, we are going to print the information in the result. We can print everything using the following line:
// Print the results
 println!("result: {:?}", result);
But, let’s display some information, the cryptocurrency balances, in a cleaner way by looping through the information and printing them line for line:
    println!("Positive coin balances: ");
    let balances = result["balances"].as_array().unwrap();
    for i in 0..balances.len() {
        let amount = balances[i]["free"]
            .as_str()
            .unwrap()
            .parse::<f32>()
            .unwrap();
        if amount > 0.0 {
            println!("{}: {}", balances[i]["asset"], amount);
        }
    }
The conversions we do here are because certain objects are represented as Value or String. The free value contains the balance amount free for trading. The asset represents the symbol for a particular cryptocurrency.
If we run the program we should see our balances printed.
Managing cryptocurrency orders
In this last section, we will initiate an actual trade. This is as simple as changing the parameters and using a different endpoint. However, there are some key points we need to pay attention to if we want the Binance API to accept our order.
Testing order placement
The endpoint /order is used to place orders. For testing purposes, there is also /order/test, we will use this one first to make sure we have everything set up correctly. If the order posted to /order/test is successful we will get empty JSON back as response: {}.
Some important points to keep in mind:
- Required parameters: symbol, side, type, timeInForce (eventhough it is listed as not mandatory), and timestamp.
- When adding quantity and price parameters it is important to adhere to minimum quanity and minimum price, and also in terms of unit steps in price.
- There is also a restriction on what percentage below or above the current price our order price can be.
For more information on quantity and price restrictions see the API documentation.
The /exchangeInfo endpoint provides values for these restrictions for a particular cryptocurrency pair: documentation link.
With this in mind, we are going to place a “limit order” to buy LTC with BTC. The current price is about 0.00443 BTC for 1 LTC. So, let’s put in 0.00300 BTC. The parameter string becomes:
"symbol=LTCBTC&side=BUY&type=LIMIT&timeInForce=GTC&quantity=1&price=0.00300&recvWindow=5000×tamp={}"
The full code for building the parameters and signature:
// Get the timestamp and the signature
let timestamp = get_timestamp(SystemTime::now());
let params = format!(
"symbol=LTCBTC&side=BUY&type=LIMIT&timeInForce=GTC&quantity=1&price=0.00300&recvWindow=5000×tamp={}",
timestamp.to_string()
);
println!("Request: {}", ¶ms);
let signature = get_signature(params.clone());
Then comes sending the request. WARNING: make sure that you are using /order/test as the endpoint or else your order might be filled unintentionally:
    // Build the entire request URL including signature and timestamp
    let request = format!(
        "https://api.binance.com/api/v3/order/test?{}&signature={}",
        params.clone(),
        signature.clone()
    );

    let result = client.post(request).send().await.unwrap();

    if result.status() == StatusCode::OK {
        println!("Status ok!");
        let data: serde_json::Value = result.json().await.unwrap();
        println!("Data: {}", data);
    } else {
        println!("An error occurred: {:?}", result);
        println!("Result text {}", result.text().await.unwrap());
        std::process::exit(1);
    }
When we run the program now, we should see the following output in the terminal:
Request: symbol=LTCBTC&side=BUY&type=LIMIT&timeInForce=GTC&quantity=1&price=0.00300&recvWindow=5000×tamp=1630872393350
Status ok!
Data: {}
Managing a real order: create and cancel
In this section, we are going to place a real Binance API crypto transaction order and then cancel it. Unless we want our order to go through, we have to be careful about what price we set. For that reason, we should make sure the price we set is well below the current asking price.
The following code listing shows the entire process of placing an order and then canceling it. We will go over the important point below the code listing:
// Execute an actual order
println!("Place an actual order and then cancel");
// Get the timestamp and the signature
let timestamp = get_timestamp(SystemTime::now());
let params = format!(
"symbol=LTCBTC&side=BUY&type=LIMIT&timeInForce=GTC&quantity=1&price=0.00300&recvWindow=5000×tamp={}",
timestamp.to_string()
);
println!("Request: {}", ¶ms);
let signature = get_signature(params.clone());
// Build the entire request URL including signature and timestamp
let request = format!(
"https://api.binance.com/api/v3/order?{}&signature={}",
params.clone(),
signature.clone()
);
let result = client.post(request).send().await.unwrap();
if result.status() == StatusCode::OK {
println!("Order status ok!");
let data: serde_json::Value = result.json().await.unwrap();
println!("Order data: {}", data);
        // Retrieve the order id, to use for cancelling the order
        let order_id = data["orderId"].to_string();
// Cancel the order
let timestamp = get_timestamp(SystemTime::now());
let params = format!(
"symbol=LTCBTC&orderId={}&recvWindow=5000×tamp={}",
order_id,
timestamp.to_string()
);
println!("Request: {}", ¶ms);
let signature = get_signature(params.clone());
        // Build the entire request URL including signature and timestamp
        let request = format!(
            "https://api.binance.com/api/v3/order?{}&signature={}",
            params.clone(),
            signature.clone()
        );

        // Sending HTTP delete will cancel the order
        let result = client.delete(request).send().await.unwrap();
if result.status() == StatusCode::OK {
println!("Cancel order status ok!");
let data: serde_json::Value = result.json().await.unwrap();
println!("Cancel order data: {}", data);
} else {
println!("Cancel order: error occurred: {:?}", result);
println!("Cancel order: result text {}", result.text().await.unwrap());
std::process::exit(1);
}
} else {
println!("Order: an error occurred: {:?}", result);
println!("Order: result text {}", result.text().await.unwrap());
std::process::exit(1);
}
The first part is the same as in the test section, except for that the real endpoint /order is used:
// Execute an actual order
println!("Place an actual order and then cancel");
// Get the timestamp and the signature
let timestamp = get_timestamp(SystemTime::now());
let params = format!(
"symbol=LTCBTC&side=BUY&type=LIMIT&timeInForce=GTC&quantity=1&price=0.00300&recvWindow=5000×tamp={}",
timestamp.to_string()
);
println!("Request: {}", ¶ms);
let signature = get_signature(params.clone());
// Build the entire request URL including signature and timestamp
let request = format!(
"https://api.binance.com/api/v3/order?{}&signature={}",
params.clone(),
signature.clone()
);
let result = client.post(request).send().await.unwrap();
The next section checks if the status of the result was StatusCode::Ok and if so, the process of canceling the order will start, else the error will be displayed.:
if result.status() == StatusCode::OK {
println!("Order status ok!");
let data: serde_json::Value = result.json().await.unwrap();
println!("Order data: {}", data);
// Retrieve the order id, to use for cancelling the order
let order_id = data["orderId"].to_string();
// Cancel the order
let timestamp = get_timestamp(SystemTime::now());
let params = format!(
"symbol=LTCBTC&orderId={}&recvWindow=5000×tamp={}",
order_id,
timestamp.to_string()
);
println!("Request: {}", ¶ms);
let signature = get_signature(params.clone());
// Build the entire request URL including signature and timestamp
let request = format!(
"https://api.binance.com/api/v3/order?{}&signature={}",
params.clone(),
signature.clone()
);
// Sending HTTP delete will cancel the order
let result = client.delete(request).send().await.unwrap();
if result.status() == StatusCode::OK {
println!("Cancel order status ok!");
let data: serde_json::Value = result.json().await.unwrap();
println!("Cancel order data: {}", data);
} else {
println!("Cancel order: error occurred: {:?}", result);
println!("Cancel order: result text {}", result.text().await.unwrap());
std::process::exit(1);
}
} else {
println!("Order: an error occurred: {:?}", result);
println!("Order: result text {}", result.text().await.unwrap());
std::process::exit(1);
}
The main points here are: first, the retrieval of the "orderId" value. We need this tell the API which order to cancel:
// Retrieve the order id, to use for cancelling the order
let order_id = data["orderId"].to_string();
Then the required parameters: symbol, orderId, and timestamp:
let params = format!(
"symbol=LTCBTC&orderId={}&recvWindow=5000×tamp={}",
order_id,
timestamp.to_string()
);
Finally, sending an HTTP Delete request to the /order endpoint:
// Build the entire request URL including signature and timestamp
let request = format!(
"https://api.binance.com/api/v3/order?{}&signature={}",
params.clone(),
signature.clone()
);
// Sending HTTP delete will cancel the order
let result = client.delete(request).send().await.unwrap();
The rest that follows is just the same status checking and data printing we have done before.
If we run the code we should see something like this in the terminal:
Place an actual order and then cancel
Request: symbol=LTCBTC&side=BUY&type=LIMIT&timeInForce=GTC&quantity=1&price=0.00300&recvWindow=5000×tamp=1630874154320
Order status ok!
Order data: {"clientOrderId":"dxxxxxxxxxx","cummulativeQuoteQty":"0.00000000","executedQty":"0.00000000","fills":[],"orderId":749619373,"orderListId":-1,"origQty":"1.00000000","price":"0.00300000","side":"BUY","status":"NEW","symbol":"LTCBTC","timeInForce":"GTC","transactTime":1630874154442,"type":"LIMIT"}
Request: symbol=LTCBTC&orderId=749619373&recvWindow=5000×tamp=1630874154555
Cancel order status ok!
Cancel order data: {"clientOrderId":"bxxxxxx","cummulativeQuoteQty":"0.00000000","executedQty":"0.00000000","orderId":749619373,"orderListId":-1,"origClientOrderId":"z3nMQ82MMZmtSVHYl7VMks","origQty":"1.00000000","price":"0.00300000","side":"BUY","status":"CANCELED","symbol":"LTCBTC","timeInForce":"GTC","type":"LIMIT"}
We should also see an entry in our dashboard appear under the LTC/BTC order history:

Conclusion
We have learned the basics of how to execute a crypto order transaction using the Binance API. Using the code in this article we were able to get account information, place a buy order, and then cancel that order. This is the basic foundation of trading using code.
The full repository with all the examples can be found on my GitHub.
Please follow me on Twitter for updates on programming articles related to cryptocurrency:
Follow @tmdev82
I am trying to integrate Binance API with a smart contract on Solana Blockchain. However, a solana program does not allow a client object to be created – can you advice on how this can be handled?