
In this article, we will learn how to implement JWT security for a Rust REST API Server. At the end of this article, we will have a web server that has an endpoint for authenticating users, which will return a JWT. Clients are then able to use this JWT to gain access to the protected endpoint of our API.
This article deals with similar concepts as two previous tutorials but combines them into one project. Here are the two previous tutorials:
In this tutorial, we will go through building JWT security for a Rust REST API server step by step. The scope of the project will be basic. We are not too concerned with operations for managing users in this tutorial. We mostly want to experience the concept of protecting routes.
The app will contain:
- Create user endpoint
- Simulated database for storing users
- Login endpoint
- Have publicly accessible endpoint
- An endpoint accessible only by logged in users
The completed project can be found on my GitHub: https://github.com/tmsdev82/rust-jwt-warp-tutorial.
Contents
- 1 Prerequisites
- 2 Some refreshers on REST API and JWT
- 3 Set up the “JWT Security REST API server” Rust project
- 4 Project structure
- 5 Basic unsecure REST API web server with Warp
- 6 Create user endpoint and fake database
- 7 Secure storage of user’s password
- 8 Login User endpoint logic
- 9 JWT security Rust REST API: Login example
- 10 Cleaner result types and error handling
- 11 Authorization check with JWT
- 12 Add JWT processing functions
- 13 Implementing the private endpoint
- 14 Adding an admin only endpoint
- 15 JWT security for Rust REST API Conclusion
Prerequisites
Basic Rust programming experience is required to follow this tutorial.
We will build on the concepts from a previous tutorial: How to build a Rust REST API with warp. So, for a more detailed walkthrough of how to set up a REST API refer to that tutorial. Having said that, let’s quickly refresh our memories on REST and JWT in the next section.
Some refreshers on REST API and JWT
In this section, we will quickly refresh ourselves on what a REST API is and what JSON Web Tokens (JWT) are. Please feel free to skip these sections if you are already familiar with these concepts.
Refresher: REST API
REST is an architectural style for building distributed systems serving many different media, such as text, audio, video, etc. This REST-style has some rules and high-level design guidelines. The aim is that by following the guidelines, we can write an API that can be easily and logically understood.
A RESTful system:
- Has a uniform interface.
- Is Client-server.
- Has no state between requests.
- Can be cached. If the results of a request (say retrieving a list of users) they can be easily cached for a time.
For more detailed information please see this website: https://restfulapi.net/
Typically HTTP request types are used:
- GET: get information from a resource endpoint. For example: A
GETrequest to/users/would return a list of users. - POST: create a resource. For example: A
POSTrequest to/users/, containing the approtioate payload, would create one or more users. - PUT: update a resource. For example: A
PUTrequest to/users/1/would update the user with id 1. - DELETE: delete a resource. For example: A
DELETErequest to/users/1/would delete the user with id 1.
Refresher: What is a JWT
JWT stands for JSON Web Token.
JSON Web Token (JWT) is an open standard (RFC 7519) that defines a compact and self-contained way for securely transmitting information between parties as a JSON object. This information can be verified and trusted because it is digitally signed.
https://jwt.io/introduction
In other words, a JWT is JSON structured information that is signed so that its contents can be trusted.
The JWT is an encoded string consisting of 3 parts that look like this: xxxxx.yyyyyy.zzzzzz. The parts are as follows: header, payload, and signature.
- header: typically contains type (typ), JWT in this case, and signing algorithm (alg), default being SHA256.
- payload: the payload contains a “claims” structure, with information about an entity. More on that later.
- signature: the signature is created from the encoded header, encoded payload, a secret, and the signing algorithm.
These JWTs are typically used in authorization mechanisms to secure access to web components.
Set up the “JWT Security REST API server” Rust project
We are going to look at how to implement JWT security for a REST API server using Rust step by step. The rough steps are:
- Create project.
- Implement barebones Warp server.
- Add endpoints for managing shopping list items.
- Add endpoints for registering a user and logging in.
- Secure storage of passwords using hashing.
- Secure access to REST API endpoints by checking requests for the JWT.
- Implement role based access on REST API endpoints: most accessible to normal users, some only accessible to admin users.
We start by creating the project using cargo:
cargo new rust-jwt-warp-tutorial
Then let’s add the required dependencies to the Cargo.toml file:
[package]
name = "rust-jwt-warp-tutorial"
version = "0.1.0"
edition = "2018"

# See more keys and their definitions at https://doc.rust-lang.org/cargo/reference/manifest.html

[dependencies]
tokio = { version= "1", features = ["full"] }
warp = "0.3"
serde = { version = "1.0", features = ["derive"]}
serde_json = "1.0"
uuid = { version = "0.8.2", features = ["serde", "v4"]}
jsonwebtoken = "8.0.1"
chrono = "0.4"
scrypt = "0.9.0"
log = "0.4"
log4rs = "1.0.0"
thiserror = "1.0"
dotenv = "0.15.0"
Let’s quickly go through these dependencies:
- tokio: A runtime for writing reliable, asynchronous, and slim applications with the Rust programming language.
- warp: A super-easy, composable, web server framework for warp speeds.
- serde: Serde is a framework for serializing and deserializing Rust data structures efficiently and generically.
- serde_json: A JSON serialization file format.
- uuid: A library to generate and parse UUIDs.
- jsonwebtoken: Create and decode JWTs in a strongly typed way.
- chrono: Date and time library for Rust. For example, we will use this to create timestamps for the token expiration time.
- scrypt: Scrypt password-based key derivation function.
- log: A lightweight logging facade for Rust.
- log4rs: A highly configurable multi-output logging implementation for the `log` facade.
- thiserror: This library provides a convenient derive macro for the standard library’s Error trait.
- dotenv: A dotenv implementation for Rust. For loading environment variable values from a
.envfile.
Project structure
Let’s go over the basic structure of the REST API we will build. Our project will consist of the following modules:
main.rs: The entry point for the REST API. Here the routes and server configuration are defined.handlers.rs: This module defines logic for handling HTTP requests and data coming to the API.models.rs: Here we define our data structure(s).errors.rs: we will have custom errors that trigger rejection responses from the server.
Basic unsecure REST API web server with Warp
In this section, we will quickly go over similar concepts as the previous tutorial: How to build a Rust REST API with warp. However, this tutorial will have a smaller scope when it comes to operations. Only dealing with GET and POST requests to demonstrate using JWT security for our RUST REST API.
Basic server and showing a welcome message
Let’s begin by showing the message “Welcome to the Rust REST API” on any URL path for the server.
use warp::Filter;

#[tokio::main]
async fn main() {
    let root = warp::path::end().map(|| { "Welcome to the Rust REST API"});

    let routes = root.with(warp::cors().allow_any_origin());

    warp::serve(routes).run(([127,0,0,1], 5000)).await;

}
Here we have a basic setup with the default route using warp::map() and simply returning the text “Welcome to the Rust REST API”. Using warp::end() will make this match the root URL on the server. For example, the “root” URL would be http://localhost:5000.
If we run the program now and use a browser to navigate to localhost:5000 or 127.0.0.1:5000, we will see our welcome text.
Confgiure logging
While we are at it let’s also configure our logging output. For that, we will use log and the log4rs crates. We can use a configuration file with a YAML structure to configure what our logging messages look like thanks to log4rs. For more information about log4rs please see my tutorial: Basic how to log to a file in Rust with log4rs.
Let’s add a file logconfig.yml to the root directory of our project:
appenders:
  stdout_logger:
    kind: console
    encoder:
      pattern: "{h({d(%Y-%m-%d %H:%M:%S)(utc)} - {l}: {m}{n})}"
root:
  level: debug
  appenders:
    - stdout_logger
Then we have to load this configuration at the start of our main() function:
use warp::Filter;
use log::info;

#[tokio::main]
async fn main() {
    log4rs::init_file("logconfig.yml", Default::default()).expect("Log config file not found.");
    info!("Starting server...");
    let root = warp::path::end().map(|| { "Welcome to the Rust REST API"});

    let routes = root.with(warp::cors().allow_any_origin());

    warp::serve(routes).run(([127,0,0,1], 5000)).await;
}
Now when we run the program we will see some extra logging from warp:

Create user endpoint and fake database
In this section, let’s add functionality for adding user data to the system. Typically this data would be stored in a database. However, because the use of a database is out of scope for this tutorial we will use a simulated database instead. In this case, it will be a key and value HashMap and define the basic configuration for our endpoints. Our endpoint for creating a user will be: https://localhost:5000/user
To summarize we will implement the following points:
- Receive and process JSON data structure.
- Create and store user data (based on incoming data) in a
HashMapobject. - Return created user data as response
Adding the user models
Let’s add the user model to represent data in the database. Another model we need is for the incoming “create this user” message.
We’ll add a file called models.rs for our data models. So, let’s create a new file called models.rs and add the following lines:
use serde::{Deserialize, Serialize};

#[derive(Debug, Serialize, Clone)]
pub struct User {
    pub user_id: usize,
    pub username: String,
    pub password: String,
    pub role: String,
}

#[derive(Debug, Deserialize, Clone)]
pub struct CreateUser {
    pub username: String,
    pub password: String,
    pub role: String,
}
This first struct, User, represents the user data as it exists in the fake database. It has an user_id which would represent the primary key in a real database. There is a username and password field used for storing the credentials. And there is a role field for simulating role-based access.
The data model for creating a user, CreateUser, is the same as User except it has no user_id field because the id is generated when the data is inserted into the database. So it shouldn’t be set by the one sending the user data.
Finally, let’s talk about the #[derive() part. These derive annotations allow us to:
Debug: print the struct as text. For example for debugging purposes.Deserialize: turn structured data into an object. In our case that would be JSON format structured data.Serialize: convert the struct data into JSON string data that can be sent as a repsonse to a HTTP request. For example, we can send the created user data with theuser_idfield back as a response to the create user request.Clone: enable making a copy of the object’s data.
Update main.rs with fake database
First, the entire update code in main.rs then we will go through in parts:
use log::info;
use std::{collections::HashMap, sync::Arc};
use tokio::sync::Mutex;
use warp::Filter;

mod models;

type UsersDb = Arc<Mutex<HashMap<String, models::User>>>;

#[tokio::main]
async fn main() {
    log4rs::init_file("logconfig.yml", Default::default()).expect("Log config file not found.");
    info!("Starting server...");
    let users_db: UsersDb = Arc::new(Mutex::new(HashMap::new()));

    let root = warp::path::end().map(|| "Welcome to the Rust REST API");

    let routes = root.with(warp::cors().allow_any_origin());

    warp::serve(routes).run(([127, 0, 0, 1], 5000)).await;
}
Let’s go through the code in parts.
We have to bring some things into the scope in main.rs to help build the rest of the REST API:
use log::info;
use std::{collections::HashMap, sync::Arc};
use tokio::sync::Mutex;
use warp::Filter;

mod models;

type UsersDb = Arc<Mutex<HashMap<String, models::User>>>;
From std we will use
HashMap: for the simulated databasesync::Arc: Used for thread-safe reference counted pointers.
Then we bring tokio::sync::Mutex into scope for thread-safe access to a data structure by being able to lock access to it while it is used by a thread.
Next, on line 4, Filter: Warp has a system that works by chaining functions together that return Filter objects.
On line 6 we declare our module: models so that it can be used in the project.
On line 8 we define a new type that represents our fake database. When we declare types like this, we are creating an alias. We can just type the alias instead of the entire Arc<Mutex<HashMap<String, models::User>>> thing each time.
So the type for our simulated database is a HashMap with an String as a key. In this case, this will be the username. To make it easy to look up data when we are handling login and other actions. Then the value in the HashMap is a User object we defined earlier in the module called models. With Arc, we create a reference-counted object. This means we can make clones of the data without copying the data, but instead getting a reference and upping the reference count. Finally, the Mutex makes our data access thread-safe.
Then on line 14, in the main function, we create an instance of our database:
#[tokio::main]
async fn main() {
    log4rs::init_file("logconfig.yml", Default::default()).expect("Log config file not found.");
    info!("Starting server...");
    let users_db: UsersDb = Arc::new(Mutex::new(HashMap::new()));

    let root = warp::path::end().map(|| "Welcome to the Rust REST API");

    let routes = root.with(warp::cors().allow_any_origin());

    warp::serve(routes).run(([127, 0, 0, 1], 5000)).await;
}
Adding the create user endpoint configuration
Next, let’s configure the endpoint that can be used to create new users in the fake database.
All of the endpoints will follow a similar pattern. Let’s add the following lines below our root declaration:
    let root = warp::path::end().map(|| "Welcome to the Rust REST API");

    let user_route = warp::path("user")
        .and(warp::post())
        .and(warp::body::json())
        .and(with_users_db(users_db.clone()))
        .and_then(handlers::create_user);
Here we define the path “user”. Meaning this endpoint is reachable at localhost:5000/user. And in this case, it will only respond to the POST request method, because of and(warp::post()). Further, on line 24, we configure that we expect a JSON body to come with the request. This JSON body should contain the to-be-created user’s information.
The next part on line 21, is a way to inject the database instance into the warp flow so that it can be used in the handler function at the end. The handler function create_user will take a UsersDb object as a parameter. It will also take the JSON body as a parameter and ultimately handle the incoming request.
Next, we should write these functions with_users_db and handlers::create_user.
Function for passing fake database object reference
First, the with_users_db function. Because we want to pass a reference to the simulated database object to our handler function, we have to write a filter function. This function extracts data and returns it, in this case, the database reference.
To be able to define this function we need to bring something new into scope:
use log::info;
use std::{collections::HashMap, convert::Infallible, sync::Arc};
use tokio::sync::Mutex;
use warp::Filter;
This convert::Infallible is an error type used in a function return value in the style of <Ok, Error> where the error can never happen. We will use this in our with_users_db function that will allow us to pass the database object to our handler functions.
Now, let’s add a function called with_users_db at the bottom of main.rs:
fn with_users_db(
    users_db: UsersDb,
) -> impl Filter<Extract = (UsersDb,), Error = Infallible> + Clone {
    warp::any().map(move || users_db.clone())
}
Note: We have to call clone here as we are moving the users_db object into the closure. However, because this is wrapped in an Arc, it will create a reference instead.
The create user handler function
In this section, we will write the logic for handling an incoming create user request. For functions that handle requests let’s create a new file called handlers.rs.
Then let’s add the create_user function in our new handlers.rs file:
use crate::{models, UsersDb};
use log::{error, info};
use warp::{
    http::{Response, StatusCode}, Reply, Rejection,
};


pub async fn create_user(user: models::CreateUser, users_db: UsersDb) -> std::result::Result<impl Reply, Rejection> {
    info!("Create user, received UserData: {:?}", user);
    let mut local_db = users_db.lock().await;

    if local_db.contains_key(&user.username) {
        error!("User already exists");
        return Ok(Response::builder()
            .status(StatusCode::BAD_REQUEST)
            .body("User already exists".to_string()));
    }

    info!("Adding user to the database...");
    let key_count = local_db.keys().len();
    let created_user = models::User {
        user_id: key_count,
        username: user.username,
        password: user.password,
        role: user.role,
    };
    local_db.insert(created_user.username.clone(), created_user.clone());

    info!("User {} added.", &created_user.username);
    Ok(Response::builder()
        .status(StatusCode::CREATED)
        .body(serde_json::to_string(&created_user).unwrap()))
}
Let’s look at the parts of the function. First the function signature:
pub async fn create_user(user: models::CreateUser, users_db: UsersDb) -> std::result::Result<impl Reply, Rejection> {
Here we have the parameters in the order of the filter chain: first the JSON body and then the fake database. However, instead of the first parameter being a JSON String instead, the first parameter will be automatically deserialized to a CreateUser object.
Next, how will we process this CreateUser data?
    info!("Create user, received UserData: {:?}", user);
    let mut local_db = users_db.lock().await;

    if local_db.contains_key(&user.username) {
        error!("User already exists");
        return Ok(Response::builder()
            .status(StatusCode::BAD_REQUEST)
            .body("User already exists".to_string()));
    }
In this first part, we check to see if the username from the incoming data already exists. To get access to the database, since it is thread-safe, we first get a lock on the data using lock().await. We can then use the contains_key() function to see if the username exists in the database. If so we return a BAD REQUEST error code and a message describing the problem.
The second half of the function creates the User data and inserts it into the database:
    info!("Adding user to the database...");
    let key_count = local_db.keys().len();
    let created_user = models::User {
        user_id: key_count,
        username: user.username.clone(),
        password: user.password.clone(),
        role: user.role.clone(),
    };
    local_db.insert(created_user.username.clone(), created_user.clone());
So, if the username does not exist, we will insert the user into the UsersDb object, using username as a lookup key. Because the data model in the database is different from the data we received in the HTTP request we have to create a new instance of User and fill in the fields on lines 20-26. Where we use the number of keys already in the database to generate the number for the user_id field.
Finally, we send the created user data as a response back to the client using the response builder Response::builder() we can set a status code and a body on the response:
    Ok(Response::builder()
        .status(StatusCode::CREATED)
        .body(serde_json::to_string(&created_user).unwrap()))
Running the example and creating a user
Before we can run the example we have to make sure main.rs is correct. We should import the handlers module:
use log::info;
use std::{collections::HashMap, convert::Infallible, sync::Arc};
use tokio::sync::Mutex;
use warp::Filter;

mod handlers;
mod models;
Let’s run the code to see if it works like we expect. We should send a JSON object to the /user endpoint using a POST request. Then the user will be added to our “database”. For example, using a curl command: curl -X POST 'localhost:5000/user' -H "Content-Type: application/json" -d '{"username": "testuser", "password": "testpass", "role": "user"}'
In the server logging we should see the following messages:
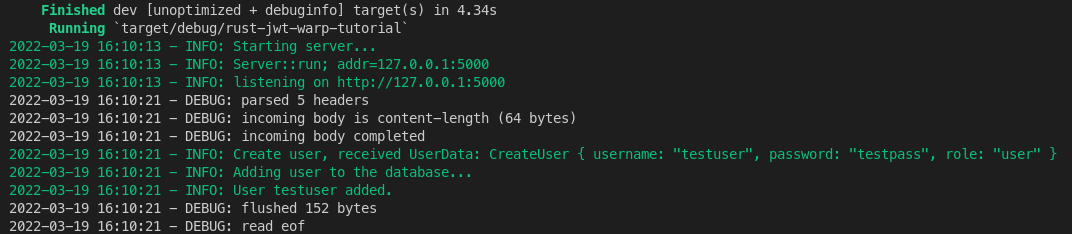
When we try to send the same data again, we should see the “User already exists” message:

Secure storage of user’s password
We store the user’s data in a fake database, but the password is saved as a plain readable string. Even though our database is fake, this isn’t very nice. So, let’s take this opportunity to learn how to be a bit more secure with passwords.
We need a function to hash the user’s password and a function to compare an incoming password to a hashed password.
Hashing the user’s password
Let’s create a new file called security.rs for all of our security-related functions. We’ll add the module to main.rs:
use log::info;
use std::{collections::HashMap, convert::Infallible, sync::Arc};
use tokio::sync::Mutex;
use warp::Filter;

mod handlers;
mod models;
mod security;
Then, let’s open security.rs and bring some things from scrypt into scope. This scrypt crate provides us with the functionalities we need to hash :
use scrypt::{
    password_hash::{rand_core::OsRng, PasswordHash, PasswordHasher, PasswordVerifier, SaltString},
    Scrypt,
};
Now we can write a function for returning a hashed password:
fn get_hashed_password(password: &str) -> String {
    let salt = SaltString::generate(&mut OsRng);

    let password_hash = Scrypt
        .hash_password(password.as_bytes(), &salt)
        .unwrap()
        .to_string();

    password_hash
}
We use a random number generator: OsRng, that retrieves randomness from the operating system (OS). Then we use the default hashing from scrypt with Scrypt.hash_password. Finally, we return the hashed password string: password_hash.
This function should be called when we create a user in the create_user function to turn the plain text password into a hashed password before we store it in our “database”:
use crate::{models, UsersDb, security};
use log::{error, info};
use warp::{
    http::{Response, StatusCode}, Reply, Rejection,
};

pub async fn create_user(user: models::CreateUser, users_db: UsersDb) -> std::result::Result<impl Reply, Rejection> {
    info!("Create user, received UserData: {:?}", user);
    let mut local_db = users_db.lock().await;

    if local_db.contains_key(&user.username) {
        error!("User already exists");
        return Ok(Response::builder()
            .status(StatusCode::BAD_REQUEST)
            .body("User already exists".to_string()));
    }

    info!("Adding user to the database...");
    let key_count = local_db.keys().len();
    let created_user = models::User {
        user_id: key_count,
        username: user.username,
        password: security::get_hashed_password(&user.password),
        role: user.role,
    };
    local_db.insert(created_user.username.clone(), created_user.clone());

    info!("User {} added.", &created_user.username);
    Ok(Response::builder()
        .status(StatusCode::CREATED)
        .body(serde_json::to_string(&created_user).unwrap()))
}
We only require a small change here on line 23.
Verifying the user’s password against the hashed password
Now that we have a hashed password stored in the database, we need to also have a function that we can use to verify that an incoming password is correct.
Let’s add a function called verify_password to security.rs. Our verification function will take in a password and a hashed password then return a boolean value:
fn verify_password(password: &str, password_hash: &str) -> bool {
    let parsed_hash = PasswordHash::new(password_hash).unwrap();

    Scrypt
        .verify_password(password.as_bytes(), &parsed_hash)
        .is_ok()
}
We have to create a PasswordHash object to do the password verification with Scrypt.verify_password. The password’s bytes are used as input for Scrypt.verify_password.
Login User endpoint logic
Now that we can create a user in the database and have functionality for comparing a password string to a hashed password, we can implement login logic for our “JWT security for a Rust REST API” project.
When a user logs in they send their credentials with a POST request, the credentials are checked, and if correct our system generates a JWT and sends it as a response.
Login data model
In this section, we are going to add new structs: for the credentials data and for the JWT.
Let’s open models.rs and add the following:
#[derive(Debug, Deserialize, Clone)]
pub struct LoginUser {
    pub username: String,
    pub password: String,
}

#[derive(Deserialize, Serialize, Debug)]
pub struct Claims {
    pub sub: String,
    pub role: String,
    pub exp: usize,
}
Our model for logging in, LoginUser simply only needs two fields: username and password.
The Claim struct represents information about the subject of the JWT. In this case, the logged-in user. It has the following fields:
The data we are including here are:
- sub: This is the subject, and is typically user data represented as a JSON string. For now, we’ll use the username
Stringas a value. - role: what authorization role this user has.
- exp: expiration time. This indicates after which date-time the token becomes invalid.
Generating a JWT for the user
We have the structure for the claims part of the JWT so we can generate the JWT now.
Let’s add a function get_jwt_for_user to security.rs. For this, we also need to bring items from the jsonwebtoken crate into scope:
use crate::models;
use chrono::{Duration, Utc};
use jsonwebtoken::{encode, EncodingKey, Header};
use scrypt::{
    password_hash::{rand_core::OsRng, PasswordHash, PasswordHasher, PasswordVerifier, SaltString},
    Scrypt,
};
Another thing we need is a secret for encoding the JWT data, so let’s add a .env file for storing the secret (make sure to add this .env to your .gitignore). In the .env file add a line: JWT_SECRET=our_secret.
Then we need to add a call to dotenv().ok() to load in the file to main.rs:
#[tokio::main]
async fn main() {
    dotenv::dotenv().ok();
    log4rs::init_file("logconfig.yml", Default::default()).expect("Log config file not found.");
Now we can add a function for retrieving the secret value from the environment variable JWT_SECRET. Let’s add it to security.rs:
fn get_secret() -> Vec<u8> {
    std::env::var("JWT_SECRET").unwrap().into_bytes()
}
Now let’s add the get_jwt_for_user function itself. Our token needs a:
- subject: in this case the username.
- role: authorization role that can restrict or grant access to endpoints.
- expiration: date and time after which the token is no longer valid.
The first two, subject and role, come from the User object passed into the function, the expiration is generated in the function:
pub fn get_jwt_for_user(user: &models::User) -> String {
    let expiration_time = Utc::now()
        .checked_add_signed(Duration::seconds(60))
        .expect("invalid timestamp")
        .timestamp();
    let user_claims = models::Claims {
        sub: user.username.clone(),
        role: user.role.clone(),
        exp: expiration_time as usize,
    };

    let token = match encode(
        &Header::default(),
        &user_claims,
        &EncodingKey::from_secret(&get_secret()),
    ) {
        Ok(t) => t,
        Err(_) => panic!(),
    };

    token
}
We create an instance of the Claims struct with all the required information as mentioned. Then we encode the data using our JWT_SECRET to finalize the token. And if successful return it as a String.
Note that the expiration, 60 seconds, is fairly short. In a real application, this would be longer but we make it short for testing purposes.
Implement the login handler
Now we can move onto the login handler which combines all the things we have built earlier.
Let’s edit the handlers.rs file to add the login handler called login.
pub async fn login(login_user: models::LoginUser, users_db: UsersDb) -> std::result::Result<impl Reply, Rejection> {
    info!("Received login request...");
    let cur_user_db = users_db.lock().await;
    let user = match cur_user_db.get(&login_user.username) {
        Some(k) => k,
        None => {
            error!("User '{}' not found in database", &login_user.username);
            return Ok(Response::builder()
                .status(StatusCode::BAD_REQUEST)
                .body("login failed".to_string()));
        }
    };

    info!("User found, verifying password...");
    if !security::verify_password(&login_user.password, &user.password) {
        error!("Password incorrect for user: {}", &login_user.username);
        return Ok(Response::builder()
            .status(StatusCode::BAD_REQUEST)
            .body("login failed".to_string()));
    }

    info!("Login success!");
    let token = security::get_jwt_for_user(user);
    Ok(Response::builder().status(StatusCode::OK).body(token))
}
This function will receive LoginUser data and the fake database UsersDb.
Then it will check to see if data exists for the incoming username on lines 37-44. If a user with that username exists we can continue by verifying the password on line 48 using security::verify_password. We do this by passing in references to the login user’s password and the password hash from the user data in the database. We send a BAD_REQUEST status code and “login failed” message back if the password is not correct.
Otherwise, we generate the JWT using the get_jwt_for_user function we wrote earlier and return that.
Configuring the login endpoint
Now to actually be able to log in and get a token we have to add a new endpoint to our routes configuration.
Let’s open main.rs and at the necessary configuration. We will call the endpoint "login" and it will look similar to the "user" endpoint:
    let user_route = warp::path("user")
        .and(warp::post())
        .and(warp::body::json())
        .and(with_users_db(users_db.clone()))
        .and_then(handlers::create_user);

    let login_route = warp::path("login")
        .and(warp::post())
        .and(warp::body::json())
        .and(with_users_db(users_db.clone()))
        .and_then(handlers::login);

    let routes = root
        .or(user_route)
        .or(login_route)
        .with(warp::cors().allow_any_origin());
The login endpoint also only deals with POST requests and therefore receives a JSON body and needs the database injected into the change as well. Then it calls handlers::login to do the processing.
Finally, we need to add a or(login_route) call to the routes configuration to make the endpoint available.
JWT security Rust REST API: Login example
Let’s run the program and try out the login functionality.
Because our database is an in-memory database we have to create a user every time we restart the server, unfortunately.
Because of the password hashing functionality, the response time for creating the user is quite slow if we run the server with cargo run. However, if we make a release build it becomes fast again: cargo run --release.
Let’s create a user again: curl -X POST 'localhost:5000/user' -H "Content-Type: application/json" -d '{"username": "testuser", "password": "testpass", "role": "user"}'
Note that we now see the hashed password as a return value:

and then login with that user: curl -X POST 'localhost:5000/login' -H "Content-Type: application/json" -d '{"username": "testuser", "password": "testpass"}'

We see here the JSON Web Token (JWT) string as a response.
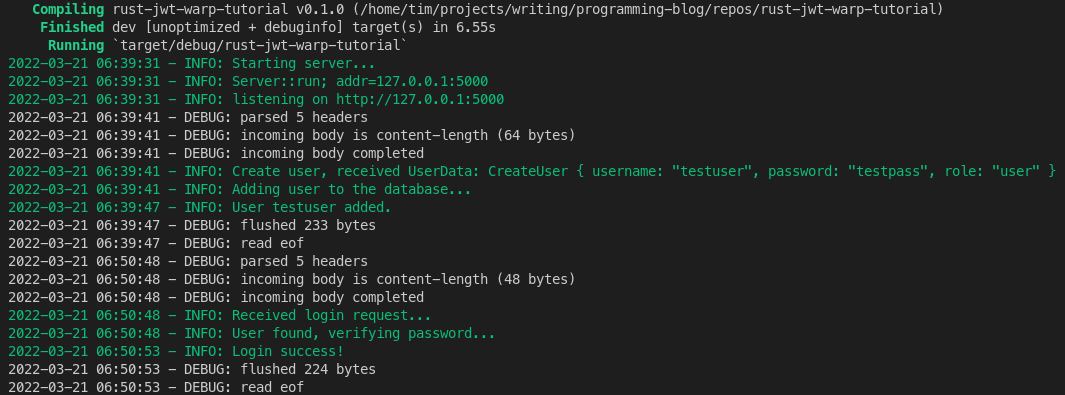
The server logging output looks something like this:
Cleaner result types and error handling
Because we now have two handlers returning similar results in error situations and there are more functions like that to come, some improvements are useful. In this section, we are going to clean up some code and improve the error handling. That way we have a much more solid code base for our “JWT security for Rust REST API” project.
First, we are going to add an enum for our errors and an error handler function in a new module.
Let’s add a file called errors.rs. But first, we’ll add the errors module to main.rs. We will also add an alias for the return value from our handler functions and other functions used with warp functions:
use log::info;
use std::{collections::HashMap, convert::Infallible, sync::Arc};
use tokio::sync::Mutex;
use warp::{Filter, Rejection};

mod errors;
mod handlers;
mod models;
mod security;

type UsersDb = Arc<Mutex<HashMap<String, models::User>>>;
type Result<T> = std::result::Result<T, Rejection>;
Error data definitions
Now let’s add the errors.rs file:
use log::error;
use serde::Serialize;
use std::convert::Infallible;
use thiserror::Error;
use warp::{http::StatusCode, reply::WithStatus, Rejection, Reply};

#[derive(Error, Debug)]
pub enum CustomError {
    #[error("invalid credentials")]
    InvalidCredentialsError,
    #[error("user exists")]
    UserExistsError(String),
}

impl warp::reject::Reject for CustomError {}

#[derive(Serialize, Debug)]
struct ErrorResponse {
    message: String,
    status: String,
}
Here on lines 7-15, we define our custom error types. Currently, we only have two:
InvalidCredentialsError: the given credentials are wrong. For example, the user does not exist in the database or the password is not correct. However, we should not be specific about what the problem is exactly in our error message as it might pose a vulnerability.UserExistsError: when the user we try to create is already present in the database. Specifically based on the sameusernamevalue.
Just these two for now. However, we will add more when we work on implementing authentication and authorization with JWT to the protected endpoints.
This enum allows us to simplify error code in our handler functions and other functions as well. The CustomError enum has to implement Reject to work with warp’s error return system.
On lines 17-21 we define the data struct ErrorResponse which will be used to return the error message to be used in our server’s error response to the client.
Rejection handler function
Let’s first add a helper function called reply_with_status. We use this function to construct the error response message:
pub fn reply_with_status(status_code: StatusCode, message: &str) -> WithStatus<impl Reply> {
    let json = warp::reply::json(&ErrorResponse {
        status: status_code.to_string(),
        message: message.to_string(),
    });

    return warp::reply::with_status(json, status_code);
}
Our reply_with_status function takes a StatusCode and string slice for the message. We return a WithStatus instance. On lines 24-27 we construct the JSON using our ErrorResponse struct. Then we return a warp::reply::with_status using this information at the end.
Next, we implement our rejection handler function. Warp will use this function to determine what error response to send. So, warp calls this when a function produces a rejection result.
This hanlde_rejection function processes the incoming rejection to determine what to send to the client as a response:
pub async fn handle_rejection(err: Rejection) -> std::result::Result<impl Reply, Infallible> {
    if err.is_not_found() {
        return Ok(reply_with_status(StatusCode::NOT_FOUND, "Not Found"));
    }

    if let Some(e) = err.find::<CustomError>() {
        match e {
            CustomError::InvalidCredentialsError => {
                return Ok(reply_with_status(StatusCode::FORBIDDEN, &e.to_string()));
            }
            CustomError::UserExistsError(username) => {
                return Ok(reply_with_status(StatusCode::BAD_REQUEST, &format!("User: {} already exists", username)));
            }
            _ => {
                return Ok(reply_with_status(StatusCode::BAD_REQUEST, &e.to_string()));
            }
        }
    } else if err.find::<warp::reject::MethodNotAllowed>().is_some() {
        return Ok(reply_with_status(
            StatusCode::METHOD_NOT_ALLOWED,
            "Method Not Allowed",
        ));
    }

    error!("unhandled error: {:?}", err);
    return Ok(reply_with_status(
        StatusCode::INTERNAL_SERVER_ERROR,
        "Internal Server Error",
    ));
}
Our handle_rejection function takes a Rejection object. First, it determines if this is a “Not Found” error, if so we immediately exit the function and send an error message with a StatusCode::NOT_FOUND. The famous 404 Not found error.
Then we check if this rejection is one of our defined custom errors on line 37 with if let Some(e) = err.find::<CustomError>(). If the rejection is a CustomError value then we go into a match expression to select the appropriate response.
However, if it is not a CustomError then we check if it is a MethodNotAllowed rejection and finally, if it is not any of the previous types of rejections, we simply return a INTERNAL_SERVER_ERROR error type message.
Updating handler functions return values
Now that we have our new error system in place we should update our handler functions. We will simply change the return value type in the function signatures to our Result alias and return our CustomError as a reject::custom:
use crate::{errors, models, security, Result, UsersDb};
use log::{error, info};
use warp::{
    http::{Response, StatusCode},
    reject, Reply,
};

pub async fn create_user(user: models::CreateUser, users_db: UsersDb) -> Result<impl Reply> {
    info!("Create user, received UserData: {:?}", user);
    let mut local_db = users_db.lock().await;

    if local_db.contains_key(&user.username) {
        error!("User already exists");
        return Err(reject::custom(errors::CustomError::UserExistsError(user.username)));
    }

    info!("Adding user to the database...");
    let key_count = local_db.keys().len();
    let created_user = models::User {
        user_id: key_count,
        username: user.username,
        password: security::get_hashed_password(&user.password),
        role: user.role,
    };
    local_db.insert(created_user.username.clone(), created_user.clone());

    info!("User {} added.", &created_user.username);
    Ok(Response::builder()
        .status(StatusCode::CREATED)
        .body(serde_json::to_string(&created_user).unwrap()))
}

pub async fn login(login_user: models::LoginUser, users_db: UsersDb) -> Result<impl Reply> {
    info!("Received login request...");
    let cur_user_db = users_db.lock().await;
    let user = match cur_user_db.get(&login_user.username) {
        Some(k) => k,
        None => {
            error!("User '{}' not found in database", &login_user.username);
            return Err(reject::custom(errors::CustomError::InvalidCredentialsError));
        }
    };

    info!("User found, verifying password...");
    if !security::verify_password(&login_user.password, &user.password) {
        error!("Password incorrect for user: {}", &login_user.username);
        return Err(reject::custom(errors::CustomError::InvalidCredentialsError));
    }

    info!("Login success!");
    let token = security::get_jwt_for_user(user);
    Ok(Response::builder().status(StatusCode::OK).body(token))
}
Recovering from rejection
We just need to call our handle_rejection function in the appropriate way to make use of our new error handling construct. For this we use the recover function call at the end of our routes configuration chain:
    let routes = root
        .or(user_route)
        .or(login_route)
        .with(warp::cors().allow_any_origin())
        .recover(errors::handle_rejection);
Now when we run the application and create the same user twice we should see our new error message:

Authorization check with JWT
In this section, we are going to add an endpoint that can only be accessed with a valid token. Meaning, the user has to log in first before being able to retrieve data from this endpoint.
To be able to protect this endpoint we have to be able to:
- Get the JWT from the incoming request’s header
- Decode the JWT
- Verify that is is a valid JWT
We will write functions that help us do that. Of course, we will also need to update our custom errors and error handling. In order to take errors with JWT processing into account.
Let’s start by updating our error definitions and error handling in errors.rs:
use log::error;
use serde::Serialize;
use std::convert::Infallible;
use thiserror::Error;
use warp::{http::StatusCode, reply::WithStatus, Rejection, Reply};

#[derive(Error, Debug)]
pub enum CustomError {
    #[error("invalid credentials")]
    InvalidCredentialsError,
    #[error("user exists")]
    UserExistsError(String),
    #[error("invalid jwt token")]
    InvalidJWTTokenError,
    #[error("jwt token creation error")]
    JWTTokenCreationError,
    #[error("authorization header required")]
    AuthHeaderRequiredError,
    #[error("invalid auth header")]
    InvalidAuthHeaderError,
    #[error("not authorized")]
    NotAuthorizedError,
}

impl warp::reject::Reject for CustomError {}

#[derive(Serialize, Debug)]
struct ErrorResponse {
    message: String,
    status: String,
}

pub fn reply_with_status(status_code: StatusCode, message: &str) -> WithStatus<impl Reply> {
    let json = warp::reply::json(&ErrorResponse {
        status: status_code.to_string(),
        message: message.to_string(),
    });

    return warp::reply::with_status(json, status_code);
}

pub async fn handle_rejection(err: Rejection) -> std::result::Result<impl Reply, Infallible> {
    if err.is_not_found() {
        return Ok(reply_with_status(StatusCode::NOT_FOUND, "Not Found"));
    }

    if let Some(e) = err.find::<CustomError>() {
        match e {
            CustomError::InvalidCredentialsError => {
                return Ok(reply_with_status(StatusCode::FORBIDDEN, &e.to_string()));
            },
            CustomError::UserExistsError(username) => {
                return Ok(reply_with_status(StatusCode::BAD_REQUEST, &format!("User: {} already exists", username)));
            },
            CustomError::NotAuthorizedError => {
                return Ok(reply_with_status(StatusCode::UNAUTHORIZED, &e.to_string()));
            },
            CustomError::InvalidJWTTokenError => {
                return Ok(reply_with_status(StatusCode::UNAUTHORIZED, &e.to_string()));
            },
            CustomError::JWTTokenCreationError => {
                return Ok(reply_with_status(StatusCode::INTERNAL_SERVER_ERROR, "Internal Server Error"));
            },
            _ => {
                return Ok(reply_with_status(StatusCode::BAD_REQUEST, &e.to_string()));
            }
        }
    } else if err.find::<warp::reject::MethodNotAllowed>().is_some() {
        return Ok(reply_with_status(
            StatusCode::METHOD_NOT_ALLOWED,
            "Method Not Allowed",
        ));
    }

    error!("unhandled error: {:?}", err);
    return Ok(reply_with_status(
        StatusCode::INTERNAL_SERVER_ERROR,
        "Internal Server Error",
    ));
}
Add JWT processing functions
Let’s edit the security.rs file to add functions for dealing with the incoming JWT. Let’s also introduce a useful enum that represents the various roles we have within our application’s security model. These are the final pieces of the JWT security for our Rust REST API project.
use crate::{models, Result, errors};
use chrono::{Duration, Utc};
use jsonwebtoken::{decode, encode, DecodingKey, EncodingKey, Header, Validation};
use scrypt::{
    password_hash::{rand_core::OsRng, PasswordHash, PasswordHasher, PasswordVerifier, SaltString},
    Scrypt,
};
use warp::{
    filters::header::headers_cloned,
    http::header::{HeaderMap, HeaderValue, AUTHORIZATION},
    reject, Filter, Rejection,
};
use log::debug;
use std::fmt;

#[derive(Clone, PartialEq)]
pub enum Role {
    User,
    Admin,
}

impl Role {
    pub fn from_str(role: &str) -> Role {
        match role.to_lowercase().as_str() {
            "admin" => Role::Admin,
            _ => Role::User,
        }
    }
}

impl fmt::Display for Role {
    fn fmt(&self, f: &mut fmt::Formatter<'_>) -> fmt::Result {
        match self {
            Role::User => write!(f, "User"),
            Role::Admin => write!(f, "Admin"),
        }
    }
}
We define two roles:
User: a normal user type.Admin: typically can access more information about the app and edit app configurations. However, in this case we will simple show the list of users registered in this system to admin users.
Because the role data in the token will be a string format, we implement a from_str function to convert it to an Role enum value on lines 25-30.
Authorization filter
Next, let’s write a filter function for checking authorization in the warp filter chain. We are going to call this function before the handler function in the route configuration chain. For example, we will add this to main.rs later:
    let private_route = warp::path("private")
        .and(warp::get())
        .and(security::with_auth(security::Role::User))
        .and_then(handlers::get_private);
Then here is the with_auth function implementation:
pub fn with_auth(role: Role ) -> impl Filter<Extract = (String,), Error = Rejection> + Clone {
    headers_cloned()
        .map(move |headers: HeaderMap<HeaderValue>| (role.clone(), headers))
        .and_then(authorize)
}
In the signature of the function, we take a Role value as a parameter. With this, we can indicate the role we require for the user to be able to access the endpoint.
We call headers_cloned() here which creates a filter that returns a clone of the request’s header (HeaderMap) . We pass in the role as well into the chain and then call a function to process this information (authorize).
Before we write the authorize() function we’ll write a helper function to determine if the user is authorized. This is based on comparing the role from the token to the role that is required:
fn is_authorized(required_role: Role, claims_role: &str) -> bool {
    let claims_role = Role::from_str(claims_role);
    debug!("needed role: {}, user role: {}", required_role, claims_role);
    required_role == claims_role || claims_role == Role::Admin
}
Here we simply convert the role from the claims data to a Role enum value and then do a comparison. Note that the || claims_role == Role::Admin part means that someone with a Admin role is always authorized.
Getting the JSON Web Token from the request header
The client sends the JWT token data as a string in the authorization header. So, we need a function to extract that information:
fn jwt_from_header(headers: &HeaderMap<HeaderValue>) -> std::result::Result<String, errors::CustomError> {
    let header = match headers.get(AUTHORIZATION) {
        Some(v) => v,
        None => return Err(errors::CustomError::AuthHeaderRequiredError),
    };
    let auth_header = match std::str::from_utf8(header.as_bytes()) {
        Ok(v) => v,
        Err(_) => return Err(errors::CustomError::AuthHeaderRequiredError),
    };
    if !auth_header.starts_with("Bearer ") {
        return Err(errors::CustomError::InvalidAuthHeaderError);
    }
    Ok(auth_header.trim_start_matches("Bearer ").to_owned())
}
This function takes a reference to a HeaderMap object which represents the header key and values. In this case, we are interested in the AUTHORIZATION key and value. If no such header value is present we return a AuthHeaderRequiredError err on line 101.
Otherwise, we convert the header value bytes to a string using from_utf8 on line 103 then we check to see that the value starts with "Bearer ". We do not consider an authorization header valid without it.
Then at the end, we return an Ok() with just the token part and the "Bearer " trimmed off.
Process JWT and role configuration data for incoming request
Finally, we will write the authorize function that calls all the other parts. It will call the function for getting the JWT from the header, decode the JWT from the request header and call the is_authorized function to determine if the user is authorized for the current request:
async fn authorize((role, headers): (Role, HeaderMap<HeaderValue>)) -> Result<String> {
    match jwt_from_header(&headers) {
        Ok(jwt) => {
            let decoded = decode::<models::Claims>(
                &jwt,
                &DecodingKey::from_secret(&get_secret()),
                &Validation::default(),
            )
            .map_err(|_| reject::custom(errors::CustomError::InvalidJWTTokenError))?;

            debug!("decoded claims: {:?}", &decoded.claims);
            if !is_authorized(role, &decoded.claims.role) {
                return Err(reject::custom(errors::CustomError::NotAuthorizedError));
            }

            Ok(decoded.claims.sub)
        }
        Err(e) => return Err(reject::custom(e)),
    }
}
First, we call jwt_from_header to get the token data which we then use on lines 116-121 to decode into a Claims struct using the secret key we defined earlier with .env and the variable JWT_SECRET. This call to decode will also valid the token, by looking at its expiration date for example. If the token is valid the Claims object can be accessed as a field on the decode object. As shown on lines 123-124.
Here on line 124 we pass the role value from the claims to the is_authorized() function to determine if the incoming request is authorized.
If all is well we return the subject of the token, claims.sub, from the function. In our current application’s case, this would be the username.
Implementing the private endpoint
Now let’s create an endpoint with JWT security for our Rust REST API.
The handler function
First, let’s add a handler that handles GET requests for the private endpoint to handlers.rs:
pub async fn get_private(username: String) -> Result<impl Reply> {
    info!("Return private page.");

    Ok(warp::reply::html(format!(
        r#"
    <html>
        <head>
            <title>Private space</title>
        <head>
        <body>
            <h1>Private</h1>
            <div>Logged in user: {}</div>
        </body>
    </html>
    "#,
        &username
    )))
}
This function takes an String value. Which, in this case, is the username for the logged in user. And we return an object that implements Reply wrapped in a Result. For this function, we are going to be returning a HTML object by calling the reply::html function.
We set up a simple HTML page that displays the logged-in user’s username. Using a raw string literal using r#""#.
The endpoint configuration
Now we can update main.rs to add this new endpoint that we will protect with an authorization check:
    let private_route = warp::path("private")
        .and(warp::get())
        .and(security::with_auth(security::Role::User))
        .and_then(handlers::get_private);

    let routes = root
        .or(user_route)
        .or(login_route)
        .or(private_route)
        .with(warp::cors().allow_any_origin())
        .recover(errors::handle_rejection);
This endpoint will be reachable at http://127.0.0.1:5000/private and only for GET requests. Let’s not forget to add it to the routes chain on line 42.
Using the private endpoint
Now when we run the program and navigate to http://127.0.0.1:5000/private we should get an error message like this:

This message confirms that our Rust REST API has some form of JWT security.
To get at the contents we have to log in first, and also create a user first:
curl -X POST 'localhost:5000/user' -H "Content-Type: application/json" -d '{"username": "testuser", "password": "testpass", "role": "user"}'

curl -X POST 'localhost:5000/login' -H "Content-Type: application/json" -d '{"username": "testuser", "password": "testpass"}'

curl -X GET 'localhost:5000/private' -H 'Authorization: Bearer eyJ0eXAiOiJKV1QiLCJhbGciOiJIUzI1NiJ9.eyJzdWIiOiJ0ZXN0dXNlciIsInJvbGUiOiJ1c2VyIiwiZXhwIjoxNjQ4MDcxNjM4fQ.Ru19FNndLniLbx-1VPXhCoLPf3mIXwMshPaIFI0yO7k'
We have to make sure to add “Bearer ” and use the token returned after logging in. The results will look like this:

Adding an admin only endpoint
As a final step to this JWT security for our Rust REST API project, let’s add an admin-only endpoint.
Endpoint configuration and handler definition
Adding a new endpoint now is very easy. Our admin-only endpoint configuration will be the same as the “private” endpoint, only it will also make use of the database. Let’s update main.rs:
    let admin_only_route = warp::path("admin_only")
        .and(warp::get())
        .and(with_users_db(users_db))
        .and(security::with_auth(security::Role::Admin))
        .and_then(handlers::get_admin_only);

    let routes = root
        .or(user_route)
        .or(login_route)
        .or(private_route)
        .or(admin_only_route)
        .with(warp::cors().allow_any_origin())
        .recover(errors::handle_rejection);
And then the get_admin_only handler function in handlers.rs:
pub async fn get_admin_only(users_db: UsersDb, username: String) -> Result<impl Reply> {
    info!("Return admin only page.");

    Ok(warp::reply::html(format!(
        r#"
    <html>
        <head>
            <title>Public space</title>
        <head>
        <body>
            <h1>Admin only</h1>
            <div>Logged in user: {}</div>
            <div>
                <b>Number of users in the database: {}</b>
            </div>
        </body>
    </html>
    "#,
        &username,
        users_db.lock().await.len()
    )))
}
Using the admin-only endpoint
Now first, let’s see what happens when we log in with a user that has a User role and try to access this admin-only endpoint:

We get a 401 Unauthorized error result as a normal user.
Now we’ll add a user with the admin role.
curl -X POST 'localhost:5000/user' -H "Content-Type: application/json" -d '{"username": "testadmin", "password": "adminpass", "role": "admin"}'

curl -X POST 'localhost:5000/login' -H "Content-Type: application/json" -d '{"username": "testadmin", "password": "adminpass"}'

curl -X GET 'localhost:5000/admin_only' -H 'Authorization: Bearer eyJ0eXAiOiJKV1QiLCJhbGciOiJIUzI1NiJ9.eyJzdWIiOiJ0ZXN0YWRtaW4iLCJyb2xlIjoiYWRtaW4iLCJleHAiOjE2NDgwNzU0ODJ9.AhYY23dbR40Sjjsx_40W3S7vNAK9OQmwhAcNk5rZGfk'
With this user that has an admin role, we will be able to access the admin_only endpoint:

JWT security for Rust REST API Conclusion
In this tutorial, we learned how to implement JWT security for a REST API with Rust. Our REST API supports creating a user, logging in, and generating a security token (JWT), role-based authorization. We also learned how to hash a password. On top of that, we spent some time implementing rejection handling for warp error responses.
The completed project can be found on my GitHub: https://github.com/tmsdev82/rust-jwt-warp-tutorial.
Please follow me on Twitter to get notified on new Rust programming articles:
Follow @tmdev82
Obrigado por esse conteudo, pra mim foi muito produtivo.