
When diving into Python programming, one of the most useful tools you’ll encounter is the virtual environment, often referred to by its tool name venv. A virtual environment for Python is used to manage the dependencies of Python packages. Even though beginner Python programmers might not be concerned with dependency management. And some might not even be aware that it could be a problem. However, it will save you a lot of headaches if you get into the habit of using virtual environments for your projects as soon as possible.
What is a Virtual Environment?
In Python, a virtual environment is a self-contained directory with a specific Python version and various additional packages. Each project can have its own virtual environment with different dependencies and versions, isolated from other projects. We typically create the virtual environment directory inside the directory of the current project we are working on. That way the directory containing the virtual environment is easy to find.
Because one of the simplest virtual environment tools to use is venv we will talk about it in this article.
Why use a Virtual Environment for Python?
Why should you worry about virtual environments and dependencies as a beginner? In previous sections, I mentioned that virtual environments are good for managing dependencies and avoiding version conflicts. Without a doubt, some people have started learning Python but have never encountered any issues like that. However, when we don’t use a virtual environment we can run into all kinds of awkward issues when working on multiple different projects.
- Isolation: Different projects can have different requirements. Virtual environments keep them separate.
- No admin rights needed: Install new packages without affecting the system Python or needing admin rights.
- Easier dependency management: When sharing your project, others can replicate your environment easily.
- Experiment without risk: Try new packages or updates without the risk of breaking your main Python setup.
Version conflicts between projects’ dependencies
For example, you start working on a project we’ll call “Project A” with Python 3.12 and install some nice packages. Then after a couple of months, you get a new idea for a project “Project B”. Because a couple of months have passed new versions of packages have been released with new functions. Or existing functions have had their parameters slightly changed. So you install newer versions of these packages because you want to use cutting-edge technology.
Now you want to go back to “Project A” to continue working on it. However, your code no longer runs. Because updated versions of the packages you were using were installed and your code in “Project A” is no longer compatible with it. If you want to run “Project A” you either have to reinstall the older versions of the packages you depend on, or update the code in “Project A” to work with the newer versions.
Even though this does not seem like a big issue at first, it definitely becomes a problem in the future. Especially because packages themselves can be dependent on specific versions of other packages.
Sharing your project with others
If we want to share our projects with others in the future it helps to keep track of all the packages your project depends on. Considering that the person you’re sharing with has to install those same packages as well. If you have been working on your projects for a while you probably will not remember the specific versions of all the packages you’re using.
Thankfully there is a pip command that shows all the packages installed in an environment: pip freeze. However, this shows all the packages in the environment. So if you’re just installing everything in the global environment and then run this command you will get a list of every package you’ve ever installed.
Therefore, having a separate virtual environment for each project is best. That way, when you run pip freeze it will only show the packages installed for that particular project. Then you can use that list to write a requirements.txt file. So that anyone who wants to work on or use your project can execute the command pip install -r requirements.txt to install all the required dependencies for that project.
How to use venv
In this section, you will learn how to use venv. Additionally, we will look at a practical example of why working with venv is a good idea.
If you’re using Python 3.3 or higher then venv is included in the Python Standard Library.
Creating your first virtual environment
Let’s see how easy it is to create a virtual environment with venv. Open a terminal or command line prompt and execute the following commands line by line:
mkdir my_project
cd my_project
python -m venv venv
Press enter after each command. The Python command python -m venv venv creates a virtual environment directory with the name venv:
- python: the Python executable
- -m: a flag in the command to indicate you want to use a module
venv: the name of the modulevenv: the name of the virtual environment
The virtual environment name can be anything you want but I like using venv for “Virtual ENVironment”.
Using the virtual environment
After creating the virtual environment you have to activate it so that packages are installed in the right place. And your project is also executed with this environment when you run it.
- On Windows:
.\venv\Scripts\activate - On MacOS/Linux:
source ./venv/bin/activate
Once activated, you’ll usually see an indicator in your terminal prompt like the name of the environment (venv).
Installing Packages in a Virtual Environment
With your environment activated, you can install packages using pip like normal (pip is the Python package manager).
For example:
pip install requests
This command installs the requests library, but only within your env.
Example venv usage for different projects
Scenario: You’re working on two projects: Project A requires requests version 2.23.0, but Project B needs the latest version.
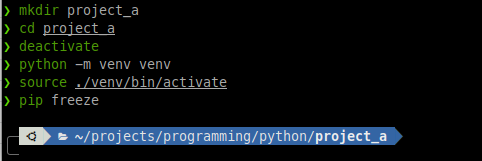
First, create and activate a virtual environment for Project A:
mkdir project_a
cd project_a
python -m venv venv
source ./venv/bin/activate # or .\venv\Scripts\activate on Windows
Now run the command pip freeze and you’ll see that there are no packages installed:
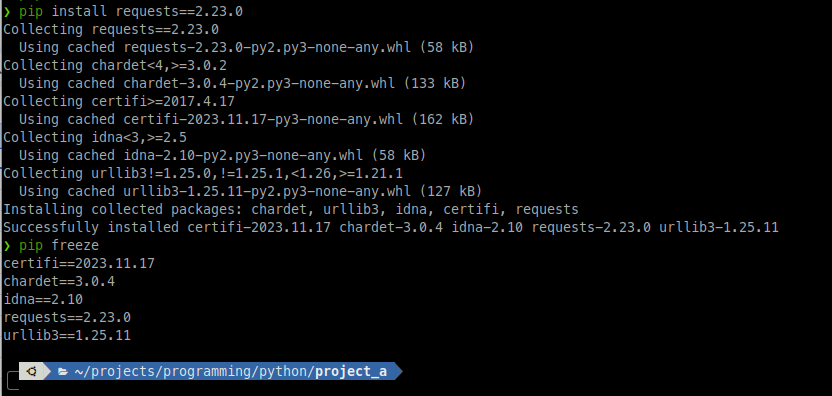
Now let’s install an older version of the requests package: pip install requests==2.23.0 and then run pip freeze again. We will see that this requests version is installed in the venv together with its dependencies.
Deactivate the environment with the command: deactivate.
Then do the same procedure for Project B, but install the latest version of requests instead:
mkdir ../project_b
cd ../project_b
python -m venv venv
source ./venv/bin/activate # or .\venv\Scripts\activate on Windows
pip install requests
Run the command pip freeze in this context to see different versions:

Now, both projects have their own environments with the required requests version, independent of each other!
Conclusion
For beginner Python developers, learning how to use virtual environments is very beneficial. It ensures a smoother, conflict-free development experience and makes your projects more reproducible and shareable. Moreover, it will save you headaches in the future. Embrace venv, and happy coding!
Here is a simple beginner tutorial that uses venv to develop a Python backend and then use JavaScript to communicate with it: Python backend with JavaScript frontend: how to
To keep up to date with my latest tutorials please follow me on X:
Follow @tmdev82
Thanks! Great explanation and demo. I just started working with open source projects, and they assume you know what a virtual environment and how to use it. This definitely filled in some gaps for me.