In this tutorial, we will learn how to connect to and manage a PostgreSQL database using the Rust programming language. A database is often an important component for any data-based backend system.
For example, the Rust REST API project we made a while ago could really use a database connection implementation: How to implement a Rust REST API with warp.
We will look at the basics of how to:
- Connect to a PostgreSQL database
- Create a database
- Create tables
- Insert data
- Execture queries
The example code repository can be found on my GitHub: here.
Prerequisites
Some Rust programming knowledge is required to follow this tutorial.
Docker installed. For some basic information on docker please see my article on it here: What is Docker and why is it used: quick primer.
Setting up the database with docker-compose
First, we will briefly go over one of the ways how we can easily set up a PostgreSQL database for testing purposes. In this case, we will use docker and docker-compose.
Docker-compose file
We are going to set up a simple docker-compose file that will start a PostgreSQL database instance and enable access for a specific user. Let’s create a file called docker-compose.yaml with the following contents:
version: "3.9"
services:
  postgres:
    image: postgres:14
    environment:
      - POSTGRES_USER=dboperator
      - POSTGRES_PASSWORD=operatorpass123
      - POSTGRES_DB=postgres
    ports:
      - "5243:5432"
The port number 5243 is the port number we will use in our code to connect to the database server. The port number in front of the “:” can be anything we like. In this case, it will mean port 5243 on our localhost will be directed to port 5432 in the docker container.
We can now run the database instance with the following command: docker-compose up. It is that simple.
If we want to run the database in a background process we can use docker-compose up -d. Then bringing everything down can be done with docker-compose down.
We can check to see the container running with the docker ps command:

Checking to see if the database is running
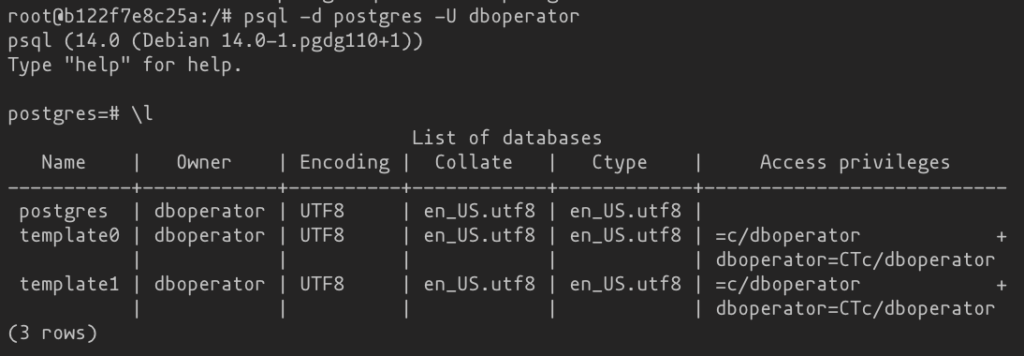
Let’s check to see if the configuration created the database successfully. We can enter the terminal of the PostgreSQL container using the following command: docker exec -ti rust-postgresql-tutorial_postgres_1 bash. Then we can connect to the postgres database we configured in the docker-compose.yml using the psql command: psql -d postgres -U dboperator. If the command is successful the database was set up correctly.
We can list the databases with the command \list:
Set up the Rust project
With the database set up out of the way, we can start our Rust project for connecting to the PostgreSQL database.
Let’s create a new project cargo new rust-postgresql-tutorial. Then let’s add some required dependencies to the Cargo.toml:
[package]
name = "rust-postgresql-tutorial"
version = "0.1.0"
edition = "2021"

# See more keys and their definitions at https://doc.rust-lang.org/cargo/reference/manifest.html

[dependencies]
postgres = "0.19"
The postgres crate helps connect to the database.
Connecting to PostgreSQL with Rust
Let’s connect to the database in our Rust program. Open up the main.rs file and replace the code with the following:
use postgres::{Client, Error, NoTls};

fn main() -> Result<(), Error> {
    let mut client = Client::connect(
        "postgresql://dboperator:operatorpass123@localhost:5243/postgres",
        NoTls,
    )?;

    Ok(())
}
This will connect our program to the PostgreSQL instance running in the Docker container. The last part of the URL “/postgres” is the name of the database. This is the name of the database that the docker-compose configuration created.
Creating a table in the database
In this section, we will add a couple of tables to the PostgreSQL database with our Rust code. To do this we will use the client object created in the previous section and call the batch_execute() function. The “batch_execute” function can execute multiple statements, separated by a semicolon (“;”). This function is intended to use when initializing a database schema:
client.batch_execute(
        "
        CREATE TABLE IF NOT EXISTS app_user (
            id              SERIAL PRIMARY KEY,
            username        VARCHAR UNIQUE NOT NULL,
            password        VARCHAR NOT NULL,
            email           VARCHAR UNIQUE NOT NULL
            )
    ",
    )?;
This will create a app_user table. We can check to make sure by going into the container and connecting to the database with: psql -d postgres -U dboperator and then using the \dt command to list all the tables:
docker exec -it rust-postgresql-tutorial_postgres_1 bash
root@4dadd7fdf34b:/# psql -d postgres -U dboperator
psql (14.0 (Debian 14.0-1.pgdg110+1))
Type "help" for help.

postgres=# \dt
           List of relations
 Schema |   Name   | Type  |   Owner
--------+----------+-------+------------
 public | app_user | table | dboperator
(1 row)

postgres=#
That’s good. We now have a table we can insert data into.
Inserting values into a table
Now let’s insert some data into the app_user table:
 client.execute(
        "INSERT INTO app_user (username, password, email) VALUES ($1, $2, $3)",
        &[&"user1", &"mypass", &"user@test.com"],
    )?;
Here we are using the execute command which enables executing queries with parameters. When we parameterize our queries like this it can help prevent SQL injection hacks. It can also improve query execution speed. Because the SQL server can cache parameterized query plans.
Everything needs to be passed as a reference here.
After running the program, our database should contain one new record:
postgres=# SELECT * FROM app_user;
 id | username | password |     email
----+----------+----------+---------------
  1 | user1    | mypass   | user@test.com
(1 row)
If we run the program again without changing the value for the username or email, we will get an error because we configured these columns to be UNIQUE:
Error: Error { kind: Db, cause: Some(DbError { severity: "ERROR", parsed_severity: Some(Error), code: SqlState(E23505), message: "duplicate key value violates unique constraint \"app_user_username_key\"", detail: Some("Key (username)=(user1) already exists."), hint: None, position: None, where_: None, schema: Some("public"), table: Some("app_user"), column: None, datatype: None, constraint: Some("app_user_username_key"), file: Some("nbtinsert.c"), line: Some(663), routine: Some("_bt_check_unique") }) }
Querying the database and processing the results
In this section, we will look at how to execute a SELECT query and how the result can be processed.
Let’s add some more records to the app_user table first before we query the data. We have to comment out or replace the original insert statement or else we will get the error mentioned above:
    // client.execute(
    //     "INSERT INTO app_user (username, password, email) VALUES ($1, $2, $3)",
    //     &[&"user1", &"mypass", &"user@test.com"],
    // )?;

    client.execute(
        "INSERT INTO app_user (username, password, email) VALUES ($1, $2, $3)",
        &[&"user2", &"mypass2", &"use2@gmail.com"],
    )?;

    client.execute(
        "INSERT INTO app_user (username, password, email) VALUES ($1, $2, $3)",
        &[&"user3", &"anotherpass", &"mister3@test.com"],
    )?;
Now let’s query the data (comment out the insert statements when running the code again):
for row in client.query("SELECT id, username, password, email FROM app_user", &[])? {
    let id: i32 = row.get(0);
    let username: &str = row.get(1);
    let password: &str = row.get(2);
    let email: &str = row.get(3);

    println!(
        "found app user: {}) {} | {} | {}",
        id, username, password, email
    );
In this example, we are using the query() function. This function executes a statement and returns the resulting rows. It is another function that allows parameterized query execution. However, since we don’t have any parameters for this query we pass a reference to an empty parameter array &[].
We can process the results in a for loop, in this case for row in. We then call get() on the row object with a column index as a parameter value. Type annotations are required for the variables the column values are assigned to.
Finally, we print the results as a string to the terminal stdout with println!().
Expected output is something like:
found app user: 1) user1 | mypass | user@test.com
found app user: 2) user2 | mypass2 | use2@gmail.com
found app user: 3) user3 | anotherpass | mister3@test.com
Updating a record in the app_user table
We can update a record now, simply by using one of the client object functions we have already used before: execute:
client.execute(
        "UPDATE app_user SET username=$1 WHERE id=$2",
        &[&"jack1", &2],
    )?;
Now when we run the program again, the row with id 2 should be updated.
Deleting a record from a table
In this last section, we will delete records by id from the app_user table. We will use a parameterized query with the execture function:
client.execute("DELETE FROM app_user WHERE id=$1", &[&1])?;
client.execute("DELETE FROM app_user WHERE id=$1", &[&3])?;
That is all there is to it. After running the program, those records should no longer exist.
If we run the program again to delete and then again we should see the updated printout of the table contents, with only one record remaining: found app user: 4) jack1 | anotherpass | mister3@test.com.
Conclusion
In this short tutorial, we learned how to connect to a PostgreSQL database with Rust. Not only that, we learned how to easily set up a running instance of a PostgreSQL database using Docker and docker-compose. Furthermore, we learned which functions to use on the postgres crate’s client object to execute various query types.
The example code repository can be found on my GitHub: here.
However, using only the postgres crate we have to type raw SQL queries to get things done. This is not always convenient. Especially in large projects. Instead, we often use what is called an ORM library, or Object-Relational Mapping, which makes talking to a database more convenient. An ORM library allows us to talk to a database in the programming language’s language, in this case, Rust, instead of in SQL. Another advantage of ORM is that typically multiple database flavors can be used with the same syntax.
We will look at a popular ORM crate in a future tutorial.
Please follow me on Twitter for updates on upcoming Rust programming articles:
Follow @tmdev82
Hey, thanks for the tutorial. Great work and probably the best and most thorough rust tutorials on the internet!
However the rust typechecker does not like &i32 in params when updating or deleting so you have to declare it as a string slice and parse it into i32.
Like this:
&[&”1″.parse::().unwrap()]