In this tutorial, we are going to learn how to build a simple backend with Python and a frontend in JavaScript. For the Python backend, we will make use of the Flask library. This will let us set up the backend with only a few lines of code.
The main goal of this article is to demonstrate the interaction between a Python backend and a frontend. So the frontend will be as simple as possible. We will use plain JavaScript, without frameworks. Meaning, this will be a very barebones example UI.
The full project’s code can be found on my GitHub: here.
I also have a longer tutorial where we build a full stake note taking web app using Python and React: Python and React Web App for beginners
Contents
Prerequisites
Even though this is a basic tutorial some prior knowledge is assumed:
- Basic Python knowledge
- Basic JavaScript knowledge
We are also assuming the following is installed on our system:
- Python 3.6 or higher
- pip
- venv: keeps our environments clean by keeping our dependencies in a specific directory for our porject.
- npm: as we are going to install http-server.
Let’s make sure we install http-server, so we have an easy way to run our frontend code. For example, using npm: npm install --global http-server.
Creating the project
First, let’s set up our project directory. This will be the root directory and contain the directories for the Python backend and the Web frontend.
Create a directory: basic-web-app-tutorial.
Building the Python backend
The first step in our Python backend and JavaScript frontend project is building the backend.
Let’s create a new directory for our project in our basic-web-app-tutorial called backend.
basic-web-app-tutorial
+ -- backend
Setting up a virtual environment for dependencies
Next, we will create a virtual environment for our dependencies. As mentioned earlier, using a virtual environment keeps the rest of our system clean. Python libraries we will install will be installed into this environment only and will not affect the rest of our system.
For more information about virtual environments see my article here: Python Virtual Environment (venv): easy guide for beginners
We can create a virtual environment called venv using the following command: python -m venv venv.
Before we can install dependencies we have to activate the environment. On Linux systems the command is: source ./venv/bin/activate. For Windows: venv\Scripts\activate.bat.
Note: if using git for your project make sure to put the venv directory in the .gitignore file.
basic-web-app-tutorial
+ .gitignore
+-- backend
     +-- venv
Installing dependencies
Moving on, let’s install the required dependencies:
- flask: A light-weight web application framework. Allows us to set up a web application quick and easy with only a few lines of code.
- flask-cors: Makes it easy to enable Cross Origin Resource Sharing (CORS). Meaning, this will allow our JavaScript web frontend to communicate with out Python backend. Otherwise, the frontend will get blocked automatically.
Let’s make sure the virtual environment is activated before we install these dependencies. If it is activate we’ll install the dependencies with the following command: pip install flask flask-cors.
Basic python backend app
In this section, we will finally write our first code.
Let’s create a file in the backend directory called app.py and edit it with our favorite text editor/IDE. For example vscode.
basic-web-app-tutorial
+ .gitignore
+-- backend
     + app.py
     +-- venv
We will start with the basic example seen on the Flask page:
from flask import Flask

app = Flask(__name__)

@app.route("/")
def hello():
    return "Hello, World!"
On the first line, we import the Flask class which allows us to instance a Flask object. This is the central object for our backend app. On line 3 the instance is created using the __name__ variable as the name for the app. This can be any name really.
Finally, we define a route using a function decorator: @app.route("/"). This means that if the backend is running we will be able to reach it at the root address. Whenever the client sends an HTTP request to the root address this hello() function will be executed. For example by navigating to our web apps’ server address using an internet browser.
After setting the environment variable FLASK_APP=app.py we can run the test server using: flask run. By default, the server will run on localhost:5000. If we don’t want to deal with setting environment variables for now we can also add the following lines:
from flask import Flask

app = Flask(__name__)

@app.route("/")
def hello():
    return "Hello, World!"

if __name__ == "__main__":
    app.run("localhost", 6969)
Now we can simply run the file the common way: python app.py and then the server will run on localhost:6969. Output in the terminal/command prompt should look something like this:

If we open up our browser and navigate to http://localhost:6969 we should be greeted by a message Hello, World!
Adding an endpoint and sending back data
To make things a little more interesting we will add an endpoint that sends back data in JSON format. Not only that, we will read this data from disk and then send it as a response. The JSON format is a very common format used for the communication of data between the backend and frontend.
Let’s add a JSON file called users.json to our backend directory:
basic-web-app-tutorial
+ .gitignore
+-- backend
     + app.py
     + users.json
     +-- venv
With the following contents:
[
    {
        "username": "user1",
        "pets": ["dog"]
    },
    {
        "username": "user2",
        "pets": []
    },
    {
        "username": "user3",
        "pets": ["duck", "duck", "goose"]
    }
]
We are using a file to simplify the example, but imagine this represents some data in a database.
Next, we will add a new endpoint that sends this data as a response to a request. We will also add new imports. Explanations follow after the code:
from flask import Flask
import flask
import json

app = Flask(__name__)

@app.route("/")
def hello():
    return "Hello, World!"

@app.route('/users', methods=["GET"])
def users():
    print("users endpoint reached...")
    with open("users.json", "r") as f:
        data = json.load(f)
        data.append({
            "username": "user4",
            "pets": ["hamster"]
        })

        return flask.jsonify(data)

if __name__ == "__main__":
    app.run("localhost", 6969)
On line 2 and 3 we import flask and json which will allow us to return JSON data and read a JSON file respectively.
On lines 11-21 the new endpoint /users is defined. The @app.route() decorator now also has a parameter methods. With this parameter, we can specify which types of HTTP requests are allowed on this endpoint. In this case, we are only allowing GET, which is typically used for retrieving data only.
Next, we simply read the data file users.json using open() to create a file handle and reading it using json.load on line 15. The result will be a list of dictionaries that we can manipulate. To demonstrate this we add another user data set.
Then to send it as a valid response we have to convert this data again using flask.jsonify()
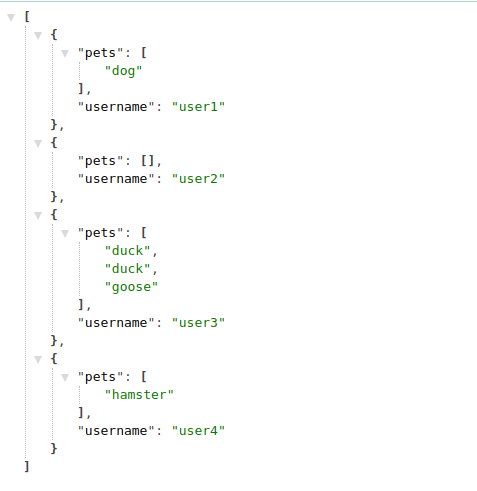
Now, to see the changes in our code we have to stop the server and start it again. Then if we navigate to http://localhost:6969/users we should see the following result:
Configuring CORS
Before we start creating the frontend client, we should configure CORS. If we don’t do this the frontend client will be blocked by the backend. This is done automatically to prevent unwanted sources from being able to communicate with our backend.
To keep it simple we will enable CORS for all origins for now. Below is a code snippet from app.py with the relevant changes highlighted:
from flask import Flask
import flask
import json
from flask_cors import CORS

app = Flask(__name__)
CORS(app)
Building the JavaScript frontend
The next step for our Python backend with JavaScript frontend project is to build the frontend. In this section, we will write a very basic HTML page with some JavaScript.
Our JavaScript will send a request to our backend server and then process the data in the response to display it on the page. As mentioned earlier this example will not use a UI framework or a library for sending requests.
Setup the frontend project
Let’s create a new directory for our project in our basic-web-app-tutorial called frontend and add a file called index.html:
basic-web-app-tutorial
+ .gitignore
+-- backend
     + app.py
     + users.json
     +-- venv
+-- frontend
     + index.html
Adding the frontend code
Below is the complete code listing for the index.html file. We will go through the important parts step by step:
<html>
<header>
    <title>Test page</title>
</header>

<body>
    <div>This is simple test to get data from a backend</div>
    <div><span>Last update: </span><span id="time-container"></span></div>
    <button onclick="getUsers()">Get user data</button>
    <div id="result-container"></div>
</body>
<script>
    var xhr = null;

    getXmlHttpRequestObject = function () {
        if (!xhr) {
            // Create a new XMLHttpRequest object
            xhr = new XMLHttpRequest();
        }
        return xhr;
    };

    function dataCallback() {
        // Check response is ready or not
        if (xhr.readyState == 4 && xhr.status == 200) {
            console.log("User data received!");
            getDate();
            dataDiv = document.getElementById('result-container');
            // Set current data text
            dataDiv.innerHTML = xhr.responseText;
        }
    }
    function getUsers() {
        console.log("Get users...");
        xhr = getXmlHttpRequestObject();
        xhr.onreadystatechange = dataCallback;
        // asynchronous requests
        xhr.open("GET", "http://localhost:6969/users", true);
        // Send the request over the network
        xhr.send(null);
    }
    function getDate() {
        date = new Date().toString();

        document.getElementById('time-container').textContent
            = date;
    }
    (function () {
        getDate();
    })();
</script>

</html>
First, let’s look at the body:
<body>
    <div>This is simple test to get data from a backend</div>
    <div><span>Last update: </span><span id="time-container"></span></div>
    <button onclick="getUsers()">Get user data</button>
    <div id="result-container"></div>
</body>
Here we simply define some HTML elements that we give ids to so we can dynamically add text/data to those elements later with JavaScript. We also add a button on line 9 to trigger a function that will retrieve data from the backend server.
HTTP request object
Next, the HTTP request object:
    var xhr = null;

    getXmlHttpRequestObject = function () {
        if (!xhr) {
            // Create a new XMLHttpRequest object
            xhr = new XMLHttpRequest();
        }
        return xhr;
    };
This XMLHttpRequest is an object that can be used to exchange data with a web server behind the scenes. It is supported by all browsers. Because it works behind the scenes we can update our page with incoming data without having to reload the page.
This setup checks to see if an instance of the object exists on line 16 and if not creates it and then returns it.
Writing the callback function
Next, is the callback function for when a response is received from the backend:
    function dataCallback() {
        // Check response is ready or not
        if (xhr.readyState == 4 && xhr.status == 200) {
            console.log("User data received!");
            getDate();
            dataDiv = document.getElementById('result-container');
            // Set current data text
            dataDiv.innerHTML = xhr.responseText;
        }
    }
This dataCallback() function checks the state of the xhr object to see if we have a success status code (200) on line 25. The ready state is also checked. Ready state 4 means: request finished and response is ready. If the response is ready we can process the data.
We update the data time information on the page by calling getDate() on line 27.
Then we set the inner HTML for our dataDiv to the responseText on lines 28-30. This responseText attribute should contain our JSON data.
Sending a request
Then the code that sends the request:
   function getUsers() {
        console.log("Get users...");
        xhr = getXmlHttpRequestObject();
        xhr.onreadystatechange = dataCallback;
        // asynchronous requests
        xhr.open("GET", "http://localhost:6969/users", true);
        // Send the request over the network
        xhr.send(null);
    }
Here we first have to retrieve an instance of the XMLHttpRequestObject in order to send requests. On the next line, line 36, we set the callback function. Meaning, when the onreadystatechange is triggered our dataCallback function will be called.
With open we specify the type of request we want to send. In this case, we want to send a HTTP GET request to the http://localhost:6969/users address. And the final parameter sets asynchronous to true. This means the request will be sent in the background without blocking other code execution.
Finally, we send the request without any additional data on line 40 with xhr.send(null).
Running the frontend client
Now we are ready to run a http-server and test out our Python backend and JavaScript frontend project.
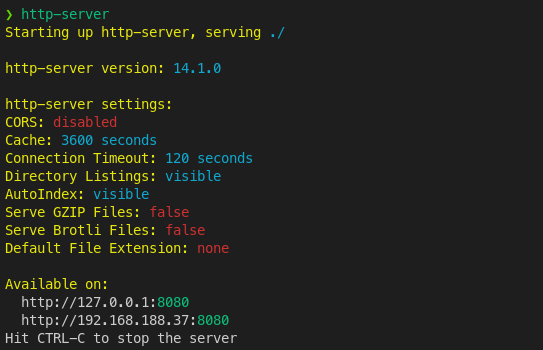
If we start http-server using the following command in the terminal/command prompt: http-server the page should be served at http://localhost:8080:
Then when we navigate to this address we should see:

Running the Python backend with JavaScript frontend
We have built all the pieces now and can finally see how they work together.
Make sure the backend server is running by running the command python app.py in the terminal/command prompt in the backend directory.
Then start the frontend web server if it is not running in the frontend directory: http-server.
Then navigate to the address for the frontend http://localhost:8080. Now when we click the button we should get data from the backend:

When we click the button an HTTP GET request is sent to the address we specified. Meanwhile, the backend server is listening for requests on localhost:6969. When the request comes in the backend checks to see the requested path /users to see if it has any matching routes/endpoints. The server code also checks the method to see if it is allowed on that route. If everything is ok, it will continue processing the request by calling the users() function in the Python code.
Send data with the JavaScript frontend and receive on the backend
In this section, we will write code for sending data with the Javascript frontend and Python code to receive that data on the backend.
Sending data with the frontend
First, we will add functionality to our barebones JavaScript frontend to send data to the backend. We will also see that sending a POST request to our backend will not be allowed by the backend on the /users endpoint until we explicitly allow it.
Updating the body HTML for input elements
Let’s add some UI elements for inputting and sending data. The updated HTML body looks like this:
body>
    <div>This is simple test to get data from a backend</div>
    <div><span>Last update: </span><span id="time-container"></span></div>
    <div>
        <label for="data-input">Data to send:</label>
        <input type="text" id="data-input">
        <button onclick="sendData()">Send data</button>
    </div>
    <div>
        <div id="sent-data-container"></div>
    </div>
    <hr>
    <div>
        <button onclick="getUsers()">Get user data</button>
        <div id="result-container"></div>
    </div>
</body>
We have added a simple text input field, a button to trigger the sendData() function and a div that will display the response from the backend. Even when sending data a backend will return some data confirming the success of the operation. For example, when editing data the backend could return the updated data object.
Adding new JavaScript code for sending data
Now let’s add some JavaScript functions.
First, the callback function that is triggered when the server sends the response to our UI:
    function sendDataCallback() {
        // Check response is ready or not
        if (xhr.readyState == 4 && xhr.status == 201) {
            console.log("Data creation response received!");
            getDate();
            dataDiv = document.getElementById('sent-data-container');
            // Set current data text
            dataDiv.innerHTML = xhr.responseText;
        }
    }
This function is similar to dataCallback() with one small difference. On line 62, we check for status 201 instead of 200. Status 201 is usually sent when data was sent and the backend created a new resource or piece of data on the backend side in the database for example. We will also configure our backend to send this status code, so here we have to react to it.
Next, the code that sends the actual data in a POST request:
    function sendData() {
        dataToSend = document.getElementById('data-input').value;
        if (!dataToSend) {
            console.log("Data is empty.");
            return;
        }
        console.log("Sending data: " + dataToSend);
        xhr = getXmlHttpRequestObject();
        xhr.onreadystatechange = sendDataCallback;
        // asynchronous requests
        xhr.open("POST", "http://localhost:6969/users", true);
        xhr.setRequestHeader("Content-Type", "application/json;charset=UTF-8");
        // Send the request over the network
        xhr.send(JSON.stringify({"data": dataToSend}));
    }
On lines 72-76 we get the value from our text input UI element. We get the element by id and then access the value attribute. We then check if the value is empty or not. Normally we would also validate the input in other ways. However, this is outside of the scope of this tutorial.
Then we get an instance of the XMLHttpRequestObject again and configure the callback function, this time we set onreadystatechange to our new callback function sendDataCallback on line 79.
On line 82, we set the request header Content-Type for our HTTP request to application/json. This informs the backend server about what kind of data we are sending.
Finally, on line 84 we send the data by putting it in a JSON structure {"data": dataToSend} and then turning it into a string using JSON.stringify.
Sending the data and getting error response
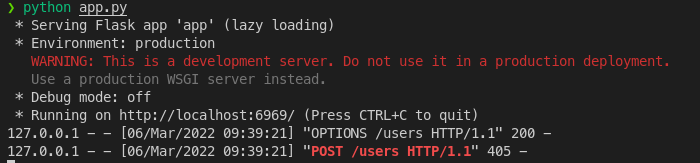
If we send some data now we will get an error response from the server. Because the backend does not allow the POST method yet our request will be rejected.

The backend also shows that it has sent a 405 (Method not allowed) response:
Next, we will add functionality to our backend to allow this POST request and to process it.
Receiving POST request in the Python backend
In this section, we will update our users() function so it is able to accept and process POST requests.
First, we have to add an import request:
from flask import Flask, request
import flask
import json
from flask_cors import CORS
This enables us to extract more information about incoming requests.
@app.route('/users', methods=["GET", "POST"])
def users():
    print("users endpoint reached...")
    if request.method == "GET":
        with open("users.json", "r") as f:
            data = json.load(f)
            data.append({
                "username": "user4",
                "pets": ["hamster"]
            })

            return flask.jsonify(data)
    if request.method == "POST":
        received_data = request.get_json()
        print(f"received data: {received_data}")
        message = received_data['data']
        return_data = {
            "status": "success",
            "message": f"received: {message}"
        }
        return flask.Response(response=json.dumps(return_data), status=201)
In the decorator on line 13, we add the “POST” method to the list of allowed methods. Now that we support two request methods on the same endpoint (/users) we have to determine what method each request is using so we can change the behavior of the code accordingly.
We use the method attribute on the request object to determine if we are dealing with a GET request or a POST request. The code for dealing with a GET stays the same as what we had before.
Our new code, lines 25-33 deals with the incoming POST request.
With request.get_json() we can extract the JSON data (payload) that was sent as a JSON dictionary. Then we extract the data and assign it to message on line 28.
Finally, on lines 29-33, we construct a new response data object and send it back as a Response object with status code 201.
Completed sending and receiving example
Now we are ready to send and receive data with the POST HTTP request method. We should make sure to restart the backend after saving the changes and refreshing/restarting the frontend web page.
Typing something into the input text box and pressing send will result in something like the following:
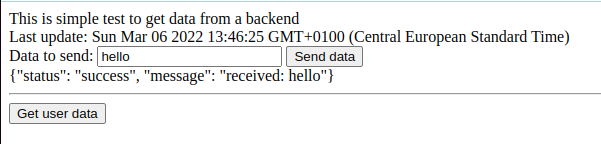
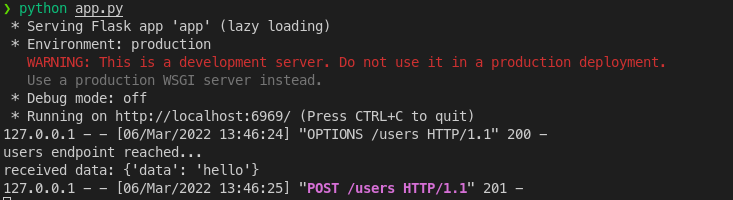
The backend shows the following output:
Conclusion
In this tutorial, we learned about building a basic Python backend and JavaScript frontend that can communicate with that backend. We put into practice the basic concepts of communication between a backend and frontend. Our backend can handle processing GET and POST requests from a client.
The full project can be found on my GitHub: here.
Please follow me on Twitter to be updated on tutorials I am working on:
Follow @tmdev82
Hi,
Very clear and easy to follow tutorial, thank you very much !
I am now wondering how to publish these type of website to something like microsoft azure or self host website. (i am new into websites world, and for now i just did basic website and a little bit of express)
Thank you !