In this tutorial, we will learn the basics of using the SQLx crate with Rust and SQLite. The SQLx crate is an async pure Rust SQL crate featuring compiling time-checked queries. However, it is not an ORM. We will look at how to create an SQLite database and do SQL operations on it with SQLx.
After we complete this tutorial we will have a good understanding of the basics for using SQLite databases in our future Rust projects using SQLx.
The repository with the finished project can be found here: https://github.com/tmsdev82/sqlx-sqlite-basics-tutorial.
Another rust and database-related article can be found here: PostgreSQL database with Rust: basic how to.
Contents
What is SQLx
SQLx is an easy-to-use async SQL crate for Rust. It supports PostgreSQL, MySQL, SQLite, and MSSQL. SQLx has compile time checked queries, and is runtime agnostic (it works on async-std, tokio, actix) and TLS backends (native-tls, rustls).
Furthermore, SQLx is cross-platform, so it can compile anywhere Rust is supported, has built-in connection pooling, and a number of other features: SQLx.
What is SQLite
SQLite is an embedded SQL database engine. It runs serverless, meaning it reads and writes directly to ordinary disk files. The code for SQLite is in the public domain, so it is free for any use. SQLite is very compact, even with all features enabled the library size can be less than 750KiB. Also, the database file format is cross-platform. Therefore, it can be copied between different kinds of systems (ex. 32-bit and 64-bit systems).
For these reasons, SQLite is very popular as an application file format. For example, used on edge devices like mobile phones, tablets, and game consoles.
Project setup
Let’s create our project using cargo cargo new sqlx-sqlite-basics-tutorial.
Then let’s add dependencies required to use SQLx in our Cargo.toml file:
[package]
name = "sqlx-sqlite-basics-tutorial"
version = "0.1.0"
edition = "2021"

# See more keys and their definitions at https://doc.rust-lang.org/cargo/reference/manifest.html

[dependencies]
sqlx = { version = "0.6.2", features = ["runtime-tokio-native-tls", "sqlite"]}
tokio = { version = "1.20.0", features = ["macros"]}
As this will be a simple and basic project we don’t need a lot of dependencies:
- sqlx: The Rust SQL Toolkit. An async, pure Rust SQL crate featuring compile-time checked queries without a DSL. Supports PostgreSQL, MySQL, and SQLite. Here we’re choosing the tokio runtime and SQLite features.
- tokio: An event-driven, non-blocking I/O platform for writing asynchronous I/O backed applications. The async-runtime that we will use for async SQL actions.
SQLx queries and operations basics
In this section, we will look at the basic operations and queries.
Creating an SQLite database
Let’s write some code to create our initial database file in main.rs:
use sqlx::{migrate::MigrateDatabase, Sqlite};

const DB_URL: &str = "sqlite://sqlite.db";

#[tokio::main]
async fn main() {
    if !Sqlite::database_exists(DB_URL).await.unwrap_or(false) {
        println!("Creating database {}", DB_URL);
        match Sqlite::create_database(DB_URL).await {
            Ok(_) => println!("Create db success"),
            Err(error) => panic!("error: {}", error),
        }
    } else {
        println!("Database already exists");
    }
}
First, we bring some items into scope: MigrateDatabase and Sqlite. Where the former (MigrateDatabase) is a trait that has functions: create_database, database_exists, and drop_database. We have to bring these into scope to be able to call them on Sqlite. Sqlite represents the database driver.
On line 3 we define the connection string for our SQLite database. This also determines the name of the database file that will be created.
Line 5: annotation to get the tokio runtime, so we have to declare the main function as async on line 6.
Then on line 7, we check if the database exists, if an error occurs we return false with unwrap_or. If the database does not exist we create it on line 9 with Sqlite::create_database(DB_URL). Next, we check for error or success with a match statement.
Running the program should look like this:

After running the code, a new file should appear in our project’s root directory: sqlite.db.
Creating a table with SQLx using Rust code
There are a number of ways to create a table with SQL. For example, using a raw SQL query in the Rust code or using a SQL migration script. First, we will use a query in Rust code. In a later section, we will look at using migration scripts.
To perform queries on the database we first have to connect to it, of course. So, let’s use SqlitePool to create a pool object for connections. Then use that to execute a CREATE TABLE query:
use sqlx::{migrate::MigrateDatabase, Sqlite, SqlitePool};

const DB_URL: &str = "sqlite://sqlite.db";

#[tokio::main]
async fn main() {
    if !Sqlite::database_exists(DB_URL).await.unwrap_or(false) {
        println!("Creating database {}", DB_URL);
        match Sqlite::create_database(DB_URL).await {
            Ok(_) => println!("Create db success"),
            Err(error) => panic!("error: {}", error),
        }
    } else {
        println!("Database already exists");
    }

    let db = SqlitePool::connect(DB_URL).await.unwrap();

    let result = sqlx::query("CREATE TABLE IF NOT EXISTS users (id INTEGER PRIMARY KEY NOT NULL, name VARCHAR(250) NOT NULL);").execute(&db).await.unwrap();
    println!("Create user table result: {:?}", result);
}
As mentioned, we create a connection pool using the DB_URL string on line 17. This SqlitePool::connect call returns Pool<Sqlite>.
We use a reference to this object when executing the CREATE TABLE query on line 19.
Running the program should result in output like this:

The result doesn’t really tell us much, other than that the query was successful. We can use a query on the table schema (sqlite_schema) to reveal all the tables in the database:
use sqlx::{migrate::MigrateDatabase, Row, Sqlite, SqlitePool};

const DB_URL: &str = "sqlite://sqlite.db";

#[tokio::main]
async fn main() {
    if !Sqlite::database_exists(DB_URL).await.unwrap_or(false) {
        println!("Creating database {}", DB_URL);
        match Sqlite::create_database(DB_URL).await {
            Ok(_) => println!("Create db success"),
            Err(error) => panic!("error: {}", error),
        }
    } else {
        println!("Database already exists");
    }

    let db = SqlitePool::connect(DB_URL).await.unwrap();

    let result = sqlx::query("CREATE TABLE IF NOT EXISTS users (id INTEGER PRIMARY KEY NOT NULL, name VARCHAR(250) NOT NULL);").execute(&db).await.unwrap();
    println!("Create user table result: {:?}", result);

    let result = sqlx::query(
        "SELECT name
         FROM sqlite_schema
         WHERE type ='table'
         AND name NOT LIKE 'sqlite_%';",
    )
    .fetch_all(&db)
    .await
    .unwrap();

    for (idx, row) in result.iter().enumerate() {
        println!("[{}]: {:?}", idx, row.get::<String, &str>("name"));
    }
}
Because we want to get column values from the row on line 33 using get, we have to bring Row into scope on line 1.
So, by querying the table sqlite_schema for items with type table we can get the names of all the tables present in the database.
On lines 32-34 we display them by looping through the resulting Vec<SqliteRow>. Using .iter().enumerate() we can get the value and also the index number.
Finally, we get the value of the column on line 33 using get. We can use a string (&str) to index the columns and retrieve the value as a String. We have to specify the types here because get is a function that uses generics.
Now let’s run the program again:

Convert query result into data struct
In this section, we will query some data again. However, instead of using the generic get() function to get values, we deserialize the result into an object. We will write a struct ourselves for this.
Defining the users data struct
Let’s start by defining the data struct for the users table. This table only has two columns so it is very simple:
use sqlx::{migrate::MigrateDatabase, FromRow, Row, Sqlite, SqlitePool};

const DB_URL: &str = "sqlite://sqlite.db";

#[derive(Clone, FromRow, Debug)]
struct User {
    id: i64,
    name: String,
}
We use the derive macro here to implement the FromRow trait. This trait will allow us to use query_as to get results as the data struct we want. We also use Clone for making copies and Debug for easy display as debug information when needed.
Inserting user data, querying and mapping results to a type
Now let’s insert some user data and then query it using query_as and our User struct. We’ll add the following code below the for loop listing the tables:
   let result = sqlx::query("INSERT INTO users (name) VALUES (?)")
        .bind("bobby")
        .execute(&db)
        .await
        .unwrap();

    println!("Query result: {:?}", result);

    let user_results = sqlx::query_as::<_, User>("SELECT id, name FROM users")
        .fetch_all(&db)
        .await
        .unwrap();

    for user in user_results {
        println!("[{}] name: {}", user.id, &user.name);
    }
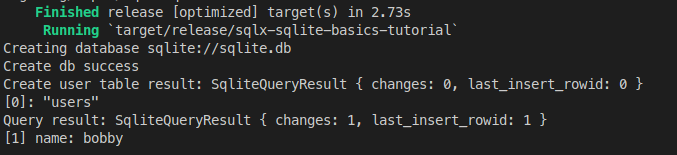
First, we insert a new user record using a parameterized query on lines 42-46. We use a ? symbol in the query here. However, it could also be $ with a number, for example in this case it would be $1. If we use a parameter in the query we also have to bind a value to it with bind(), as seen on line 43.
Next, we print the result from the query execution on line 48.
Then, we use query_as on lines 50-53 to query the users table and map the results to a concrete type.
Finally, we print the results using the fields of the User struct which is much more convenient than using get() on the row object.
Running the program results in an output like this:
Deleting records
While we’re at it, let’s also add a delete query after the insertion query:
    let delete_result = sqlx::query("DELETE FROM users WHERE name=$1")
        .bind("bobby")
        .execute(&db)
        .await
        .unwrap();

    println!("Delete result: {:?}", delete_result);
Nothing new here, we’re simply executing another query. Only this time we use $1 to mark the parameter.
SQLx migrations with SQL and Rust code
So far we have done everything with just Rust code for our SQLx basics with SQLite project. When it comes to creating and updating tables it might be more convenient to make use of the migration mechanism.
Migrations or schema migrations are scripts for updating a database to the desired state. This could be by adding tables, or columns, even removing columns, or tables, changing column types, etc.
Installing the SQLx CLI
To use migrations we have to install the SQLx CLI tool: cargo install sqlx-cli. This will install the command line tool globally.
Adding a migration script
First, let’s remove our current database file sqlite.db and also any other database files like sqlite.db-shm and sqlite.db-wal.
Then, let’s add a migration using the following command from the command prompt in the root of our project directory: sqlx migrate add users. This will create a directory migrations and a file with a timestamp prefix and ending in _users.sql. The timestamp tells the migration code in what order to execute the scripts.
Currently, the file just has a comment line -- Add migration script here. So let’s open it and add the following script:
CREATE TABLE IF NOT EXISTS users
(
    id          INTEGER PRIMARY KEY NOT NULL,
    name        VARCHAR(250)        NOT NULL,
    active      BOOLEAN             NOT NULL DEFAULT 0
);
Applying migrations in Rust code
Now let’s up data our Rust code to use the migration scripts instead of a CREATE TABLE query in code. We should also update our User struct to include the new active column:
use sqlx::{migrate::MigrateDatabase, FromRow, Row, Sqlite, SqlitePool};

const DB_URL: &str = "sqlite://sqlite.db";

#[derive(Clone, FromRow, Debug)]
struct User {
    id: i64,
    name: String,
    active: bool,
}

#[tokio::main]
async fn main() {
    if !Sqlite::database_exists(DB_URL).await.unwrap_or(false) {
        println!("Creating database {}", DB_URL);
        match Sqlite::create_database(DB_URL).await {
            Ok(_) => println!("Create db success"),
            Err(error) => panic!("error: {}", error),
        }
    } else {
        println!("Database already exists");
    }

    let db = SqlitePool::connect(DB_URL).await.unwrap();

    let crate_dir = std::env::var("CARGO_MANIFEST_DIR").unwrap();
    let migrations = std::path::Path::new(&crate_dir).join("./migrations");

    let migration_results = sqlx::migrate::Migrator::new(migrations)
        .await
        .unwrap()
        .run(&db)
        .await;

    match migration_results {
        Ok(_) => println!("Migration success"),
        Err(error) => {
            panic!("error: {}", error);
        }
    }

    println!("migration: {:?}", migration_results);

    let result = sqlx::query(
        "SELECT name
         FROM sqlite_schema
         WHERE type ='table'
         AND name NOT LIKE 'sqlite_%';",
    )
    .fetch_all(&db)
    .await
    .unwrap();

    for (idx, row) in result.iter().enumerate() {
        println!("[{}]: {:?}", idx, row.get::<String, &str>("name"));
    }

    let result = sqlx::query("INSERT INTO users (name) VALUES (?)")
        .bind("bobby")
        .execute(&db)
        .await
        .unwrap();

    println!("Query result: {:?}", result);

    let user_results = sqlx::query_as::<_, User>("SELECT id, name, active FROM users")
        .fetch_all(&db)
        .await
        .unwrap();

    for user in user_results {
        println!(
            "[{}] name: {}, active: {}",
            user.id, &user.name, user.active
        );
    }

    let delete_result = sqlx::query("DELETE FROM users WHERE name=$1")
        .bind("bobby")
        .execute(&db)
        .await
        .unwrap();

    println!("Delete result: {:?}", delete_result);
}
We have updated the User struct. But more importantly, on lines 26-42 we call code for performing database migrations:
    let crate_dir = std::env::var("CARGO_MANIFEST_DIR").unwrap();
    let migrations = std::path::Path::new(&crate_dir).join("./migrations");

    let migration_results = sqlx::migrate::Migrator::new(migrations)
        .await
        .unwrap()
        .run(&db)
        .await;

    match migration_results {
        Ok(_) => println!("Migration success"),
        Err(error) => {
            panic!("error: {}", error);
        }
    }

    println!("migration: {:?}", migration_results);
In this code block we first get the path to the migrations directory by getting the root directory from the CARGO_MANIFEST_DIR environment variable. Then we join the ./migrations directory path onto that.
Next on lines 29-33 we create a new instance of the Migrator and call run(&db) right away to start the migrations process.
Finally, we print the result of the migration on lines 35-42.
Updating users query
We should also update our SELECT query and printing of the results of the query:
    let user_results = sqlx::query_as::<_, User>("SELECT id, name, active FROM users")
        .fetch_all(&db)
        .await
        .unwrap();

    for user in user_results {
        println!(
            "[{}] name: {}, active: {}",
            user.id, &user.name, user.active
        );
    }
Here we added the active column in the query as well as the in the loop printing the results. We have to add the column in the query when we deserialize to the User object, because the field is not defined as optional using Option<T>.
Result of running the program
Running the program now results in the following output:
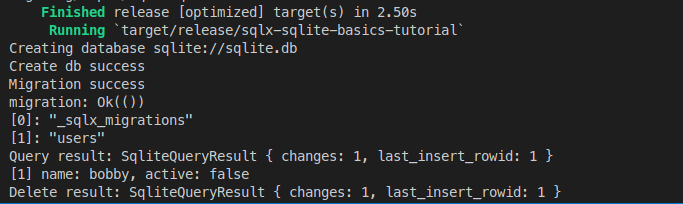
We can see that the migration is successful and that users table is again in the sqlite_schema. Furthermore, there is another table listed as well: the _sqlx_migrations table. This is where the system registers what migrations have been performed.
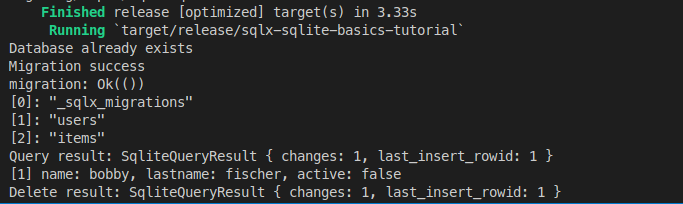
Adding another table via migration
Adding another table is of course simple in the same way we added the users table using the command: sqlx migrate add items.
This will add another file in the migrations directory with the suffix _items.sql. Let’s add the following script:
CREATE TABLE IF NOT EXISTS items
(
    id          INTEGER PRIMARY KEY NOT NULL,
    name        VARCHAR(250)        NOT NULL,
    price       FLOAT               NOT NULL DEFAULT 0
);
Updating a table
Of course, we can also update a table to add a new column. For example, to add a lastname to the users table. Let’s add a migration script for that using the command sqlx migrate add users_lastname. And then add the following script to the file with the _users_lastname.sql suffix:
ALTER TABLE users ADD lastname VARCHAR(250) NOT NULL DEFAULT 'unknown';
With this we need to update the code in the following way:
#[derive(Clone, FromRow, Debug)]
struct User {
    id: i64,
    name: String,
    lastname: String,
    active: bool,
}
Update the select query and printing:
    let result = sqlx::query("INSERT INTO users (name, lastname) VALUES (?,?)")
        .bind("bobby")
        .bind("fischer")
        .execute(&db)
        .await
        .unwrap();

    println!("Query result: {:?}", result);

    let user_results = sqlx::query_as::<_, User>("SELECT id, name, lastname, active FROM users")
        .fetch_all(&db)
        .await
        .unwrap();

    for user in user_results {
        println!(
            "[{}] name: {}, lastname: {}, active: {}",
            user.id, &user.name, &user.lastname, user.active
        );
    }
And the result:
Conclusion
In this simple and quick tutorial, we learned the basics of using the SQLx crate and creating a SQLite database. We learned a little bit about migrations and parameterized queries as well. Now we have a foundation for writing simple applications that make use of a database for information storage.
The repository with the finished project can be found here: https://github.com/tmsdev82/sqlx-sqlite-basics-tutorial.
Please follow me on Twitter to get updates on more Rust programming-related tutorials:
Follow @tmdev82
> To use migrations we have to install the SQLx CLI tool: cargo install sql-cli. This will install the command line tool globally.
It should be `cargo install sqlx-cli`