In this article, we will create a quick and dirty crypto triangle arbitrage dashboard frontend with React, to display the triangle arbitrage calculation results and related data. The dashboard will connect to our backend, described in the article: Crypto triangle arbitrage dashboard: how to, part 1, using a WebSocket connection. Then, the triangle arbitrage data received from the backend will be displayed in a simple table.
The completed React project can be found on my GitHub: here.
Prerequisites
The following is required to be able to follow the article and run the frontend and receive data:
- The completed code project from the backend article. Here is a link to the repository on my GitHub too.
- Experience with typescript.
- Experience with React and how to create a project.
Creating the frontend project for the crypto triangle arbitrage dashboard
Let’s use the npx command to create a new project: npx create-react-app triangle-arbitrage-dashboard-frontend --template typescript.
We use the typescript template because we like type hinting.
First, clean up the generated code in the App.css and App.tsx files:
App.css
.App {
  text-align: center;
  background: black;
  min-height: 100vh;
  display: flex;
  flex-direction: column;
  align-items: center;
  justify-content: center;
  font-size: calc(10px + 2vmin);
  color: white;
}

.title {
  font-size: calc(10px + 2vmin);
}
App.tsx
import React from 'react';
import './App.css';

function App() {
  return (
    <div className="App">
      <div className="title">
        Crypto triangle arbitrage dashboard
      </div>
    </div>
  );
}

export default App;
Triangle arbitrage data classes
Before we can receive data from our backend it helps to have the data mapped out into classes. The simplest way to set this up is to follow a similar structure to what the backend uses. Considering that, let us look at the structs our Rust backend uses. The following listing shows the contents of the models.rs file:
use serde::de;
use serde::{Deserialize, Deserializer, Serialize};

#[derive(Debug, Deserialize, Serialize, Clone)]
pub struct OfferData {
    #[serde(deserialize_with = "de_float_from_str")]
    pub price: f64,
    #[serde(deserialize_with = "de_float_from_str")]
    pub size: f64,
}

#[derive(Debug, Deserialize, Serialize, Clone)]
#[serde(rename_all = "camelCase")]
pub struct DepthStreamData {
    pub last_update_id: u32,
    pub bids: Vec<OfferData>,
    pub asks: Vec<OfferData>,
}

pub fn de_float_from_str<'a, D>(deserializer: D) -> Result<f64, D::Error>
where
    D: Deserializer<'a>,
{
    let str_val = String::deserialize(deserializer)?;
    str_val.parse::<f64>().map_err(de::Error::custom)
}

#[derive(Debug, Deserialize, Serialize, Clone)]
pub struct DepthStreamWrapper {
    pub stream: String,
    pub data: DepthStreamData,
}

#[derive(Debug, Serialize, Clone)]
pub struct TriangleArbitrageData {
    pub triangle: [String; 3],
    pub profits: Vec<f64>,
    pub start_pair_data: DepthStreamWrapper,
    pub mid_pair_data: DepthStreamWrapper,
    pub end_pair_data: DepthStreamWrapper,
}
This is all pretty straightforward, and we can ignore the function on line 20. So, let’s create a directory called classes in our project’s src dir, and add a file ArbitrageData.ts. In this file, we will create the following classes:
class OfferData {
  price: number;
  size: number;

  constructor(price: number, size: number) {
    this.price = price;
    this.size = size;
  }
}

class DepthStreamData {
  last_update_id: number;
  asks: Array<OfferData>;
  bids: Array<OfferData>;

  constructor(
    last_update_id: number,
    asks: Array<OfferData>,
    bids: Array<OfferData>
  ) {
    this.last_update_id = last_update_id;
    this.asks = asks;
    this.bids = bids;
  }
}

class DepthStreamWrapper {
  stream: String;
  data: DepthStreamData;

  constructor(stream: String, data: DepthStreamData) {
    this.stream = stream;
    this.data = data;
  }
}

class TriangleArbitrageData {
  triangle: Array<String>;
  profits: Array<number>;
  start_pair_data: DepthStreamWrapper;
  mid_pair_data: DepthStreamWrapper;
  end_pair_data: DepthStreamWrapper;

  constructor(
    triangle: Array<String>,
    profits: Array<number>,
    start_pair_data: DepthStreamWrapper,
    mid_pair_data: DepthStreamWrapper,
    end_pair_data: DepthStreamWrapper
  ) {
    this.triangle = triangle;
    this.profits = profits;
    this.start_pair_data = start_pair_data;
    this.mid_pair_data = mid_pair_data;
    this.end_pair_data = end_pair_data;
  }
}

export { OfferData, DepthStreamData, DepthStreamWrapper, TriangleArbitrageData };
The data structure is pretty much one for one converted, aside from some different types.
Connecting to the crypto triangle arbitrage backend WebSocket
In this section, we will add functionality to connect to the backend using a WebSocket connection.
Before we get into displaying the data in a table, let’s first write code that establishes a connection and add a simple way to confirm that we are receiving data.
Here is the updated code for App.tsx:
import React, { useState } from "react";
import "./App.css";

let ws: WebSocket;

function App() {
  const [connected, setConnected] = useState<boolean>(false);

  function onOpen(event: any): void {
    console.log("Opened WebSocket connection.");
    setConnected(true);
  }

  function onMessage(event: any): void {
    let parsedData = JSON.parse(event.data);
    console.log("received data for: " + parsedData.triangle);
  }

  function connectToBackend() {
    console.log("Connecting to backend..");
    ws = new WebSocket("ws://127.0.0.1:8000/ws");
    ws.onopen = onOpen;
    ws.onmessage = onMessage;
  }

  function disconnectFromBackend() {
    console.log("Disconnected.");
    if (ws) {
      ws.close();
    }
    setConnected(false);
  }

  return (
    <div className="App">
      <div>Crypto triangle arbitrage dashboard</div>
      <div>
        {connected ? (
          <button onClick={disconnectFromBackend}>Disconnect</button>
        ) : (
          <button onClick={connectToBackend}>Connect</button>
        )}
      </div>
    </div>
  );
}

export default App;
This will show a connect button in the interface when we are not yet connected and a disconnect button when we are connected. The connect button calls connectToBackend which will create a new WebSocket object to connect to the locally running crypto triangle arbitrage dashboard backend. We should make sure to start the backend before clicking this button.
We have implemented two event handler functions: onOpen and onMessage. The onOpen function will be called when the connection is established successfully and just prints a message and sets connected to true:
  function onOpen(event: any): void {
    console.log("Opened WebSocket connection.");
    setConnected(true);
  }
Next, the onMessage function handles all incoming message events. We will add more to this function in the next section to handle the triangle arbitrage data. Currently, it just prints a small part of the data, the coin symbols used in the triangle, to the console:
  function onMessage(event: any): void {
    let parsedData = JSON.parse(event.data);
    console.log("received data for: " + parsedData.triangle);
  }
With all this code in place, start the backend and frontend projects, then click the connect button. Opening up the dev tools of your browser and looking at the console output should look something like this:

Displaying the crypto triangle arbitrage data
Finally, let’s process the data and display it in a simple table.
To make the data table look a bit presentable let’s update the App.css:
.App {
  text-align: center;
  background: black;
  min-height: 100vh;
  display: flex;
  flex-direction: column;
  align-items: center;
  justify-content: center;

  color: white;
}

.title {
  font-size: calc(10px + 2vmin);
}

table, td, th {
  border: 1px solid white;
}

td {
  padding: 5px 10px;
}

.profit {
  color: rgb(31, 160, 31);
}

.loss {
  color: rgb(221, 49, 49);
}
Then we can update App.tsx to handle and display the arbitrage data.
Update the imports to import the TriangleArbitrageData class:
import React, { useState } from "react";
import "./App.css";
import { TriangleArbitrageData } from "./classes/ArbitrageData";
Adding a new useState line for holding and setting the data:
function App() {
  const [connected, setConnected] = useState<boolean>(false);
  const [triangleArbitrageData, setTriangleArbitrageData] = useState<TriangleArbitrageData>();
Updating the onMessage to parse data to a TriangleArbitrageData object, then updating the state variable:
function onMessage(event: any): void {
    let parsedData: TriangleArbitrageData = JSON.parse(event.data);
    console.log("received data for: " + parsedData.triangle +
    ": " + parsedData.profits);

    setTriangleArbitrageData(parsedData);
}
Now, let’s write a function to render the data table:
function renderTriangleArbitrageDataTable() {
    return (
      <div>
        <table>
          <thead>
            <tr>
              <th>triangle</th>
              <th>potential profit</th>
            </tr>
          </thead>
          <tbody>
            {triangleArbitrageData?.profits.map( (triangleProfit, i) => {
              return (
                <tr key={i}>
                  <td>
                    {triangleArbitrageData.triangle}
                  </td>
                  <td className={triangleProfit > 0 ? "profit" : triangleProfit === 0 ? "" : "loss"  }>
                    {triangleProfit}
                  </td>
                </tr>
              )
            } ) }
          </tbody>
        </table>
      </div>
    );
 }
Just a simple table where the rows are generated from the profits array using the map function. We set the className based on if the profit number is positive or negative or 0.
Finally, we have to update the main HTML rendering:
return (
    <div className="App">
      <div className="title">Crypto triangle arbitrage dashboard</div>
      <div>
        {connected ? (
          <button onClick={disconnectFromBackend}>Disconnect</button>
        ) : (
          <button onClick={connectToBackend}>Connect</button>
        )}
      </div>
      <div>
          {triangleArbitrageData ? renderTriangleArbitrageDataTable() : <div>No data to show, please connect to backend.</div> }
      </div>
    </div>
 );
The end result
Having updated all that we can run the backend again and connect to the frontend to see the data coming in and being updated in the UI:
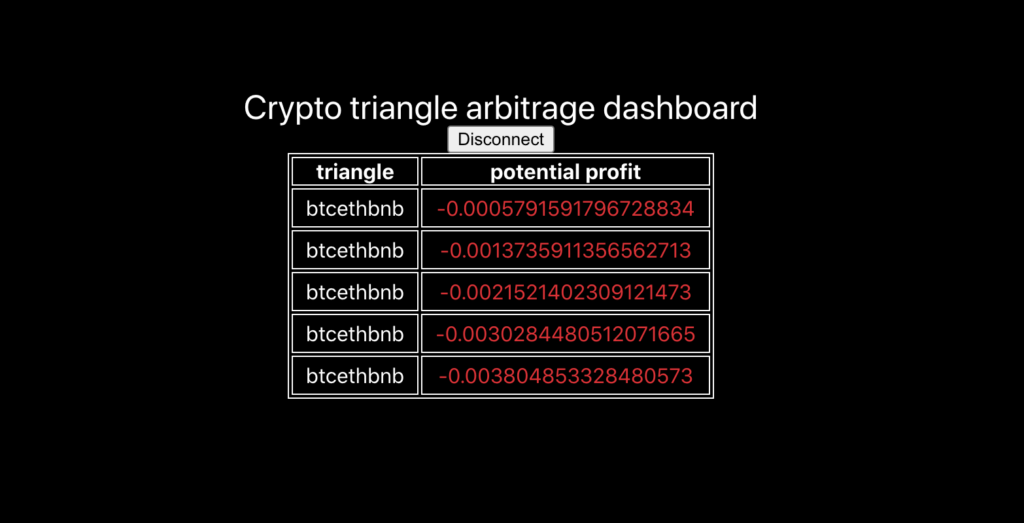
Unfortunately, it was all red this time!
Conclusion
We have completed our simple frontend for our crypto triangle arbitrage dashboard. From this, we learned how to connect to our backend using a WebSocket, and how easy it is to convert the incoming data to an object for display.
The frontend helps us visually see potential profit opportunities. However, we are only showing one triangle here. The next step for the backend and frontend could be to get and show data for many different triangles.
Please check out the completed React project on my GitHub: here.
Part 1 of this series, where the creation of the backend is explained: Crypto triangle arbitrage dashboard: how to, part 1.
The next part is also available: Crypto triangle arbitrage dashboard, part 3: how to add logging
Hello!
I’ve really enjoyed your blog. Thank you for posting.
This project uses react for the front end. React seems to add a lot of overhead to the project. Would it be possible to use a rust framework like rocket, yew or other to make the frontend?