In this tutorial, we will learn how to use JSON Web Tokens (JWT) with the Rust programming language. We will go over the basics of JWT, the structure of a JWT, how to encode and decode a JWT. After reading this tutorial you will have a good fundamental understanding of how to use JSON Web Tokens.
We will use the jsonwebtoken crate for this article.
The full code example for this tutorial can be found on my GitHub: here.
What is a JWT
Before getting into the code, let’s first look at what a JSON Web Token is. Furthermore, why and when we would use it in our projects.
JSON Web Token (JWT) is an open standard (RFC 7519) that defines a compact and self-contained way for securely transmitting information between parties as a JSON object. This information can be verified and trusted because it is digitally signed.
https://jwt.io/introduction
What this means is that JWT is structured information that is signed so that its contents can be trusted.
The JWT is an encoded string consisting of 3 parts that looks like this: xxxxx.yyyyyy.zzzzzz. The parts are as follows: header, payload, and signature.
- header: typically contains type (typ), JWT in this case, and signing algorithm (alg), default being SHA256.
- payload: the payload contains a “claims” structure, with information about an entity. More on that later.
- signature: the signature is created from the encoded header, encoded payload, a secret, and the signing algorithm.
When and why to use JWT
The most common use case is to use JWTs for authorization. We can also use JWTs to transfer information between microservice components.
Authorization
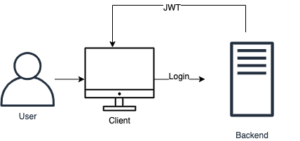
In this case, a user logs in to your web application through the frontend using their credentials. And then the server returns a JWT to the client. This JWT typically contains information about the user, for example, username and access roles. Then, in subsequent requests to the server, the JWT can be used as a means of verifying the authorization of the requests.
Information transfer
When working with a microservice design it could be useful to transfer information in JWT format. For some components, we might not want them to be able to access the database. Or if we want to keep the users’ information in a database separate from other data. However, if these other components need information about the user, for example, JWTs are a good way to pass that information around.
Since JWTs are signed and each component can verify that the information contained within is correct.
How to use JWT with Rust
In this section, we are going to write the code to create a token, encode and sign it, and then decode it.
JWT Rust project set up
First, we are going to create the project with cargo new rust-jwt-tutorial. Then let’s add the following dependencies to the Cargo.toml file:
- jsonwebtoken: Create and decode JWTs in a strongly typed way.
- serde: A generic serialization/deserialization framework.
- chrono: Date and time library for Rust. For example, we will use this to create timestamps for the token expiration time.
[package]
name = "rust-jwt-tutorial"
version = "0.1.0"
edition = "2018"

# See more keys and their definitions at https://doc.rust-lang.org/cargo/reference/manifest.html

[dependencies]
jsonwebtoken = "7"
serde = { version = "1.0", features = ["derive"]}
chrono = "0.4"
Let’s add some use declarations to main.rs, to make things more readable:
use chrono::{Duration, Utc};
use jsonwebtoken::{decode, encode, DecodingKey, EncodingKey, Header, Validation};
use serde::{Deserialize, Serialize};
These will be explained as we go through the rest of the code in main.rs.
The JWT claims struct
The word “claims” is a term with a specific meaning in the context of JWT.
Claims are statements about an entity (typically, the user) and additional data. There are three types of claims: registered, public, and private claims.
https://jwt.io/introduction
- Registered claims, are claims that are predefined in the standards. Such as sub (subject), exp (expiration time), and iat (issued at). More: https://datatracker.ietf.org/doc/html/rfc7519#section-4.1.
- Public claims, can be defined at will by those using JWT.
- Private claims, custom claims create to share information between parties that agree on using them. But they are neither registered or public claims. For example, several components of a microservice architecture could use private claims to pass extra custom information to each other.
In Rust, in this example, we represent the claims as a struct with certain fields:
#[derive(Deserialize, Serialize, Debug)]
struct Claims {
    sub: String,
    iat: usize,
    exp: usize,
    test: String,
}
Here we implement a struct with three “registered claims”: sub (subject), iat (issued at), and exp (expiration time). The time fields, iat and exp, are UNIX timestamps, also known as “the number of non-leap seconds since January 1st 1970”.
There is also one “private claim” called test, which is just there for demonstration purposes. For now, all these fields are simple basic types.
We derive from serde::Deserialize and serde::Serialize to be able to serialize and deserialize the token. The use of Debug here just helps with printing the token information to the terminal.
Encode a JWT with Rust
In this section, we will encode the claims data. For this, we just need a key, a signing algorithm, and some data. We will keep it simple and use "secret" as the key and the default signing algorithm which is sha256. Normally, the secret would be a long unique phrase with a minimum length of 32 characters, for security reasons.
fn main() {
    let key = b"secret";
    let my_iat = Utc::now().timestamp();
    let my_exp = Utc::now()
        .checked_add_signed(Duration::seconds(5))
        .expect("invalid timestamp")
        .timestamp();
    let my_claims = Claims {
        sub: "h@d.com".to_owned(),
        iat: my_iat as usize,
        exp: my_exp as usize,
        test: "hello world".to_owned(),
    };

    let token = match encode(
        &Header::default(),
        &my_claims,
        &EncodingKey::from_secret(key),
    ) {
        Ok(t) => t,
        Err(_) => panic!(),
    };

    println!("token: {:?}", token);
}
Here we create the secret as byte array on line 14. Then create the time stamps using chrono::Utc::now. In the case of my_exp we add 5 seconds, in order to set the expiration time 5 seconds into the future. Using this short time period we can later test the expiration validation mechanism more easily. Normally we would make the expiration time much longer.
Next, we create the Claims object and fill in all the fields, on line 20-25.
Then, we use jsonwebtoken::encode to encode the token passing in a header, claims, and a key. The header typically has two parts: type of token, and signing algorithm. In this case the type is “JWT”, and the default signing algorithm sha256. Therefore, we can use &Header::default() to get default header values.
Finally, we pass in the Claims object my_claims and also pass in an EncodingKey object created from the key we declared earlier.
If all goes well an encoded string is returned and assigned to token. Running the program now should print the encoded string to the terminal:
token: "eyJ0eXAiOiJKV1QiLCJhbGciOiJIUzI1NiJ9.eyJzdWIiOiJoQGQuY29tIiwiaWF0IjoxNjMyNjc3NDk4LCJleHAiOjE2MzI2Nzc1NTgsInRlc3QiOiJoZWxsbyB3b3JsZCJ9.pWXQfPePKrEt6i8QS6KZ7s-X0RB07fz8DIAogrClfF8"
As mentioned at the start of the article, these are the three parts mentioned before: header, payload, and signature.
Decoding a JWT
Now that we can create a JWT, let’s look at how to decode the information in a JWT to reveal the information contained within.
Using the jsonwebtoken crate this is very easy. We just need the token, the decoding key, and a validation object. Let’s start with default validation:
    let token_data = match decode::<Claims>(
        &token,
        &DecodingKey::from_secret(key),
        &Validation::default(),
    ) {
        Ok(c) => c,
        Err(err) => {
            println!("err: {:?}", err.kind());
            panic!()
        }
    };

    println!("token data: {:?}", token_data);
Running the program now results in the following output:
token: "eyJ0eXAiOiJKV1QiLCJhbGciOiJIUzI1NiJ9.eyJzdWIiOiJoQGQuY29tIiwiaWF0IjoxNjMyNjc3NDk4LCJleHAiOjE2MzI2Nzc1NTgsInRlc3QiOiJoZWxsbyB3b3JsZCJ9.pWXQfPePKrEt6i8QS6KZ7s-X0RB07fz8DIAogrClfF8"
token data: TokenData { header: Header { typ: Some("JWT"), alg: HS256, cty: None, jku: None, kid: None, x5u: None, x5t: None }, claims: Claims { sub: "h@d.com", iat: 1632677498, exp: 1632677558, test: "hello world" } }
Decoding of the JWT was successful and the information we encoded in the claims earlier can all be seen, together with the header.
Validating the JWT
In this section, we are going to look at some basic validation. By default, the expiration time is validated, for example. Let’s demonstrate this now.
First, new use declarations:
use chrono::{Duration, Utc};
use jsonwebtoken::{decode, encode, DecodingKey, EncodingKey, Header, Validation};
use serde::{Deserialize, Serialize};
use std::{thread, time};
Then we will add a thread::sleep before decoding the token:
    println!("Waiting...");
    thread::sleep(time::Duration::from_secs(6));

    let token_data = match decode::<Claims>(
        &token,
        &DecodingKey::from_secret(key),
        &Validation::default(),
    ) {
        Ok(c) => c,
        Err(err) => {
            println!("err: {:?}", err.kind());
            panic!()
        }
    };
Make sure the sleep time is longer than the configured expiration time. The program will output an error now:
token: "eyJ0eXAiOiJKV1QiLCJhbGciOiJIUzI1NiJ9.eyJzdWIiOiJoQGQuY29tIiwiaWF0IjoxNjMyNjg2NjQ5LCJleHAiOjE2MzI2ODY2NTQsInRlc3QiOiJoZWxsbyB3b3JsZCJ9.fzgcGUGQh3oVO4ClRh6f1EO169RxsG1gOriDr9qD8sc"
Waiting...
err: ExpiredSignature
thread 'main' panicked at 'explicit panic', src/main.rs:50:13
This is what we expected.
Let’s look at validating another basic element sub. For this, we need to create a Validation object and designate what the value of sub should be.
Let’s also remove the sleep thread line, while we are at it, so we don’t have to wait for validation to happen. We will first demonstrate a validator that the token will not pass:
    // println!("Waiting...");
    // thread::sleep(time::Duration::from_secs(6));
    let validator = Validation {
        sub: Some("a@d.com".to_owned()),
        ..Validation::default()
    };
    let token_data = match decode::<Claims>(&token, &DecodingKey::from_secret(key), &validator) {
        Ok(c) => c,
        Err(err) => {
            println!("err: {:?}", err.kind());
            panic!()
        }
    };
On lines 41-44 we create a validator object, where we assign a value to sub and leave the rest on default. The value for sub will not match the one in the JWT we created earlier so the program’s output will show the following error:
err: InvalidSubject
thread 'main' panicked at 'explicit panic', src/main.rs:49:13
Now if we change the value to h@d.com, the token will pass the validation and show the token contents as output like before.
Conclusion
We have learned how to use JWT with rust, by looking at the basic aspects of JWT step by step using Rust code examples. With these basics we have a good foundation and can now encode information in a JWT, decode a JWT and validate its contents.
The full code example for this tutorial can be found on my GitHub: here.
Please follow me on Twitter for updates on upcoming Rust programming articles:
Follow @tmdev82
Tim, this is a really well written article on creating and using json web tokens in Rust.
I’m glad I found your article,
I’m actually in the process of implementing json web tokens –
in an authentication and authorization system I’m building in Rust.
Thanks for sharing your knowledge on the topic.