In this article, we will go through the steps of how to swap tokens on Uniswap V2 with Rust and Web3. Using the Rust programming language we will connect to the Ethereum (test) network and interact with Uniswap. There are multiple versions of Uniswap, but in this article, we will perform transactions with Uniswap V2.
Important: We will use infura.io to get a connection to an Ethereum node for this article. Infura.io will not maintain any private keys on our behalf to sign transactions with. That means we have to sign the transactions ourselves and send a raw transaction. Instead of calling a contract method directly.
The code for the completed “swap on Uniswap V2 with Rust” project can be found on my Github: here.
Why Uniswap
Why Uniswap? Well, Uniswap is the biggest and most well-known decentralized exchange on the Ethereum blockchain. As a matter of fact, it is the biggest of any of the decentralized exchanges anywhere. So, it is a good idea to learn how to work with it, if we want to do things in the crypto space.
What is Uniswap
As mentioned Uniswap is a decentralized exchange. The main points are, Uniswap:
- is an automated market maker using liquidity pools that determine the value of assets.
- is also totally permissionless, so anyone can participate.
- only allows trading of ERC20 tokens on the Ethereum network.
Some core concepts to know about concerning Uniswap:
- ERC20: ERC20 tokens are fungibile tokens on Ethereum. Uniswap supports all standard ERC20 implementations.
- Factory: A smart contract that deploys a unique smart contract for any ERC20/ERC20 trading pair.
- Pair: A smart contract deployed from the Uniswap V2 Factory that enables trading between two ERC20 tokens.
- Pool: Liquidity within a pair is pooled across all liquidity providers.
- Liquidity provider / LP: A liquidity provider is someone who deposits an equivalent value of two ERC20 tokens into the liquidity pool within a pair. Liquidity providers take on price risk and are compensated with fees.
- Mid price: The price between what users can buy and sell tokens at a given moment. In Uniswap this is the ratio of the two ERC20 token reserves.
This is enough for now, more terms here.
For a more detailed explanation of what Uniswap is and what its aim is, visit the Uniswap documentation page.
Uniswap versions
There are actually 3 versions of Uniswap at the time this article was written. And by the nature of smart contracts, all versions of Uniswap are still up and available to use.
Uniswap V1
Only allows swapping between ETH and one ERC20 token at a time. Meaning, that if you want to swap BAL for AAVE, you have to first trade BAL for ETH and then go to the ETH-AAVE liquidity pool to trade the ETH for AAVE tokens. Prices feeds on Uniswap V1 are not decentralized and can be manipulated. V1 was a good proof-of-concept, but it’s not really in use anymore.
Uniswap V2
The main difference with V1 is that V2 allows swapping one ERC20 token for another ERC20 token directly. Besides that, V2 is very decentralized and not as easily manipulated. There are more features and bug fixes, but knowing these basics is enough for now.
Here is an image illustrating liquidity provider and Uniswap Pool concepts:

For more information see the Uniswap V2 documentation.
Uniswap V3
This version builds on concepts of V2, of course. But, provides increased capital efficiency and fine-tuned control to liquidity providers, improves the accuracy and convenience of the price oracle, and has a more flexible fee structure. As well as other features. For more information see the Uniswap V3 documentation.
With this background information in mind, we will start writing code for our project.
What to use Uniswap V2 or Uniswap V3?
Uniswap V2 and Uniswap V3 are both in use. We will be using Uniswap V2 in this article. Because its API is a bit easier to follow than Uniswap V3’s API. We will get to Uniswap V3 in a later article.
Prerequisites
We are going to learn how to swap on Uniswap V2 with Rust, so I recommend having some familiarity with Web3, Smart contracts, and Rust before reading this article.
We will be building on an earlier article I wrote: Rust Web3 connect to Ethereum blockchain: how to. I recommend reading that one if you haven’t already.
If you want to follow along please have:
- Access to an Ethereum node for a test network, for example through infura.io.
- A crypto wallet with fake Eth on a test network, for example using metamask.
Create and set up the swap tokens on Uniswap project
We start by creating a Rust project and adding the crates we will be using.
cargo new rust-uniswap-tutorial
After the project creation is completed, open Cargo.toml and add the following to the dependencies section:
[dependencies]
hex = "0.4"
web3 = "0.17.0"
tokio = { version= "1", features = ["full"] }
dotenv = "0.15.0"
secp256k1 = "0.20.3"
We should have a .env file in the root directory of the project as well. This .env should contain an endpoint URL to an Ethereum node, an account address to a wallet containing (fake) ETH, and a private key for our wallet. In the previous article, we set up an endpoint to the Rinkeby test network, through infura, and a wallet with fake ETH.
The private key can be exported from the Metamask wallet interface under “Account details”.
We will use the test network and fake ETH so that we don’t lose any actual money in our journey to learn how to swap tokens on Uniswap with Rust and other blockchain-related subjects.
The .env contents should look something like this:
INFURA_RINKEBY=wss://rinkeby.infura.io/ws/v3/xxxxxxx
PRIVATE_TEST_KEY=xxxxxxxxxxxx
ACCOUNT_ADDRESS=xxxxxxxxxx
Set up the Ethereum network connection with Web3 and Infura.io
Setting up a connection to the Ethereum network is easy using the Web3 crate.
The below code shows an example from the article about Web3 and Ethereum basics. In this example, a WebSocket connection is established, and then the account is added to the accounts list. Finally, the balance is printed.
use std::env;
use std::str::FromStr;

use web3::contract::{Contract, Options};
use web3::types::{Address, H160, U256};

#[tokio::main]
async fn main() -> web3::Result<()> {
    dotenv::dotenv().ok();

    let websocket = web3::transports::WebSocket::new(&env::var("INFURA_RINKEBY").unwrap()).await?;
    let web3s = web3::Web3::new(websocket);

    let mut accounts = web3s.eth().accounts().await?;
    accounts.push(H160::from_str(&env::var("ACCOUNT_ADDRESS").unwrap()).unwrap());
    println!("Accounts: {:?}", accounts);

    let wei_conv: U256 = U256::exp10(18);
    for account in accounts {
        let balance = web3s.eth().balance(account, None).await?;
        println!(
            "Eth balance of {:?}: {}",
            account,
            balance.checked_div(wei_conv).unwrap()
        );
    }
    Ok(())
}
Let’s do a quick refresher of what is happening here.
#[tokio::main]
async fn main() -> web3::Result<()> {
    dotenv::dotenv().ok();

    let websocket = web3::transports::WebSocket::new(&env::var("INFURA_RINKEBY").unwrap()).await?;
    let web3s = web3::Web3::new(websocket);
On line 3 we enable the async run time using tokio.
Then, on line 5, we read the .env file.
Finally, On lines 7 and 8 we create a new WebSocket connection object. Then we instance the Web3 API wrapper object that enables us to use Web3 to talk to the Ethereum network.
    let mut accounts = web3s.eth().accounts().await?;
    accounts.push(H160::from_str(&env::var("ACCOUNT_ADDRESS").unwrap()).unwrap());
    println!("Accounts: {:?}", accounts);

    let wei_conv: U256 = U256::exp10(18);
    for account in accounts {
        let balance = web3s.eth().balance(account, None).await?;
        println!(
            "Eth balance of {:?}: {}",
            account,
            balance.checked_div(wei_conv).unwrap()
        );
    }
Here we get the accounts list, add a new one, and then print the balances of accounts in the list. The balance.checked_div is a method to do a checked division on the balance which is a very large number. The balance is in WEI, so if we want to convert the number to ETH we have to divide by how much WEI 1 ETH is.
Swap ETH for Tokens using a Router
The easiest way to learn to swap tokens on Uniswap V2 with Rust is to swap using a router. A router is a stateless smart contract. They provide methods to safely swap to and from different assets. For example, for swapping ETH to DAI or DAI to ETH. The router also provides other functionality such as managing liquidity pools. However, we will not talk about the other functionalities in this article.
There are 2 routers for Uniswap V2: router01 and router02. The router01 contract is unsafe, so we will use router02.
Gather the required pieces for swapping
Let’s say we only have ETH in our wallet, and we want to swap it for a token, an ERC20 token to be exact. We will need the following information:
- Router02 smart contract address: to be able to create a contract object.
- Router02 smart contract ABI in JSON format: to be able create a contract object and to call the contract’s functions.
- WETH token (Wrapped ETH, a ERC20 compatible version of ETH) address: ETH has to be swapped for WETH first, which will then be swapped for other tokens.
- Token address of the token we want to swap for.
- Recepient wallet address.
Router02 address and contract ABI
Luckily for us, the Router02 smart contract’s address is easy to find as it is listed in the documentation and is the same on all the networks: 0x7a250d5630B4cF539739dF2C5dAcb4c659F2488D.
We can use that address to look up the contract on etherscan.io to get the smart contract details:
https://rinkeby.etherscan.io/address/0x7a250d5630B4cF539739dF2C5dAcb4c659F2488D
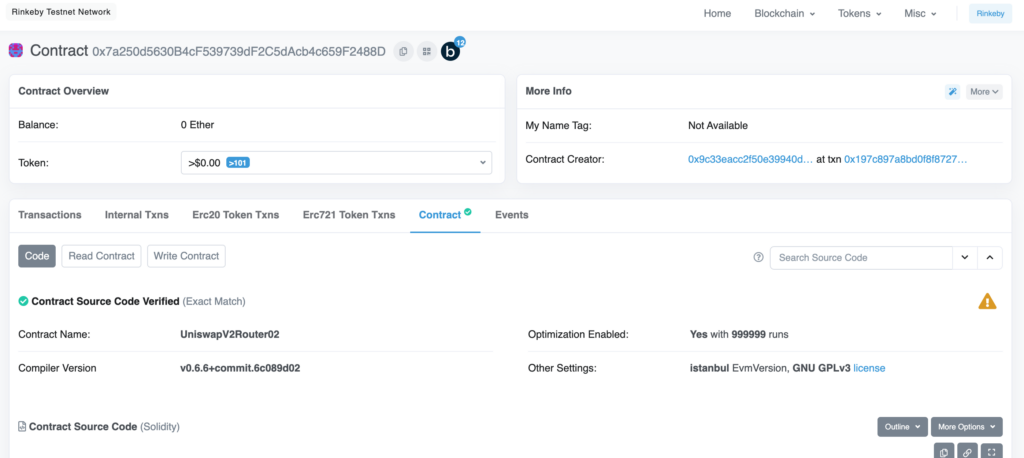
Scroll down on the contract page to find the ABI section and copy it:
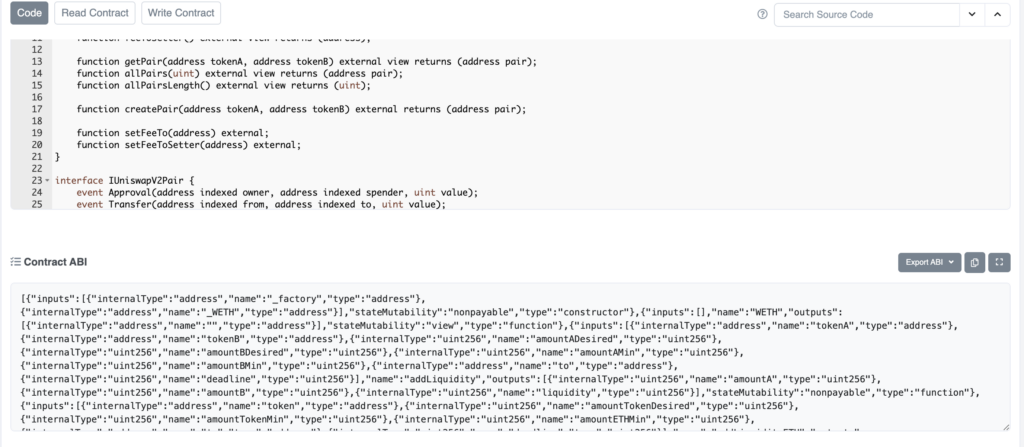
Copy the ABI JSON and past it into a file in the src dir, called router02_abi.json.
Get the WETH token address
The Router02 contract contains a function called swapExactETHForTokens, which we will use to swap ETH for DAI. Earlier it was mentioned we need to swap to WETH first before we can swap for other tokens, and swapExactETHForTokens helps with this. This function has a path parameter where you can enter multiple token addresses, to swap for until you reach the target token. However, the first token in the path for swapExactETHForTokens has to be WETH.
For that reason, we need to get the WETH token address. This is easy to do using the Router02 contract because it contains a function for that purpose. Let’s write the code for that now:
    let router02_addr = Address::from_str("0x7a250d5630B4cF539739dF2C5dAcb4c659F2488D").unwrap();
    let router02_contract = Contract::from_json(
        web3s.eth(),
        router02_addr,
        include_bytes!("router02_abi.json"),
    )
    .unwrap();

    let weth_addr: Address = router02_contract
        .query("WETH", (), None, Options::default(), None)
        .await
        .unwrap();

    println!("WETH address: {:?}", &weth_addr);
On line 30 we create an Address object to pass into the Contract::from_json function. Then we call Contract::from_json passing in our WebSocket object, the address to the router02 contract, and the contents of the router02_abi.json file.
We now have a contract object that allows us to query or call functions. In this context, query is for readonly functions and call is for functions that change a state.
Online 38 we call the query and pass "WETH" as the contract function name that we want to query. The function has no inputs so all empty and default parameter values can be entered by us here.
Running the program now results in the following output:
Accounts: [0x4a3d4859929a890698efad79c7b0e95a13c0ae61]
Eth balance of 0x4a3d4859929a890698efad79c7b0e95a13c0ae61: 3
WETH address: 0xc778417e063141139fce010982780140aa0cd5ab
Finding another ERC20 token address
Because we don’t just want to swap ETH for WETH on Uniswap V2 with our Rust project, we need at least one more token address.
However, there is something to be cautious of. Because we are using the Rinkeby test network some of the tokens might not have enough liquidity to support swapping. Another thing to keep in mind is, there are a ton of clones of tokens, so it is hard to tell which token is useful.
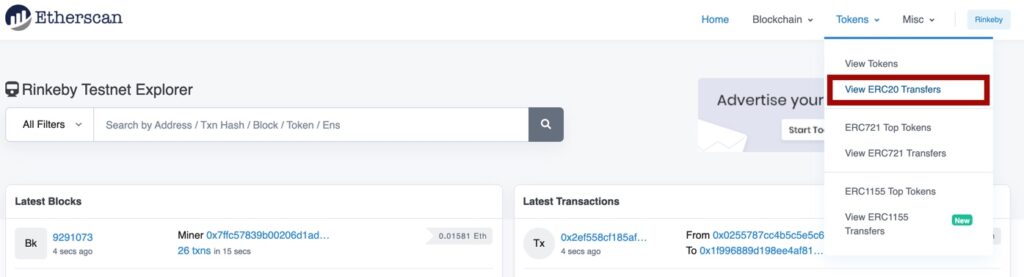
One way to find a token with liquidity that can be used for testing is to look at the ERC20 transfers page that can be found under the Tokens menu:
We can then click on a token name in the Token column to find information about it and the address:
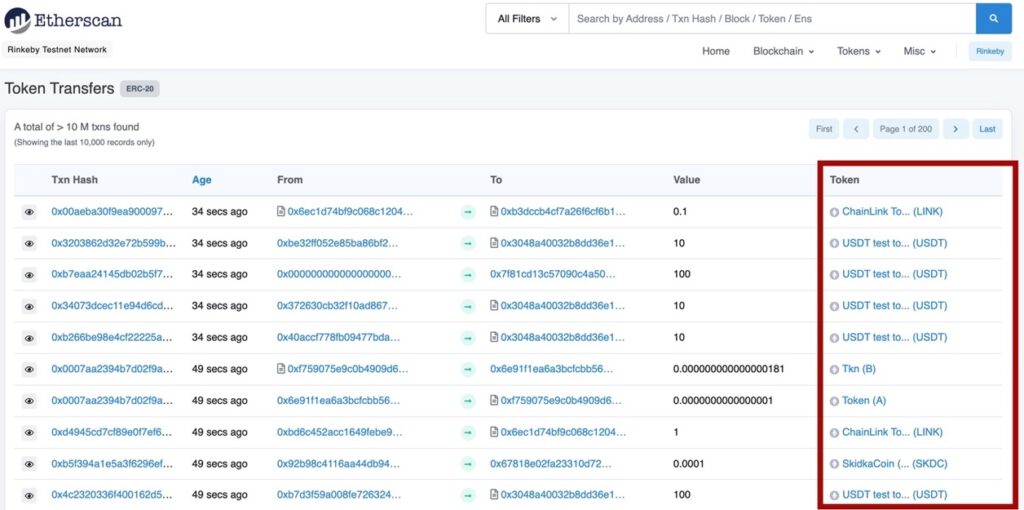
For example, clicking on one of the DAI token transfers:
https://rinkeby.etherscan.io/token/0xc7ad46e0b8a400bb3c915120d284aafba8fc4735
Get a recipient address
We use the address for our own wallet we have from Metamask.
Get estimated gas costs for swapExactETHForTokens
Before we do the actual swap on Uniswap V2 in our Rust project, we can call the estimate_gas function to test that all the information we gathered is correct. And to determine the estimated gas needed. This function, estimate_gas, will determine the approximate amount of gas that is needed to execute the desired contract. However, this is different from the costs it takes to get a transaction mined on the blockchain. We will look at how to get the gas unit price after this section.
Calling estimate_gas requires similar parameters to call, so we also need to adhere to the parameters of swapExactETHForTokens.
Parameters
Let’s look at the parameters now:
function swapExactETHForTokens(uint amountOutMin, address[] calldata path, address to, uint deadline)
  external
  payable
  returns (uint[] memory amounts);
Here is what the parameters mean, from the documentation page:
msg.value (amountIn): This one is not mentioned in the function signature, but is listed on the documentation page. That is because, this one of the standard values that can be passed through theOptionswhen executing a function. This will become clear when we look at the code.amountOutMin: The minimum amount of output tokens that must be received for the transaction not to revert.address[]: An array of token addresses.path.lengthmust be >= 2. Pools for each consecutive pair of addresses must exist and have liquidity.to: Recipient of the output tokens. NOTE: you would think this should be your account address. However, we have to put in the router02’s address here.deadline: Unix timestamp after which the transaction will revert. In other words, a time limit for the transaction. For example, we can indicate that if the transaction does not complete for in 5 minutes, because the prices is higher than we wanted to pay for it, the swap should be canceled.
What is very important here are the value types of the parameters. In the definition above here, we see uint, address, and address[]. However, what value types are these in Rust? The ABI JSON gives us a better hint:
, {
    "inputs": [{
        "internalType": "uint256",
        "name": "amountOutMin",
        "type": "uint256"
    }, {
        "internalType": "address[]",
        "name": "path",
        "type": "address[]"
    }, {
        "internalType": "address",
        "name": "to",
        "type": "address"
    }, {
        "internalType": "uint256",
        "name": "deadline",
        "type": "uint256"
    }],
    "name": "swapExactETHForTokens",
    "outputs": [{
        "internalType": "uint256[]",
        "name": "amounts",
        "type": "uint256[]"
    }],
    "stateMutability": "payable",
    "type": "function"
},
So, we need to use web3::types::U256, address is web3::types::Address. The address[] type is not directly obvious, it could be an array, but since the path parameter is allowed to me of length 2 or more, this should be a Vec.
As mentioned, for the deadline parameter we need a timestamp. Let’s write a function that calculates a timestamp X milliseconds into the future:
fn get_valid_timestamp(future_millis: u128) -> u128 {
    let start = SystemTime::now();
    let since_epoch = start.duration_since(UNIX_EPOCH).unwrap();
    let time_millis = since_epoch.as_millis().checked_add(future_millis).unwrap();

    time_millis
}
Calling estimate_gas for swapExactETHForTokens
The following code listing shows how to call the estimate_gas function:
    let dai_address = Address::from_str("0xc7ad46e0b8a400bb3c915120d284aafba8fc4735").unwrap();
    let valid_timestamp = get_valid_timestamp(300000);
    println!("timemillis: {}", valid_timestamp);

    let out_gas_estimate = router02_contract
        .estimate_gas(
            "swapExactETHForTokens",
            (
                U256::from_dec_str("106662000000").unwrap(),
                vec![weth_addr, dai_address],
                accounts[0],
                U256::from_dec_str(&valid_timestamp.to_string()).unwrap(),
            ),
            accounts[0],
            Options {
                value: Some(U256::exp10(18).checked_div(20.into()).unwrap()),
                gas: Some(500_000.into()),
                ..Default::default()
            },
        )
        .await
        .expect("Error");

    println!("estimated gas amount: {}", out_gas_estimate);
First, a note on the large numbers for amountOutMin: 106662000000 and the value: (10^18)/20 = 50000000000000000. The last number is the input amount of ETH in terms of WEI. This much WEI is the same as 0.05 ETH. The first number is how much DAI we want to get out of the swap, and 0.05 ETH is worth about 106662000000 DAI at the moment of writing this article.
On the first line, we create an Address object using the DAI address we found. Then we retrieve a timestamp 300 seconds into the future. Next, we call the estimate_gas function on the contract object we created earlier.
We indicate we want to estimate gas for the swapExactETHForTokens function. We use U256::from_dec_str() to convert strings to U256 values where necessary. The accounts[0] variable contains our wallet address and is the recipient’s address.
Finally, we have the from and the options parameters of the estimate_gas function. From indicates where the transaction is coming from. Then, the options parameter is a struct we will examine in more detail in the next sections. For now, we will only fill in value ourselves and leave the rest on default(). In this case, value represents the amount of ETH we will put into the swap.
Estimated gas result
Now we can run the program again. The program will show a result like this:
Accounts: [0x4a3d4859929a890698efad79c7b0e95a13c0ae61]
Eth balance of 0x4a3d4859929a890698efad79c7b0e95a13c0ae61: 3
WETH address: 0xc778417e063141139fce010982780140aa0cd5ab
timemillis: 1631648633152
estimated gas amount: 127106
This number, 127106, is how much gas will be used by the contract. When we execute a transaction we also need to set a typical price for a unit of gas. The higher we set the price the more likely we are to get included in the block when mined.
Getting a gas price
One method we can use to get a good gas price is to call the function gas_price on the Web3 ETH API. This will report the median gas price used in the last few blocks in the blockchain. This is not a perfect price, but good enough for the scope of this article.
Here is the code to call gas_price:
   let gas_price = web3s.eth().gas_price().await.unwrap();
   println!("gas price: {}", gas_price);
Currently, this results in the following output:
gas price: 1000000011
That is a lot more than what we had before.
Signing and sending a raw transaction
In this section, we are going to call the swapExactEthForTokens function. We are almost ready to execute a swap on Uniswap V2 with our Rust project.
Configure transaction data
First, we have to take our contract and inputs and convert it to a byte array, which we will send with the raw transaction as data:
        let data = router02_contract
        .abi()
        .function("swapExactETHForTokens")
        .unwrap()
        .encode_input(
            &(
                U256::from_dec_str("106662000000").unwrap(),
                vec![weth_addr, dai_address],
                accounts[0],
                U256::from_dec_str(&valid_timestamp.to_string()).unwrap(),
            )
                .into_tokens(),
        )
        .unwrap();
Here we simply input the function name and parameters we had for the estimate_gas function where appropriate, and we will get a vec<u8> as a result.
Configure transaction parameters
Next, we create a transaction parameters object using this data and add some more information:
    let nonce = web3s
        .eth()
        .transaction_count(accounts[0], None)
        .await
        .unwrap();
    println!("nonce: {}", nonce);

    let transact_obj = TransactionParameters {
        nonce: Some(nonce),
        to: Some(router02_addr),
        value: U256::exp10(18).checked_div(20.into()).unwrap(),
        gas_price: Some(gas_price),
        gas: out_gas_estimate,
        data: Bytes(data),
        ..Default::default()
    };
    println!("transact_obj {:?}", transact_obj);
The nonce here on line 88 is kind of like an identifier for your transactions. The nonce is a sequence that should be incremented by 1 each time. That means we can use the transaction count from our account as the nonce. Since if there are 0 transactions the first transaction should have a nonce of 0, then the transaction count will go up 1, so we can use that as the nonce, and so on.
Then we create a TransactionParameters object, with the following fields and values:
nonce: numbered sequence as mentioned before.to: this should be the contract address for the Router02, not our account address.value: the amount of ETH we want to use in terms of WEI.gas_price: How much we are willing to pay for a unit of gas, the higher the more likely our transaction will be included in the block.gas: maximum amount of gas provided for the transaction.data: The data for our contracts and parameters in bytes.
We print the transaction object at the end there so that we can check what all the fields were set to after running the program:
estimated gas amount: 127106
gas price: 1000000008
nonce: 5
transact_obj TransactionParameters { nonce: Some(5), to: Some(0x7a250d5630b4cf539739df2c5dacb4c659f2488d), gas: 127106, gas_price: Some(1000000008), value: 50000000000000000, data: Bytes([127, 243, 106, 181, 0, 0, 0, 0, 0, 0, 0, 0, 0, 0, 0, 0, 0, 0, 0, 0, 0, 0, 0, 0, 0, 0, 0, 0, 0, 0, 0, 24, 213, 140, 245, 128, 0, 0, 0, 0, 0, 0, 0, 0, 0, 0, 0, 0, 0, 0, 0, 0, 0, 0, 0, 0, 0, 0, 0, 0, 0, 0, 0, 0, 0, 0, 0, 128, 0, 0, 0, 0, 0, 0, 0, 0, 0, 0, 0, 0, 74, 61, 72, 89, 146, 154, 137, 6, 152, 239, 173, 121, 199, 176, 233, 90, 19, 192, 174, 97, 0, 0, 0, 0, 0, 0, 0, 0, 0, 0, 0, 0, 0, 0, 0, 0, 0, 0, 0, 0, 0, 0, 0, 0, 0, 0, 1, 123, 245, 138, 246, 29, 0, 0, 0, 0, 0, 0, 0, 0, 0, 0, 0, 0, 0, 0, 0, 0, 0, 0, 0, 0, 0, 0, 0, 0, 0, 0, 0, 0, 0, 0, 0, 2, 0, 0, 0, 0, 0, 0, 0, 0, 0, 0, 0, 0, 199, 120, 65, 126, 6, 49, 65, 19, 159, 206, 1, 9, 130, 120, 1, 64, 170, 12, 213, 171, 0, 0, 0, 0, 0, 0, 0, 0, 0, 0, 0, 0, 199, 173, 70, 224, 184, 164, 0, 187, 60, 145, 81, 32, 210, 132, 170, 251, 168, 252, 71, 53]), chain_id: None, transaction_type: None, access_list: None }
Sign and send the transaction
We are at the final step for doing a swap on Uniswap V2 with our Rust project. Now we just have to sign our transaction with our private key, from our Metamask wallet, and we can send the raw transaction to the network:
    let private_key = SecretKey::from_str(&env::var("PRIVATE_TEST_KEY").unwrap()).unwrap();
    let signed_transaction = web3s
        .accounts()
        .sign_transaction(transact_obj, &private_key)
        .await
        .unwrap();

    println!("signed transaction {:?}", signed_transaction);

    let result = web3s
        .eth()
        .send_raw_transaction(signed_transaction.raw_transaction)
        .await
        .unwrap();

    println!("Transaction successful with hash: {:?}", result);
Here we get the private key from the environment variable PRIVATE_TEST_KEY as configured by the .env file we created at the start of the article. Using this key we create a SecretKey object. We then call sign_transaction with the transact_obj we created earlier and private_key.
Now that we have a signed transaction we can send it as a raw transaction to the network, using send_raw_transaction().
If all goes well we will get the transaction hash back as a result. We can use this hash to look up the transaction on rinkeby.etherscan.io:
signed transaction: SignedTransaction { message_hash: 0x318d488e13595fe6353a4ec9824a04c13fd96626c37362108955f1590db076cd, v: 43, r: 0xc7596ec875d01f6b5c0d8d23ad84488205ecba36c56fa60e3473fc965fb66a21, s: 0x3e0b2ff0b54d75b672869bdb4256b3f0b8ee50626e226229afa16d004fcd51cc, raw_transaction: Bytes([249, 1, 80, 5, 132, 59, 154, 202, 8, 131, 1, 240, 130, 148, 122, 37, 13, 86, 48, 180, 207, 83, 151, 57, 223, 44, 93, 172, 180, 198, 89, 242, 72, 141, 135, 177, 162, 188, 46, 197, 0, 0, 184, 228, 127, 243, 106, 181, 0, 0, 0, 0, 0, 0, 0, 0, 0, 0, 0, 0, 0, 0, 0, 0, 0, 0, 0, 0, 0, 0, 0, 0, 0, 0, 0, 24, 213, 140, 245, 128, 0, 0, 0, 0, 0, 0, 0, 0, 0, 0, 0, 0, 0, 0, 0, 0, 0, 0, 0, 0, 0, 0, 0, 0, 0, 0, 0, 0, 0, 0, 0, 128, 0, 0, 0, 0, 0, 0, 0, 0, 0, 0, 0, 0, 74, 61, 72, 89, 146, 154, 137, 6, 152, 239, 173, 121, 199, 176, 233, 90, 19, 192, 174, 97, 0, 0, 0, 0, 0, 0, 0, 0, 0, 0, 0, 0, 0, 0, 0, 0, 0, 0, 0, 0, 0, 0, 0, 0, 0, 0, 1, 123, 245, 138, 246, 29, 0, 0, 0, 0, 0, 0, 0, 0, 0, 0, 0, 0, 0, 0, 0, 0, 0, 0, 0, 0, 0, 0, 0, 0, 0, 0, 0, 0, 0, 0, 0, 2, 0, 0, 0, 0, 0, 0, 0, 0, 0, 0, 0, 0, 199, 120, 65, 126, 6, 49, 65, 19, 159, 206, 1, 9, 130, 120, 1, 64, 170, 12, 213, 171, 0, 0, 0, 0, 0, 0, 0, 0, 0, 0, 0, 0, 199, 173, 70, 224, 184, 164, 0, 187, 60, 145, 81, 32, 210, 132, 170, 251, 168, 252, 71, 53, 43, 160, 199, 89, 110, 200, 117, 208, 31, 107, 92, 13, 141, 35, 173, 132, 72, 130, 5, 236, 186, 54, 197, 111, 166, 14, 52, 115, 252, 150, 95, 182, 106, 33, 160, 62, 11, 47, 240, 181, 77, 117, 182, 114, 134, 155, 219, 66, 86, 179, 240, 184, 238, 80, 98, 110, 34, 98, 41, 175, 161, 109, 0, 79, 205, 81, 204]), transaction_hash: 0x4efdbd6ba13bd98964a75c7f09fa16a2fd6e9e863c45190da59d41296b9b837e }
Transaction successful with hash: 0x4efdbd6ba13bd98964a75c7f09fa16a2fd6e9e863c45190da59d41296b9b837e
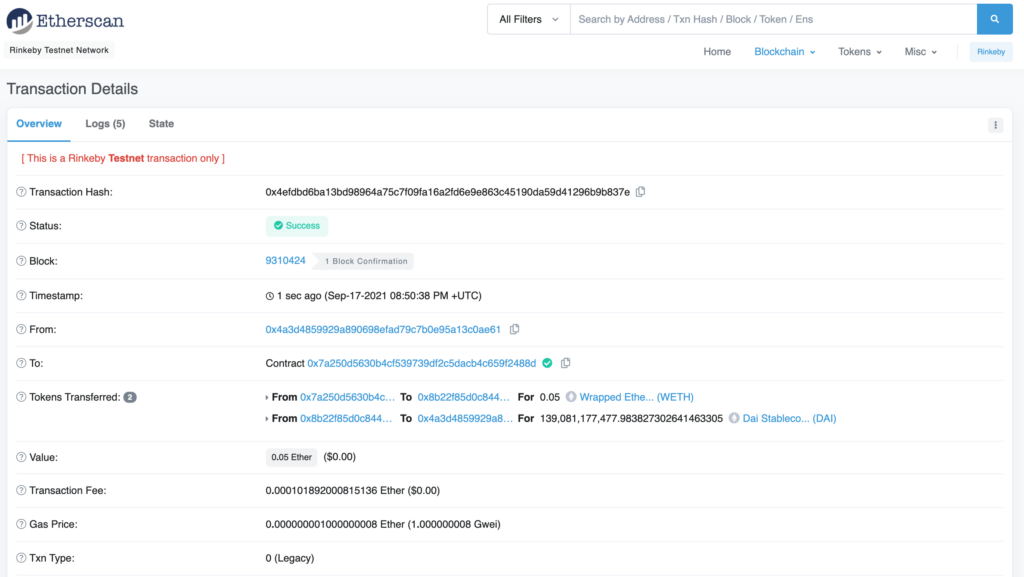
If we open up our Metamask wallet we will see DAI was added and ETH was subtracted from our balance. If the DAI is not visible, click the “add token” button and enter the address we use in the code 0xc7ad46e0b8a400bb3c915120d284aafba8fc4735. Then the balance should show up.
Conclusion
We have completed a swap on Uniswap V2 with Rust using the Web3 crate. In this process, we learned many things about Ethereum transactions as well. We learned how to get a “gas required” estimate for a transaction and how to get a reasonable gas price per unit of gas. In the end, we learned how to create a transaction object, sign it, and send it as a raw transaction.
If you want to view the complete code for the “swap on Uniswap V2 with Rust” project the code repository can be found on my Github: here.
Please follow me on Twitter if you want to keep up to date with more articles like this:
Follow @tmdev82
I’ve been following your blog for some time now during my journey of learning Rust and have found your tutorials most helpful. They’re clearly written and applicable to my interests in crypto. I’m starting a company in web3 and would love to discuss potential opportunities with you if you’re interested. We’re a fully remote global team and financed. If you’re interested in discussing further feel free to reach out, grokpronoia@protonmail.com.