In this article for semi-beginners, we are going to learn how to connect to Ethereum with the web3 crate and Rust. We will connect using a WebSocket and then retrieve the balance of our account. Finally, we will use a token smart contract to retrieve information about the token.
Please note that we will be using the Rinkeby test network for our interactions. So, if an address for a smart contract or token doesn’t seem to work, make sure that you are using the Rinkeby network.
Please look at my GitHub for the full project: rust-web3-basics-tutorial.
Please also see this follow-up article with the same theme: Rust Web3 token transactions from blocks: how to
The follow-up article to this article talks about how to swap tokens on Uniswap V2 using Web3.
If you’re interested in other cryptocurrency-related Rust programming articles:
- Easily connect to Binance WebSocket streams with Rust
- Crypto triangle arbitrage dashboard: how to, part 1
Contents
Prerequisites
To easily follow this article you should have knowledge on:
- The Ethereum blockchain
- Basic concept of smart contracts, but it will also be explained
- The Rust programming language
- Being able to connect to an Ethereum node (Rinkeby network) and a wallet with fake test Eth. See my article for tips: Easy to set up Ethereum connection and wallet.
If you are not familiar with Ethereum I recommend reading up on the concepts in more detail on the Ethereum website.
Set up the project
Let’s create a new Rust project to connect to Ethereum using Web3 now:
cargo new rust-web3-basics-tutorial
We will add the following dependencies:
- hex: Encoding and decoding data into/from hexadecimal representation.
- web3: Ethereum JSON-RPC multi-transport client. Rust implementation of Web3.js library.
- tokio: An event-driven, non-blocking I/O platform for writing asynchronous I/O backed applications.
- dotenv: A `dotenv` implementation for Rust. We will use this to load sensitive information (keys, ids, etc) from a .env file.
[package]
name = "uniswap-web3-rust-tutorial"
version = "0.1.0"
edition = "2018"

# See more keys and their definitions at https://doc.rust-lang.org/cargo/reference/manifest.html

[dependencies]
hex = "0.4"
web3 = "0.17.0"
tokio = { version= "1", features = ["full"] }
dotenv = "0.15.0"
Connecting to an Ethereum node using web3
The first things we are going to do are:
- Use web3 to connect to an Ethereum node using a WebSocket connection.
- Add an account address.
- Retrieve the balance from the account.
Before we start make sure you have an endpoint for an Ethereum node to connect to and a wallet with test Eth to use. See my article for tips: Easy to set up Ethereum connection and wallet.
Create a .env file in the root directory of the Rust project to put the wallet and endpoint information in like so:
INFURA_RINKEBY=wss://rinkeby.infura.io/ws/v3/xxxxxxxxxxx
ACCOUNT_ADDRESS=xxxxxxx
Note that for the account address the 0x prefix should not be included.
Below is the full code listing to achieve this, we will go through the code in sections:
use std::env;
use std::str::FromStr;

use web3::types::{H160, U256};

#[tokio::main]
async fn main() -> web3::Result<()> {
    dotenv::dotenv().ok();

    let websocket = web3::transports::WebSocket::new(&env::var("INFURA_RINKEBY").unwrap()).await?;
    let web3s = web3::Web3::new(websocket);

    let mut accounts = web3s.eth().accounts().await?;
    accounts.push(H160::from_str(&env::var("ACCOUNT_ADDRESS").unwrap()).unwrap());
    println!("Accounts: {:?}", accounts);

    let wei_conv: U256 = U256::exp10(18);
    for account in accounts {
        let balance = web3s.eth().balance(account, None).await?;
        println!(
            "Eth balance of {:?}: {}",
            account,
            balance.checked_div(wei_conv).unwrap()
        );
    }

    Ok(())
}
Modules
Let’s bring some things into scope:
use std::env;
use std::str::FromStr;

use web3::types::{Address, H160, U256};
Here we import std::env to read environment variables. The std::str::FromStr trait is imported so that Address::from_str can be used.
The web3::types we are importing are for processing / instancing smart contract addresses and handling return values.
Main function definition and WebSocket connection
The main function is annotated with #[tokio::main] because we need to run in an async runtime. The return value is a web3 result, since we are working with web3.
#[tokio::main]
async fn main() -> web3::Result<()> {
    dotenv::dotenv().ok();

    let websocket = web3::transports::WebSocket::new(&env::var("INFURA_RINKEBY").unwrap()).await?;
    let web3s = web3::Web3::new(websocket);
With line 9 we load variables from the .env file so that we can later retrieve the values using std::env::var(s). On line 11 we create a transports::WebSocket instance that will be used to establish the connection to the Ethereum network. Here the value of the INFURA_RINKEBY environment variable is retrieved, which should contain the full WebSocket endpoint URL. Finally, line 12 creates the Web3 instance.
Retrieve and add accounts
In this section, we retrieve a list of accounts, which will be an empty list initially, and add one (for example our metamask wallet).
    let mut accounts = web3s.eth().accounts().await?;
    accounts.push(H160::from_str(&env::var("ACCOUNT_ADDRESS").unwrap()).unwrap());
    println!("Accounts: {:?}", accounts);
We simply call the accounts() on .eth() to retrieve the list of accounts, and then on line 15 add an account address from a value we stored in the ACCOUNT_ADDRESS environment variable. The list is a vec of H160 so we instance this type from a string.
Printing the accounts should look something like this in the terminal:
Accounts: [0x4a3dxxxxxxxxxxxxxxxxxxxx]
Retrieve account balance
In this final part, we will retrieve the balance from our account(s), before moving on to interacting with smart contracts. Our balance will be represented in “Wei”. In fact, most if not all asset values on the Ethereum blockchain are represented in terms of Wei. It is the smallest denomination of ether. One ether = 1,000,000,000,000,000,000 Wei (1018). Because we are normally used to thinking in terms of Eth value, let’s first write a function that converts the Wei value to Eth:
fn wei_to_eth(wei_val: U256) -> f64 {
    let res = wei_val.as_u128() as f64;
    res / 1_000_000_000_000_000_000.0
}
On line 8 we convert the U256 to a f64 by first turning it into a u128. Because there is no function to covert to f64 directly on the U256 struct. Then we divide that number by 1_000_000_000_000_000_000.0, because 1 Eth is 1^18 Wei.
    for account in accounts {
        let balance = web3s.eth().balance(account, None).await?;
        println!("Eth balance of {:?}: {}", account, wei_to_eth(balance));
    }
We then loop through the list of accounts and call balance(), passing the account as a parameter to retrieve the account balance. To get the balance value in terms of Eth we use the conversion function we write just now. Then we print the balance to the terminal.
If all goes well, we should see our account’s address printed to the terminal together with the balance. We now know we have a working connection to the Rinkeby Ethereum test network.
We have completed the first section of our “connect to Ethereum with Rust Web3” project.
Let’s move on to using a smart contract.
Interacting with smart contracts
With smart contracts, the important concept to know is that smart contracts are code programs that run on the Ethereum network. All of these programs have an address and an application binary interface (ABI). We need to know these two pieces of information to be able to interact with a smart contract in our Rust code.
One of the tools to find the address and the interface of a smart contract or token is rinkeby.etherscan.io.
Finding the address and contract ABI
Let’s look up the address for the AAVE token as the first piece of information. Make sure to go to the Rinkeby URL for etherscan, so that we are searching on the test net.
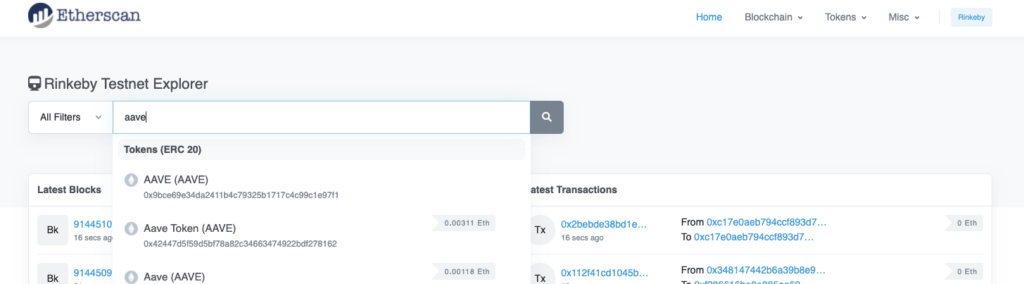
Clicking on the Aave Token (AAVE) result will navigate to the following page:
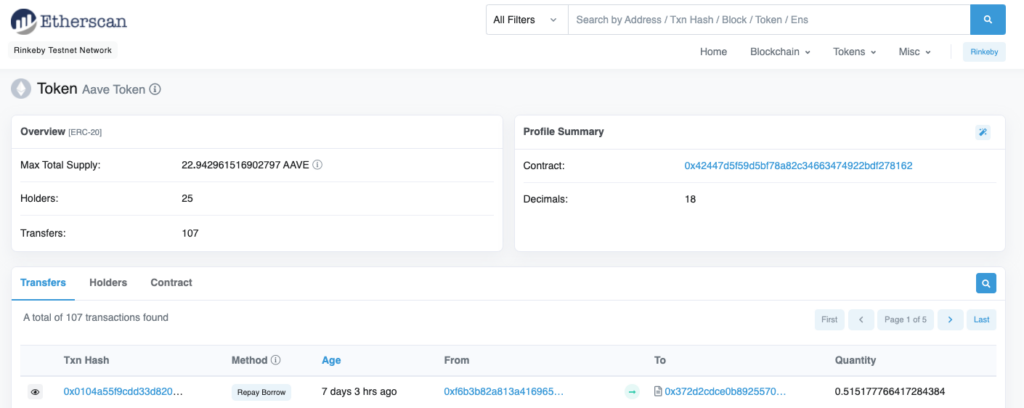
Here we see the contract address on the left: 0x42447d5f59d5bf78a82c34663474922bdf278162. If we click on the address we can go to the contract page:

The second piece of information we need, the ABI. We will find this in the contract details on the “Contract” tab. If we scroll down on that tab we will find the “Contract ABI” section:
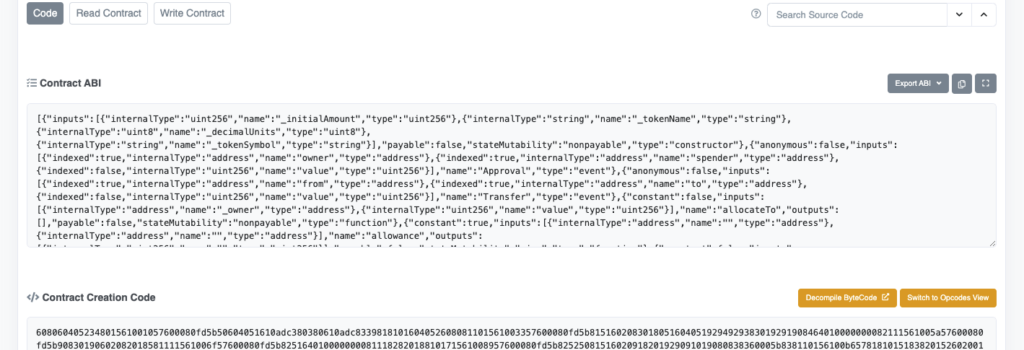
Here is the entire ABI in JSON format:
[{"inputs":[{"internalType":"uint256","name":"_initialAmount","type":"uint256"},{"internalType":"string","name":"_tokenName","type":"string"},{"internalType":"uint8","name":"_decimalUnits","type":"uint8"},{"internalType":"string","name":"_tokenSymbol","type":"string"}],"payable":false,"stateMutability":"nonpayable","type":"constructor"},{"anonymous":false,"inputs":[{"indexed":true,"internalType":"address","name":"owner","type":"address"},{"indexed":true,"internalType":"address","name":"spender","type":"address"},{"indexed":false,"internalType":"uint256","name":"value","type":"uint256"}],"name":"Approval","type":"event"},{"anonymous":false,"inputs":[{"indexed":true,"internalType":"address","name":"from","type":"address"},{"indexed":true,"internalType":"address","name":"to","type":"address"},{"indexed":false,"internalType":"uint256","name":"value","type":"uint256"}],"name":"Transfer","type":"event"},{"constant":false,"inputs":[{"internalType":"address","name":"_owner","type":"address"},{"internalType":"uint256","name":"value","type":"uint256"}],"name":"allocateTo","outputs":[],"payable":false,"stateMutability":"nonpayable","type":"function"},{"constant":true,"inputs":[{"internalType":"address","name":"","type":"address"},{"internalType":"address","name":"","type":"address"}],"name":"allowance","outputs":[{"internalType":"uint256","name":"","type":"uint256"}],"payable":false,"stateMutability":"view","type":"function"},{"constant":false,"inputs":[{"internalType":"address","name":"_spender","type":"address"},{"internalType":"uint256","name":"amount","type":"uint256"}],"name":"approve","outputs":[{"internalType":"bool","name":"","type":"bool"}],"payable":false,"stateMutability":"nonpayable","type":"function"},{"constant":true,"inputs":[{"internalType":"address","name":"","type":"address"}],"name":"balanceOf","outputs":[{"internalType":"uint256","name":"","type":"uint256"}],"payable":false,"stateMutability":"view","type":"function"},{"constant":true,"inputs":[],"name":"decimals","outputs":[{"internalType":"uint8","name":"","type":"uint8"}],"payable":false,"stateMutability":"view","type":"function"},{"constant":true,"inputs":[],"name":"name","outputs":[{"internalType":"string","name":"","type":"string"}],"payable":false,"stateMutability":"view","type":"function"},{"constant":true,"inputs":[],"name":"symbol","outputs":[{"internalType":"string","name":"","type":"string"}],"payable":false,"stateMutability":"view","type":"function"},{"constant":true,"inputs":[],"name":"totalSupply","outputs":[{"internalType":"uint256","name":"","type":"uint256"}],"payable":false,"stateMutability":"view","type":"function"},{"constant":false,"inputs":[{"internalType":"address","name":"dst","type":"address"},{"internalType":"uint256","name":"amount","type":"uint256"}],"name":"transfer","outputs":[{"internalType":"bool","name":"","type":"bool"}],"payable":false,"stateMutability":"nonpayable","type":"function"},{"constant":false,"inputs":[{"internalType":"address","name":"src","type":"address"},{"internalType":"address","name":"dst","type":"address"},{"internalType":"uint256","name":"amount","type":"uint256"}],"name":"transferFrom","outputs":[{"internalType":"bool","name":"","type":"bool"}],"payable":false,"stateMutability":"nonpayable","type":"function"}]
We will put this JSON in a file called erc20_abi.json in the src directory of our project. We now have all the pieces of information to get information from the AAVE token smart contract.
Calling methods on the AAVE smart contract
We are now going to write the code that will retrieve the name of the token and get the total supply available.
First, we are going to update the imports section to include certain structs and types we will be needing. The updated lines are highlighted:
use std::env;
use std::str::FromStr;

use web3::contract::{Contract, Options};
use web3::types::{Address, H160, U256};
Add the following lines below the code for printing the account balance of our wallet we wrote earlier:
    let aave_addr = Address::from_str("0x42447d5f59d5bf78a82c34663474922bdf278162").unwrap();
    let token_contract =
        Contract::from_json(web3s.eth(), aave_addr, include_bytes!("erc20_abi.json")).unwrap();

    let token_name: String = token_contract
        .query("name", (), None, Options::default(), None)
        .await
        .unwrap();

    let total_supply: U256 = token_contract
        .query("totalSupply", (), None, Options::default(), None)
        .await
        .unwrap();

    println!("Token name: {}, total supply: {}", token_name, total_supply);
First, on line 28 we create an Address object from the AAVE token contract address we found earlier. Then we use that Address object and our Web3 instance (web3s) to instance a Contract object from the JSON ABI. The Contract object will allow us to call functions on the smart contract.
To get the token name, we call the “name” function from the contract using the query() function on the contract instance. Let’s look at the JSON interface definition for this “name” function:
{
    "constant": true,
    "inputs": [],
    "name": "name",
    "outputs": [{
        "internalType": "string",
        "name": "",
        "type": "string"
    }],
    "payable": false,
    "stateMutability": "view",
    "type": "function"
}
There are no inputs, and there is one output that is of type "string". The output type is important as we have to explicitly set the type of the variable we are assigning the output to. So the entire call looks like:
let token_name: String = token_contract
        .query("name", (), None, Options::default(), None)
        .await
        .unwrap();
The first parameter is the function name, then the parameters of which we have none, the from address (not needed for this call), for options we can set to default, and then finally the block id, which also isn’t needed for this call.
In a similar way we can get the total supply of the token in terms of Wei, first the JSON definition of the function:
{
    "constant": true,
    "inputs": [],
    "name": "totalSupply",
    "outputs": [{
        "internalType": "uint256",
        "name": "",
        "type": "uint256"
    }],
    "payable": false,
    "stateMutability": "view",
    "type": "function"
}
Note that the type is different since we are dealing with a number. Calling this function with our code is almost the same as with the “name” function:
let total_supply: U256 = token_contract
        .query("totalSupply", (), None, Options::default(), None)
        .await
        .unwrap();
The big difference here is obviously the function name "totalSupply" and the output type for the value: U256, which can hold a very large number.
Printing out the retrieved information to the terminal looks like this:
Token name: Aave Token, total supply: 22942961516902797000
The full main.rs code listing looks like this:
use std::env;
use std::str::FromStr;

use web3::contract::{Contract, Options};
use web3::types::{Address, H160, U256};

fn wei_to_eth(wei_val: U256) -> f64 {
    let res = wei_val.as_u128() as f64;
    res / 1_000_000_000_000_000_000.0
}

#[tokio::main]
async fn main() -> web3::Result<()> {
    dotenv::dotenv().ok();

    let websocket = web3::transports::WebSocket::new(&env::var("INFURA_RINKEBY").unwrap()).await?;
    let web3s = web3::Web3::new(websocket);

    let mut accounts = web3s.eth().accounts().await?;
    accounts.push(H160::from_str(&env::var("ACCOUNT_ADDRESS").unwrap()).unwrap());
    println!("Accounts: {:?}", accounts);

    for account in accounts {
        let balance = web3s.eth().balance(account, None).await?;
        println!("Eth balance of {:?}: {}", account, wei_to_eth(balance));
    }

    let aave_addr = Address::from_str("0x42447d5f59d5bf78a82c34663474922bdf278162").unwrap();
    let token_contract =
        Contract::from_json(web3s.eth(), aave_addr, include_bytes!("erc20_abi.json")).unwrap();

    let token_name: String = token_contract
        .query("name", (), None, Options::default(), None)
        .await
        .unwrap();

    let total_supply: U256 = token_contract
        .query("totalSupply", (), None, Options::default(), None)
        .await
        .unwrap();

    println!("Token name: {}, total supply: {}", token_name, total_supply);

    Ok(())
}
Conclusion
What have we learned in our connect to Ethereum network using Rust Web3 project? We learned how to connect to the Ethereum (test) network, and retrieve the balance of an account. Last but not least, we looked at the basics of interacting with a smart contract, and how to find the required information using etherscan.io.
For the full code for this project go to my GitHub: rust-web3-basics-tutorial.
Please also check out the follow-up article where we learn how to swap tokens on Uniswap V2 and this follow-up article with the same theme as the current one: Rust Web3 token transactions from blocks: how to
Please follow me on Twitter to get updates on more Web3 and cryptocurrency programming related articles:
Follow @tmdev82