In this tutorial, we will learn some basics on how to build a web front-end using pure Rust compiled to WebAssembly with the help of the Yew framework. This is part 1 of a multi-part series exploring various concepts within the Yew framework. In this first part, we will look at how to generate HTML with Yew, what components are, some event handling, and manipulating HTML elements.
After we have finished the project explained in this tutorial we will have experience with:
- Creating components
- Handling events
- Manipulating element values
The complete code for this tutorial can be found on my GitHub: https://github.com/tmsdev82/yew-basic-web-app
Part two of the tutorial is here: CSS and JavaScript WASM Rust: Yew how to P2.
Contents
- 1 Rust, WebAssembly, and Yew
- 2 Using Trunk for bundling and serving WASM
- 3 Project setup
- 4 Minimal WebAssembly Rust Yew front-end App
- 5 Logging to the console
- 6 Components and properties with Yew
- 7 Handling input events
- 8 Sending and processing internal component messages
- 9 Updating the input HTML element
- 10 Updating an internal list
- 11 Managing state for a function component with use_state
- 12 Implementing the list component as a function_component
- 13 Conclusion
Rust, WebAssembly, and Yew
Before we begin working on the project, some background information on WebAssembly. Because how is it that we can use Rust to create a web front-end anyway? That is thanks to WebAssembly or WASM for short.
What is WebAssembly?
WASM is a binary instruction format for a stack-based virtual machine. This means that if you can compile a program to these this WASM binary instruction format, this virtual machine will be able to execute it.
Rust can easily be compiled into WASM, as there is very good tooling available to help us with that. For this tutorial, we will use Trunk.
The four most popular browsers (Firefox, Chrome, Safari, and Edge) support executing WebAssembly. So one of the primary uses of WASM is running code in a browser. However, WASM’s use case is not limited to just Web Applications running in a browser.
Why is WebAssembly interesting? Well, the code is supposed to run at “native speeds”, meaning it has the potential to run faster than JavaScript.
For more information on WebAssembly in general please see: https://webassembly.org/
What is Yew?
Yew is a Rust framework for creating front-end web applications using WebAssembly. With Yew, we can do basically anything web front-end related, but instead of using JavaScript for functions, calling backend APIs, state management, etc, we can write Rust code.
Yew is a component-based framework. This means that every piece of HTML we write in Rust exists as a Yew component.
For more information see the official Yew website.
Using Trunk for bundling and serving WASM
To make things easier we will use Trunk for bundling and testing our code. Trunk can act as a local webserver to serve our HTML and WASM Web application. It is as easy as placing a index.html, with appropriate content, in our project’s root directory and running the command: trunk serve.
Installation instructions for Trunk can be found on Trunk’s home page.
Project setup
Let’s create our first WebAssembly Rust front-end project with Yew: cargo new yew-basic-web-app.
Next, we’ll add the crates we will use to the dependencies section in the Cargo.toml file. We’ll be using the following crates:
- yew: A framework for making client-side single-page apps.
- yew-router: A router implementation for the Yew framework.
- web-sys: Bindings for all Web APIs, a procedurally generated crate from WebIDL.
- log: A lightweight logging facade for Rust.
- wasm-logger: A logger that sends a message with its Rust source’s line and filename to the browser console.
[package]
name = "yew-basic-web-app"
version = "0.1.0"
edition = "2021"

# See more keys and their definitions at https://doc.rust-lang.org/cargo/reference/manifest.html

[dependencies]
yew = "0.19"
yew-router = "0.16"
web-sys = "0.3.57"
log = "0.4.6"
wasm-logger = "0.2.0"
Minimal WebAssembly Rust Yew front-end App
In this section, we are going to create a minimal Web App. Our initial Web App will have only an index.html and main.rs. Our Yew code will be injected into this HTML file. For now, we will see some very simple code to demonstrate that what write with Rust shows up on the HTML page.
Adding the index.html
First, we have to add an index.html file to the root directory of our project, for example:
<!DOCTYPE html>
<html lang="en">
<head>
    <meta charset="UTF-8">
    <meta http-equiv="X-UA-Compatible" content="IE=edge">
    <meta name="viewport" content="width=device-width, initial-scale=1.0">
    <title>Yew basic Single Page App</title>
</head>
<body>

</body>
</html>
That is all we need for now. Our App’s HTML and code will be in our Rust source files. However, in later sections, we will add some CSS. So, we will also look at an example of how to reference CSS in this file and have it bundled by Trunk.
Adding Yew code to main.rs
Next, we will write some Rust code for the front-end with items from the Yew crate which will be turned into WebAssembly.
What we need at a minimum is:
- Import everything from yew with
use yew::prelude::* - Create a (function)
componentthat represents the HTML content - Start the app using
yew:start_appand passing in the component as the type
First, let’s look at the code and then go through and explain it:
use yew::prelude::*;

#[function_component(App)]
fn app() -> Html {
    html! {
        <>
        <div class="container">
            <h1>{"Basic Yew Web App"}</h1>
        </div>
        </>
    }
}

fn main() {
    yew::start_app::<App>();
}
App function and components
The main part we want to look at here is the app() function. This function represents the main app’s root HTML. Our function has an attribute #[function_component(App)]. This is very important. Since Yew is a component-based framework. Components are the building blocks of Yew. All HTML lives inside a component.
In this case, the attribute will create a component called App based on our app function.
For more information on function components see the docs.
Our function component here is a simplified version of a normal Component. Because normally a component is defined as a struct and has to implement the Component trait with certain functions. However, using function_component allows us to write a simple component with minimal code.
Writing actual HTML
Our app function should return Html. This Html can be constructed with the html! macro. The html! macro allows us to write HTML and SVG code in a similar fashion as JSX.
More detailed information here.
Because we can only have one root element in this html! macro we open with an empty tag <> on line 5, which is allowed. The rest is normal-looking HTML, except for how the text in the <h1> tag is declared. Literals must always be quoted and wrapped in braces. That’s why we wrote <h1>{"Basic Yew Web App"}</h1> there.
Initializing and running the app
In the main() function we initialize the app with yew::start_app::<App>();.
Now we can start the app using the Trunk command: trunk serve
The output in the terminal should look something like this:
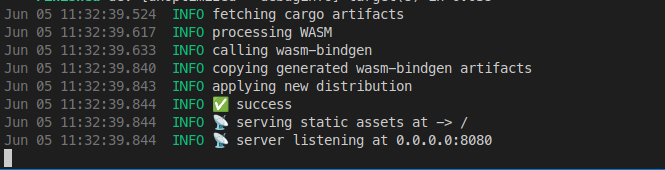
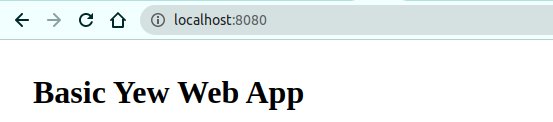
As we can see a server is started locally for hosting our app. This server is listening on port 8080. So if we open a browser and navigate to localhost:8080 we should see our app:
Great! Next, let’s add some interactive elements.
Logging to the console
Before we proceed with interactive elements. Let’s first take a moment to enable logging to the web browser’s developer console. This will help us when debugging our Rust and Yew WebAssembly front-end programs in the future. Because we can log messages to this console that shows what is going on in our code.
To enable this type of logging we simply have to initialize the wasm_logger from the wasm_logger crate in main.rs:
use yew::prelude::*;

#[function_component(App)]
fn app() -> Html {
    html! {
        <>
        <div class="container">
            <h1>{"Basic Yew Web App"}</h1>
        </div>
        </>
    }
}

fn main() {
    wasm_logger::init(wasm_logger::Config::default());
    log::debug!("App is starting");
    yew::start_app::<App>();
}
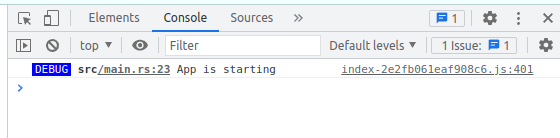
Here we added 2 lines: 15 and 16. Line 15 is how the logger is initialized. This will then rout messages created with log to the web console.
Now when the app starts we should see a message in the console (open the Developer tools):
Components and properties with Yew
In this section, we are going to learn more about components. We are also going to learn about properties. Properties are a way for parent components to influence child components. This is very common in JS frontend frameworks as well.
We will create a new component using the struct and impl way of defining a component. With this component, we will show a number input element and we will cap the maximum value using Rust code. In doing this, we will learn about input and handling events.
Implementing a Yew component struct
Let’s add a new file for our component: capped_input_component.rs.
At first, we’ll make it a basic component without properties. The component can be an empty struct that implements the Component trait. For the Component trait we are then required to implement two associated types:
type Message: is used to send messages to a component after an event has taken place. For example after a user clicks a button. This type is often an enum.-
type Properties: represents the information passed to the component from its parent. This type must implement thePropertiestrait.
We also have to implement functions: create and view:
use yew::{Component, html, Html};

pub struct CappedInputComponent {}

impl Component for CappedInputComponent {
    type Message = ();
    type Properties = ();
    fn create(_ctx: &yew::Context<Self>) -> Self {
        Self  {}
    }

    fn view(&self, _ctx: &yew::Context<Self>) -> Html {
        html! {
            <div>
                {"Capped input component"}
            </div>
        }
    }
}
For now, we leave the associated types (Message and Properties) empty. We return an empty Self or, in other words, CappedInputComponent instance on line 9 from the create function.
Then on line 12 we define the view function which returns a single div with some text. Just to see the custom component working.
Note that we write the ctx parameter as _ctx this is to suppress compiler warnings due to unused parameter variables.
Using the custom component
Let’s use our component in the main HTML in main.rs:
use yew::prelude::*;
use capped_input_component::CappedInputComponent;

mod capped_input_component;

#[function_component(App)]
fn app() -> Html {
    html! {
        <>
        <div class="container">
            <h1>{"Basic Yew Web App"}</h1>
            <div>
                <CappedInputComponent/>
            </div>
        </div>
        </>
    }
}

fn main() {
    wasm_logger::init(wasm_logger::Config::default());
    log::debug!("App is starting");
    yew::start_app::<App>();
}
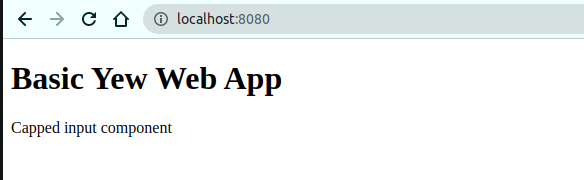
Here we pull CappedInputComponent into scope from our module on line 2. And then we use the component in our HTML on line 13.
If we had trunk serve running the web page will automatically update each time we save our changes. Our current web page looks like this:
Component properties
In this section, we will create a property struct for our component. This will allow the parent component to set values on our capped input component. We will use the properties value to limit the value of a number input.
Let’s update the capped_input_component.rs file:
use yew::{Component, html, Html, Properties};

#[derive(Properties, PartialEq)]
pub struct CappedInputProps {
    pub min_value: u32,
    pub max_value: u32
}
First, at the top, we add a new struct definition. Here we define the properties we want our component to have. In this case, we have decided to add min and max value properties as unsigned integers.
We should also make sure to derive from Properties and PartialEq. This is required by the Yew framework. The PartialEq is required so that Yew can do comparisons.
Using properties in the Component implementation
Next, we should update the impl Component for CappedInputComponent block with the new properties struct. We will also update the view code with text showing the properties as well as an input control with min and max attributes. These attributes can be set by the properties of our component:
pub struct CappedInputComponent {}

impl Component for CappedInputComponent {
    type Message = ();
    type Properties = CappedInputProps;
    fn create(_ctx: &yew::Context<Self>) -> Self {
        Self  {}
    }

    fn view(&self, ctx: &yew::Context<Self>) -> Html {

        let min_val = ctx.props().min_value;
        let max_val = ctx.props().max_value;
        html! {
            <div>
                <label>{format!("Input value. Min: {}, Max: {}", min_val, max_val)}</label>
                <input type="number" placeholder="input a number" min={min_val.to_string()} max={max_val.to_string()}/>
            </div>
        }
    }
}
We set type Properties to our CappedInputProps struct on line 13.
Then we should make sure to rename _ctx to ctx on line 18 in the function definition. This ctx allows us to access the properties within the component. As the name implies, this is the component’s context.
To make using the values more convenient we assign the values to local variables on lines 20 an 21.
We show the values in a label tag on line 24 where we use the format! macro to produce a parameterized string.
Finally, we add the input element with type of "number" to our HTML and set the element properties min and max with the properties from our component. These values have to be converted to strings to work with the attributes of the HTML element.
Setting properties from the parent component
Now that we have the properties implemented for our CappedInputComponent we are seeing errors in main.rs since the properties are required to be set on the component:
#[function_component(App)]
fn app() -> Html {
    html! {
        <>
        <div class="container">
            <h1>{"Basic Yew Web App"}</h1>
            <div>
                <CappedInputComponent min_value={0} max_value={20}/>
            </div>
        </div>
        </>
    }
}
Here we use the properties defined on the component as if it is a normal HTML element on line 13. Now when we run the web app we should see the following:

Now that we can set properties on our component we can easily add another instance with a different set of constraints:
#[function_component(App)]
fn app() -> Html {
    html! {
        <>
        <div class="container">
            <h1>{"Basic Yew Web App"}</h1>
            <div>
                <CappedInputComponent min_value={0} max_value={20}/>
                <CappedInputComponent min_value={5} max_value={30}/>
            </div>
        </div>
        </>
    }
}
The result:
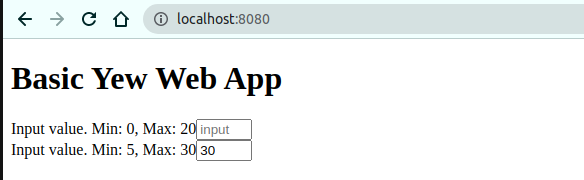
Note that we can not set a value higher than 20 using the up and down arrows on the control or mouse scroll wheel. However, we can still type in a number that exceeds the bounds we set:
We can change this behavior using Events.
Handling input events
In this section, we are going to learn about handling events using a callback function, and how to use the update function of the component life cycle to update the component.
We are going to listen for the input event (oninput) to see changes in the input element for all types of input (typing, scroll-wheel, up and down buttons).
Implementing a callback for the input event
First, we have to write a callback which will be called every time there is an input event. Callbacks are used to communicate with services, agents, and parent components within Yew. A function passed to callback always has e parameter. In the case of the oninput event this should be InputEvent.
More information on callbacks here.
We can define the callback for the input event in the view function in capped_input_component.rs:
use web_sys::{HtmlInputElement};
use yew::{Component, html, Html, Properties, InputEvent, TargetCast};

#[derive(Properties, PartialEq)]
pub struct CappedInputProps {
    pub min_value: u32,
    pub max_value: u32
}

pub struct CappedInputComponent {}

impl Component for CappedInputComponent {
    type Message = ();
    type Properties = CappedInputProps;
    fn create(_ctx: &yew::Context<Self>) -> Self {
        Self  {}
    }

    fn view(&self, ctx: &yew::Context<Self>) -> Html {

        let min_val = ctx.props().min_value;
        let max_val = ctx.props().max_value;

        let on_input = ctx.link().callback(move |e: InputEvent| {
            let input_el: HtmlInputElement = e.target_unchecked_into();

            let val: u32 = match input_el.value().parse() {
                Ok(val) => val,
                Err(err) => {
                    log::error!("error ocurred parsing value: {}", err);
                    0
                }
            };

            log::debug!("Input value: {}", val);

        });
        html! {
            <div>
                <label>{format!("Input value. Min: {}, Max: {}", min_val, max_val)}</label>
                <input  type="number" placeholder="input a number" oninput={on_input} min={min_val.to_string()} max={max_val.to_string()}/>
            </div>
        }
    }
}
Here on lines 24 to 37 we define the Callback<InputEvent> using ctx.link().callback(). We pass a closure into callback. This closure will ultimately be called upon an input event.
For now, this function simply retrieves the value from the associated element. We then log a message to the console.
To retrieve the value from the input element we have to cast the InputEvent to a HtmlInputElement using e.target_unchecked_into(). This allows us to then get the value using input_el.value(). When we call this function we get a String. However, we are interested in numbers so we try to parse the String to a u32 on lines 27-33. We assign the result to val.
Finally, we log a debug message showing the value of val. In the next section, we will manipulate this value to restrict its value.
To trigger our callback on input we have to set the oninput attribute on the input HTML element. We do this on line 41: <input type="number" placeholder="input a number" oninput={on_input} min={min_val.to_string()} max={max_val.to_string()}/>
Callback results in debug message
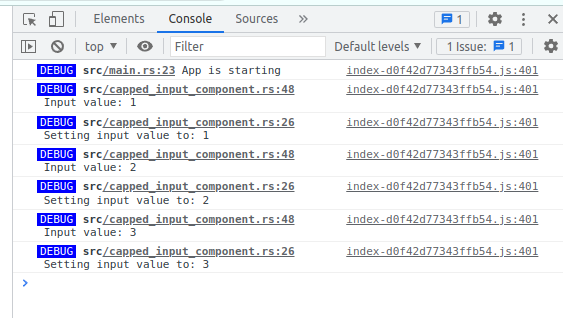
When the app runs and we type into one of the input fields we should see the following output in the console of the browser’s developer tools:

Sending and processing internal component messages
In this section, we are going to write code to send a message with some value from our on_input callback and handle it some place else.
To accomplish this we need to add a Message enum and make use of the update part of the component life cycle.
Sending messages to update the component
To update the component we need to use the update method. This is placed in the component lifecycle (create, view, update) where elements should be changed. Then, to tell the update method what to do we can use the Message type. Since there can be multiple types of updates we want to do the Message type is recommended to be an enum.
First, let’s set up the enum for changing the value on the input element:
use web_sys::{HtmlInputElement};
use yew::{Component, html, Html, Properties, InputEvent, TargetCast};

pub enum Msg {
    SetInput(u32)
}
We want to be able to pass a value, because want to set to the update function so our enum value is in the form of SetInput(u32) to facilitate that.
Now we can set the type Message to Msg on line 17:
impl Component for CappedInputComponent {
    type Message = Msg;
    type Properties = CappedInputProps;

    fn create(_ctx: &yew::Context<Self>) -> Self {
        Self  {}
    }
...
}
Now, we should update our callback to return the Msg enum:
        let on_input = ctx.link().callback(move |e: InputEvent| {
            let input_el: HtmlInputElement = e.target_unchecked_into();

            let val: u32 = match input_el.value().parse() {
                Ok(val) => val,
                Err(err) => {
                    log::error!("error ocurred parsing value: {}", err);
                    0
                }
            };

            log::debug!("Input value: {}", val);
            Msg::SetInput(val)
        });
Handling the messages in the update function
Now that we are returning a message from our callback we need some place to handle the message and take action. We can do that in the the update function:
    fn update(&mut self, ctx: &yew::Context<Self>, msg: Self::Message) -> bool {
        match msg {
            Msg::SetInput(val) => {
                log::debug!("Setting input value to: {}", val);
                true
            }
        }
    }
Here we have a simple implementation of the update function. We only have one arm of the match and all it does is show the value of val passed to update in the msg. The update function returns a boolean value indicating whether or not the component should be rendered.
Running the app we will see this value get logged as a debug message in the update function:
Updating the input HTML element
In this next part of the WebAssembly Rust front-end with Yew project, we are going to check the value coming in through the oninput callback and restrict it to the configured maximum and minimum values. Then we will set the value of the input element in the update function.
Change input value to adhere to restrictions
We’re going to implement a check in our callback and limit the input value first. We compare the incoming value to the max and min allowed value and then change the value if necessary:
       let on_input = ctx.link().callback(move |e: InputEvent| {
            let input_el: HtmlInputElement = e.target_unchecked_into();

            let mut val: u32 = match input_el.value().parse() {
                Ok(val) => val,
                Err(err) => {
                    log::error!("error ocurred parsing value: {}", err);
                    0
                }
            };

            log::debug!("Input value: {}", val);
            if val > max_val {
                val = max_val;
            } else if val < min_val {
                val = min_val
            }

            Msg::SetInput(val)
        });
However, doing this will not change the value seen in the web app in the input element. Because we need to change the value on the HTML element itself as well.
Getting an HTML element using Yew’s ref and NodeRef
Before we can set the value on an HTML element we first need to know to reference the element somehow. For this, we can use the ref keyword and a NodeRef object. This ref keyword is used to be able to retrieve a component or DOM HTML Element. See the official document on NodeRef for more detailed information.
Let’s first add a field to our component struct to hold the NodeRef for the input element, and also initialize it in the create function:
use web_sys::{HtmlInputElement};
use yew::{Component, html, Html, Properties, InputEvent, TargetCast, NodeRef};

pub enum Msg {
    SetInput(u32)
}

#[derive(Properties, PartialEq)]
pub struct CappedInputProps {
    pub min_value: u32,
    pub max_value: u32
}

pub struct CappedInputComponent {
    input_ref: NodeRef
}

impl Component for CappedInputComponent {
    type Message = Msg;
    type Properties = CappedInputProps;

    fn create(_ctx: &yew::Context<Self>) -> Self {
        Self  { input_ref:NodeRef::default() }
    }
...
}
Then we can use this on for the input element attribute ref as a value:
    fn view(&self, ctx: &yew::Context<Self>) -> Html {

        let min_val = ctx.props().min_value;
        let max_val = ctx.props().max_value;

        let on_input = ctx.link().callback(move |e: InputEvent| {
            let input_el: HtmlInputElement = e.target_unchecked_into();

            let mut val: u32 = match input_el.value().parse() {
                Ok(val) => val,
                Err(err) => {
                    log::error!("error ocurred parsing value: {}", err);
                    0
                }
            };

            log::debug!("Input value: {}", val);
            if val > max_val {
                val = max_val;
            } else if val < min_val {
                val = min_val
            }

            Msg::SetInput(val)
        });
        let input_ref = self.input_ref.clone();
        html! {
            <div>
                <label>{format!("Input value. Min: {}, Max: {}", min_val, max_val)}</label>
                <input ref={input_ref} type="number" placeholder="input a number" oninput={on_input} min={min_val.to_string()} max={max_val.to_string()}/>
            </div>
        }
    }
Set the input value on the HTML element with Yew
Now that we have a reference to the HTML element we can manipulate this element in the update function with our Rust code.
Let’s add the following code to the update function:
    fn update(&mut self, ctx: &yew::Context<Self>, msg: Self::Message) -> bool {
        match msg {
            Msg::SetInput(val) => {
                log::debug!("Setting input value to: {}", val);
                let input_element = self.input_ref.clone().cast::<HtmlInputElement>().unwrap();
                input_element.set_value(&val.to_string());
                true
            }
        }
    }
Since we know the element being referred to is an input element we can cast the input_ref to a HtmlInputElement object without problems.
Then we can call the set_value function to set the value on the HTML element. We have to convert the value to a string reference.
Completed input value restriction
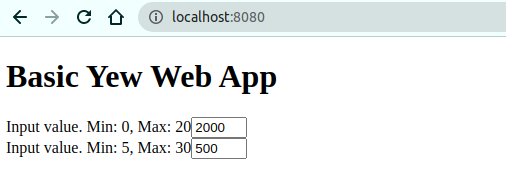
So, now we can run the application again and see that when we type in a value that exceeds the restrictions we configured it will no longer be displayed. Instead, our code changes the value to the max or the minimum value depending on what was typed.

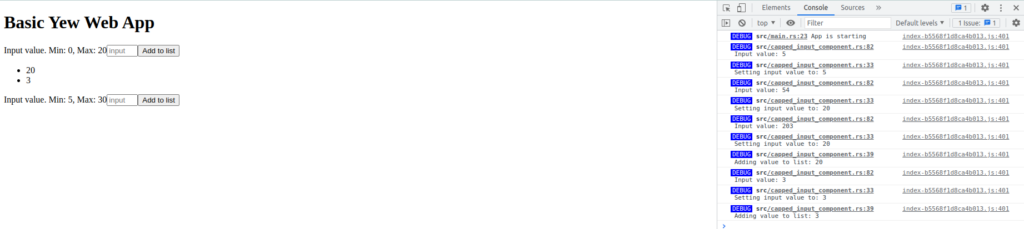
Opening the developer tools and looking at the console we should see a message “Input value: 200” and “Setting input value to: 20” when typing in 200.
Updating an internal list
In this section, add managing a list to our WebAssembly Rust Front-end with Yew project. We will look at another example of how Yew handles the internal state of a component. What this means is, that we can set a variable and Yew will internally keep track of its state so its value is remembered. If the variable is referenced in the HTML we can see it change in the UI when it gets updated.
We are going to do something that is quite similar to updating the input element. However, this time we are going to update a list (Vec) instead.
Let’s add a button that when clicked will add our number input to a list.
Preparing our struct: CappedInputComponent
The state of the list can easily be tracked using a field on the CappedInputComponent struct. If we want to change this field, though, we have to do it through the message system and the update function. This means we have to add a new message for the “add input to list” action:
use web_sys::{HtmlInputElement};
use yew::{Component, html, Html,
    Properties, InputEvent, TargetCast, NodeRef, MouseEvent};

pub enum Msg {
    SetInput(u32),
    AddValue(u32),
    DoNothing
}

#[derive(Properties, PartialEq)]
pub struct CappedInputProps {
    pub min_value: u32,
    pub max_value: u32
}

pub struct CappedInputComponent {
    input_ref: NodeRef,
    value_list: Vec<u32>
}
We add a use of MouseEvent on line 3 since we want to handle a mouse click on the button event. Then on lines 7 and 8 we have some new message types. First, AddValue is for when we want to add a value to our list. Second, DoNothing is for cases where the button is clicked but the input field is empty for example. Since we don’t want to add empty values.
Since our struct has a new field we also have to update the create function to initialize the default value. In this case an empty list:
impl Component for CappedInputComponent {
    type Message = Msg;
    type Properties = CappedInputProps;

    fn create(_ctx: &yew::Context<Self>) -> Self {
        Self  { input_ref:NodeRef::default(), value_list: Vec::new() }
    }
Handle new messages in update
Next, we have to add new arms to our match expression in the update function. Here we can add the new value to our list or tell the update to do nothing:
    fn update(&mut self, ctx: &yew::Context<Self>, msg: Self::Message) -> bool {
        match msg {
            Msg::SetInput(val) => {
                log::debug!("Setting input value to: {}", val);
                let input_element = self.input_ref.clone().cast::<HtmlInputElement>().unwrap();
                input_element.set_value(&val.to_string());
                true
            },
            Msg::AddValue(val) => {
                log::debug!("Adding value to list: {}", val);
                self.value_list.push(val);
                true
            },
            Msg::DoNothing => {
                log::debug!("Do nothing");
                true
            }
        }
    }
We do some extra logging so we can easily follow what is going on through the browser’s console outputs. Then in the Msg::AddValue(val) arm, we simply push the new value onto the value_list list field.
On click callback to send an update message
Now we can add a new callback function and a button. Our callback function will take the value from the input element, parse it and then return the appropriate message (AddValue or DoNothing). Here is the full code listing of the update view function. Let’s go through the changes piece by piece after looking at the whole thing:
    fn view(&self, ctx: &yew::Context<Self>) -> Html {

        let min_val = ctx.props().min_value;
        let max_val = ctx.props().max_value;

        let on_click = {
            let cur_input = self.input_ref.clone();
            ctx.link().callback(move |_e: MouseEvent| {
                let value_input_element = cur_input.cast::<HtmlInputElement>().unwrap();
                let new_value = value_input_element.value();
                value_input_element.set_value("");
                match new_value.parse() {
                    Ok(val) => Msg::AddValue(val),
                    Err(_) => {
                        log::debug!("Error occured parsing '{}'", new_value);
                        Msg::DoNothing
                    }
                }
            })
        };

        let on_input = ctx.link().callback(move |e: InputEvent| {
            let input_el: HtmlInputElement = e.target_unchecked_into();

            let mut val: u32 = match input_el.value().parse() {
                Ok(val) => val,
                Err(err) => {
                    log::error!("error ocurred parsing value: {}", err);
                    0
                }
            };

            log::debug!("Input value: {}", val);
            if val > max_val {
                val = max_val;
            } else if val < min_val {
                val = min_val
            }

            Msg::SetInput(val)
        });

        let display_values = self.value_list.iter().map(|value| html!{<li>{value}</li>});
        html! {
            <div>
                <div>
                    <label>{format!("Input value. Min: {}, Max: {}", min_val, max_val)}</label>
                    <input ref={self.input_ref.clone()} type="number" placeholder="input a number" oninput={on_input} min={min_val.to_string()} max={max_val.to_string()}/>
                    <button onclick={on_click}>{"Add to list"}</button>
                </div>
                <div>
                    <ul>
                    {for display_values}

                    </ul>
                </div>
            </div>
        }
    }
On input callback explanation
Now let’s look at each part. Starting with the on_click callback function:
        let on_click = {
            let cur_input = self.input_ref.clone();
            ctx.link().callback(move |_e: MouseEvent| {
                let value_input_element = cur_input.cast::<HtmlInputElement>().unwrap();
                let new_value = value_input_element.value();
                value_input_element.set_value("");
                match new_value.parse() {
                    Ok(val) => Msg::AddValue(val),
                    Err(_) => {
                        log::debug!("Error occured parsing '{}'", new_value);
                        Msg::DoNothing
                    }
                }
            })
        };
On line 56 here we clone the input_ref value to be able to move it into the closure for the callback. This then allows us to cast the reference to a HtmlInputElement instance to get the value on lines 58 and 59 respectively.
Once we get the value we want to clear the input to make it clear the value was submitted and to make it easier to enter a new value for the user. So, we simply call .set_value("") on the element with an empty string like that.
Finally, we attempt to parse the value to an u32 value type to make sure the value is valid. If the value is Ok(val) then we return a Msg::AddValue message to tell our update function to add the value. Otherwise, if the parse fails, we send a Msg::DoNothing message.
Let’s look at the last part now, the part where the list is generated and shown as well as the button element.
      let display_values = self.value_list.iter().map(|value| html!{<li>{value}</li>});
        html! {
            <div>
                <div>
                    <label>{format!("Input value. Min: {}, Max: {}", min_val, max_val)}</label>
                    <input ref={self.input_ref.clone()} type="number" placeholder="input a number" oninput={on_input} min={min_val.to_string()} max={max_val.to_string()}/>
                    <button onclick={on_click}>{"Add to list"}</button>
                </div>
                <div>
                    <ul>
                    {for display_values}

                    </ul>
                </div>
            </div>
        }
We want to display the list of values as an HTML unordered list (<ul></ul>) so each item is a HTML list item (<li></li>).
Therefore we are turning our Vec of values into an iterator on HTML elements using iter() and map() functionality on line 92. This iterator can then be used in a for loop in our main HTML on line 102. This {for display_values} will insert each <li></li> element into our HTML.
Aside from that we also add a button to our HTML definition on line 98. We set the onclick attribute value to our callback on_click. As the name suggests this is the event hook for when the button is clicked.
Inspecting the result
Now let’s look at the result. We should see a button and a growing list when entering values and clicking the button:
Managing state for a function component with use_state
We have learned how to manage data internally in a struct component, in other words, a struct that implements Component. However, what if we want to create a simpler component using function_component and still, manage internal state? In this last section of part1 of our WebAssembly Rust front-end with Yew project, we will look at how use_state can be used.
Implementing the list component as a function_component
Let’s create a new file in the src directory called list_component.rs. This will hold the code for our new component defined using function_component.
The code has a lot of overlap with the code in the view function for our component called CappedInputComponent. However, there are some key differences.
First, we will look at the whole code listing and then go through the parts one by one:
use web_sys::{HtmlInputElement};
use yew::{prelude::*};

#[function_component(ListComponent)]
pub fn list_component() -> Html {
    let name_list = use_state(Vec::new);
    let input_ref: NodeRef = NodeRef::default();

    let on_click = {
        let name_list = name_list.clone();
        let cur_input = input_ref.clone();
        Callback::from(move |_e: MouseEvent| {
            let mut names = (*name_list).clone();
            let name_input_element = cur_input.cast::<HtmlInputElement>().unwrap();
            let new_name = name_input_element.value();
            name_input_element.set_value("");
            names.push(new_name);
            name_list.set(names);

        })
    };

    let display_names = (*name_list).iter().map(|name| html!{<li>{name}</li>});
    html!{
        <div>
            <div>
            {"List component"}
            </div>
            <div>
                <input ref={input_ref} type="text" placeholder="input a name"/>
                <button onclick={on_click}>{"Add to list"}</button>
            </div>
            <div>
                <ul>
                {for display_names}
                </ul>
            </div>
        </div>
    }
}
Not much difference in the html! part, so let’s talk about use_state.
What is use_state
According to the documentation use_state returns a UseStateHandle object which we can deref to the current value and it gives us a method to update the value of our variable. To deref something in Rust we use *variablename.
In the first part of the function component we set up a variable with use_state and also a NodeRef. We will use NodeRef to refer to the HTML input element.
use web_sys::{HtmlInputElement};
use yew::{prelude::*};

#[function_component(ListComponent)]
pub fn list_component() -> Html {
    let name_list = use_state(Vec::new);
    let input_ref: NodeRef = NodeRef::default();
Since we want to track the state of a list we pass Vec::new as a parameter to use_state. We don’t have to specify a type to be stored in the Vec here, because the compiler will figure it out from context later.
Implementing the on_click callback
Now let’s look at the callback implementation:
    let on_click = {
        let name_list = name_list.clone();
        let cur_input = input_ref.clone();
        Callback::from(move |_e: MouseEvent| {
            let mut names = (*name_list).clone();
            let name_input_element = cur_input.cast::<HtmlInputElement>().unwrap();
            let new_name = name_input_element.value();
            name_input_element.set_value("");
            names.push(new_name);
            name_list.set(names);

        })
    };
Before we can use our name_list in the callback we have to move it into the closure. However, since we want to use name_list to get the values out later in this list_component function, we have to clone it in a new scope on line 10. The same is true for input_ref.
Next, on line 13 we deref the name_list and also clone it to move it out of the derefence so we can have a mutable object.
Then on line 14, we cast the cur_input which is a ref to the input element to a HtmlInputElement object. So we can get the value from it on line 15 and then clear the value in the element on line 16.
Finally, we push the new value new_name into the list on line 17 and then use the set function from the UseStateHandle object to update the state of our Vec.
Displaying our list in HTML
The last thing we have added is the HTML displaying the input, button, and list:
  let display_names = (*name_list).iter().map(|name| html!{<li>{name}</li>});
    html!{
        <div>
            <div>
            {"List component"}
            </div>
            <div>
                <input ref={input_ref} type="text" placeholder="input a name"/>
                <button onclick={on_click}>{"Add to list"}</button>
            </div>
            <div>
                <ul>
                {for display_names}
                </ul>
            </div>
        </div>
    }
We have to dereference the name list (name_list) again so we can iterate over the Vec since name_list itself is a UseStateHandle object. Then we use map to construct an iterable containing <li>{name}</li> as we did for our other component as well.
The rest of the HTML is pretty much the same as what we wrote earlier for our CappedInputComponent component.
The function_component Result
Before we can look at the result we have to add our new component to the main HTML in main.rs:
use yew::prelude::*;
use capped_input_component::CappedInputComponent;
use list_component::ListComponent;

mod capped_input_component;
mod list_component;

#[function_component(App)]
fn app() -> Html {
    html! {
        <>
        <div class="container">
            <h1>{"Basic Yew Web App"}</h1>
            <div>
                <CappedInputComponent min_value={0} max_value={20}/>
                <CappedInputComponent min_value={5} max_value={30}/>
                <ListComponent/>
            </div>
        </div>
        </>
    }
}
Let’s run or refresh the application again (if it didn’t refresh automatically) and look at the result:

Conclusion
Through this simple WebAssembly Rust Front-end with Yew project, we have learned about components, events, internal state, and elements. We looked at how to write a component by using impl Component and also using function_component for simpler more compact code. Furthermore, we looked at how events work in Yew and how messages can be used to update our component.
The complete code can be found on my github here: https://github.com/tmsdev82/yew-basic-web-app
Part two of the tutorial is here: CSS and JavaScript WASM Rust: Yew how to P2.
Please follow me on Twitter to get notified of new Rust programming articles:
Follow @tmdev82
Wow, thank you so much for this. I was trying so hard to figure out how to use yew with rust and I found dead-end after dead-end, this tutorial has walked me through a lot of things I was looking for on the web. 🙂