
In this tutorial, we will learn Python programming by working on a beginner project: a Web Scraper. With this project we will learn the basics of web scraping:
- download web page data
- extracts information from it
- store the data
A web scraper is a tool that gathers data from web sites to be used in an application. For example, news, prices on a store’s website, event information on an event page, etc. That data can then be used for analysis, reporting, to train an artificial intelligence (AI).
A web scraper might sound like a big and difficult project but we will begin small and slowly build it up. We will start with a simple program that downloads a web page and then keep adding functionality to build on it. With Python, this is very easy to do. Especially when using free Python packages that are built by other people.
What we will learn to do in this tutorial:
- Set up a Python project.
- Download and use Python packages.
- Write a program to download website content with Python.
- Extract information from website content with a Python package called “Beautiful soup“.
- Save and load data on disk with Python.
- Create a command line interface for our Python Web Scraper.
The code for the complete project can be found on my GitHub page: https://github.com/tmsdev82/basic-python-web-scraper
Contents
- 1 Prerequisites
- 2 What are Python packages?
- 3 Setting up the Python web scraper project
- 4 First step in building a Python web scraper: download a web page
- 5 Make the Python web scraper more dynamic
- 6 Python web scraper: extracting information from downloaded pages
- 6.1 Python library: Beautiful Soup
- 6.2 Print all titles on the page with Beautiful Soup
- 6.3 Extracting stock information from the data
- 6.3.1 Looking at a page’s source with Chrome Developer Tools
- 6.3.2 Get the ul tags list and find the correct table
- 6.3.3 Running the program to list tables
- 6.3.4 Side track: understanding HTML page structure
- 6.3.5 Using beautiful soup to filter on an HTML element’s attribute
- 6.3.6 Turning the data into structured information
- 7 Storing web scraper data with Python
- 8 Improving the Python web scraper
- 9 Testing the Python web scraper CLI
- 10 Conclusion
Prerequisites
Even though this tutorial is aimed at beginners some things are useful to know beforehand:
- Some basic knowledge of Python syntax.
- How to use a command line prompt or terminal.
- Visual Studio code installed. This tutorial will make use of Visual Studio code features to explore the code we’re writing.
What are Python packages?
A Python package or library is code that someone else made that you can download and install to use for your own profjects.
Python packages are a fundamental aspect of the Python programming ecosystem. They provide a modular approach to application development. A package is a collection of Python modules. While a module is a single Python file. Packages can be downloaded from an online repository called “PyPi“, using the pip install <package name> command that comes standard with a Python installation. We can also turn our own Python code into a package and upload it so that other can use it if we want.
Why use Python packages?
You can write code for a certain functionality yourself, of course. However, if someone else has already written that functionality, why not use an existing package? It is very common for programmers to use packages written by other people. In fact, I would recommend using packages if you want to accelerate developing applications.
There are a lot of clever and passionate programmers out there building useful and amazing Python packages and releasing them to the public. Often it is the case that someone solved a problem they had in the past and they want to help other programmers by publishing their solutions. Thanks to that, we don’t have to reinvent the wheel if we don’t want to.
Of course, there are also reasons why you would want to build (most) everything yourself. Maybe you want to learn the inner details of how something works? Maybe you have security concerns? Or there is a package that kind of does what you want but not completely. Then it is a good idea to try to rebuild an existing tool or library and write most of the code yourself.
In this tutorial, we will make use of Python packages where we can to save time.
Setting up the Python web scraper project
In this section, we will set up the project directory and a virtual environment. We use the virtual environment to install packages in a way that doesn’t affect the rest of your system. This is easier than it sounds.
Create a project directory and virtual environment
Let’s begin by setting up the basic project with a virtual environment with the venv module and installing some dependencies. For more information on virtual environments see my tutorial here: Python Virtual Environment (venv): easy guide for beginners.
- Create a new directory for your project with the command:
mkdir python-web-scraper - Change the directory to the project directory:
cd python-web-scraper - Create a virtual environment:
python -m venv venv - Finally, activate the virtual environment:
source ./venv/bin/activateon Linux-based systems orvenv\Scripts\activate.baton Windows.
Python web scraper package dependencies
Next, we’ll install a couple of Python package that will help us build the web scraper. These packages are:
requests: Requests allows you to send HTTP requests very easily. HTTP stands for Hypertext Transfer Protocol, it is a way to communicate over the internet. See this Wiki page for more information.beautifulsoup4: Beautiful Soup is a library that makes it easy to scrape information from web pages. It uses an HTML or XML parser, providing Pythonic ways for iterating, searching, and modifying the parsed information.
Use the following command to install the packages: pip install requests beautifulsoup4
Then open the project directory in your favorite code editor. I recommend using Visual Studio Code. Because it is fast, easy to work with, and supports all kinds of programming languages.
If you have it installed, you can just execute the command code . and Visual Studio Code will open and use the current directory as a project directory.
First step in building a Python web scraper: download a web page
We begin our program by writing code that downloads a web page from a specific web address (also known as an URL). Because we want to analyze or manipulate data we have to first download and store the data. We can store data in memory (like in a variable) or on our local machine. Then our program can perform operations on that data. The ultimate goal is to extract information.
Data is usually unstructured facts, while information is structured and gives context to the data. For example, we could scrape a bunch of financial news articles (data) and analyze the text to determine what the sentiment is about a certain company in the context of how well their business is going. We can do this every week and track how the sentiment changes over time (information).
For this tutorial we will keep it simple and work with numbers data instead: financial numbers listen on finance.yahoo.com.
Creating the program
In this section, we write a program that downloads data with a few lines of code. We will then go through each line to see what it does. In the following sections, we will keep introducing new coding concepts to this simple program to make it bigger and better.
Create a new file in the project directory called main.py, this will be our main project file. This is the file we use to start our program with the python main.py command. Open the file and add this code:
import requests

result = requests.get("https://finance.yahoo.com/quote/AAPL")

print(result)
Just with these three lines of code, we can download the financial news page on Yahoo Finance about the company Apple.
The first line import requests imports the requests library. As a result, this allows us to call functions from the requests library. For example, on line 3 the get function is called: requests.get(...).
The get function on line 3 sends a HTTP GET request to the URL passed into it as a parameter. In this, case the string "https://finance.yahoo.com/quote/AAPL" is passed. Then the getattempts to make a connection to this address and waits for the HTTP response, then returns that HTTP response and it is assigned to our variable called result.
Finally, we print the result to the console (also known as the command line or terminal) with the line by calling the print function print(result).
Running the program to download a web page
Run the command: python main.py in the command line or terminal. For example, by opening the terminal in VS Code and making sure to activate the virtual environment in this terminal. Then the result should look like this:
![python web scraper first result print: response [200]](https://tms-dev-blog.com/wp-content/uploads/2024/01/image-3.png)
The result should be <Response [200]>. This is actually a response object coming from the requests library. Because it was passed to print(result) as a parameter it was turned into the text we see here. The [200] here refers to a HTTP response code 200 which means the request was completed successfully. For more information on response code see here. Having said that, this response object has other properties that give more information.
For our Python Web Scraper program, we are interested in the HTML from web pages. That is where we can extract information, we have to look at the text property for this.
Looking at different properties of the response object
Since the response object is assigned to our result variable we can access its other properties by using dot notation: a . one the object followed by the property name. In this case, the property we are interested in is text. Let’s modify our program and print the text attribute instead of the object default string:
import requests

result = requests.get("https://finance.yahoo.com/quote/AAPL")

print(result.text)
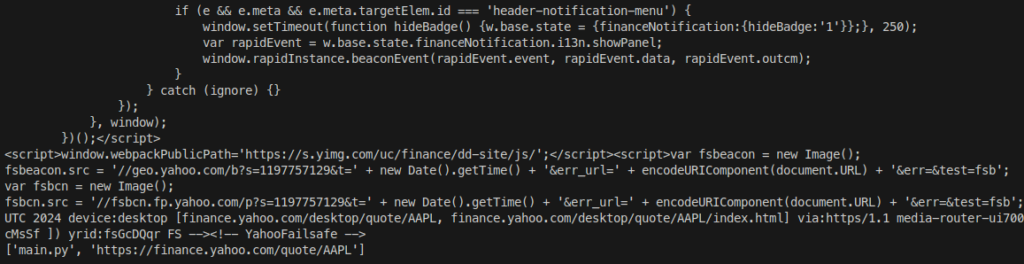
Now when we run the program the output should be different. In fact, the program now prints the entire HTML code of the page:

There is so much data that you probably can’t scroll up enough to see it all. In a later section, we will look at how to save this data to a file so we can look at all of it more easily.
Before we do that let’s talk more about the response object’s properties. How do we know what properties it all has? One way is to look at the documentation for this library. For example, this page on the response object. The documentation lists all the properties and also the functions with explanations.
We can also look at objects when the code is running by using a debugger. Learning how to use a debugger is an important skill for any programmer. So, we will try that next.
Using a debugger to look at properties and values
Let’s use a debugger to look at the properties of the response object. If you’ve never used a debugger before it is good to take some time to read this tutorial:
Visual Studio Code debugger for Python: how to use
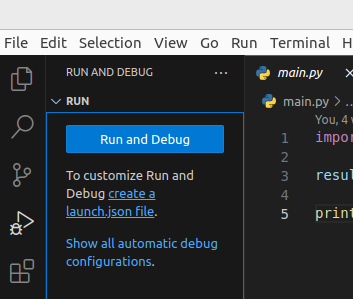
In short, to be able to debug the program we need a launch configuration.
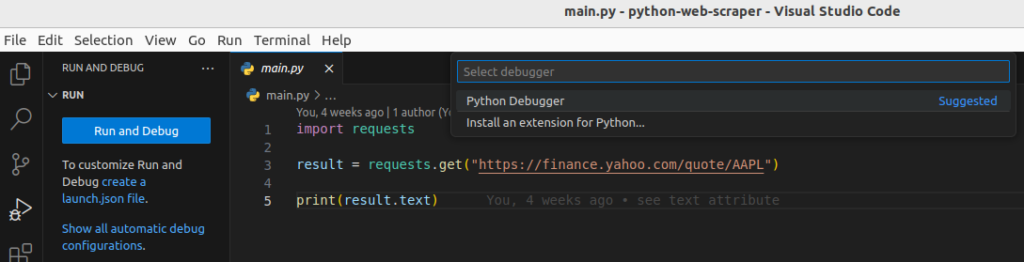
Create a launch.json file to be able to start the program with the debugger by first clicking on the debug icon in the left vertical menu:
Then select “Python Debugger”:
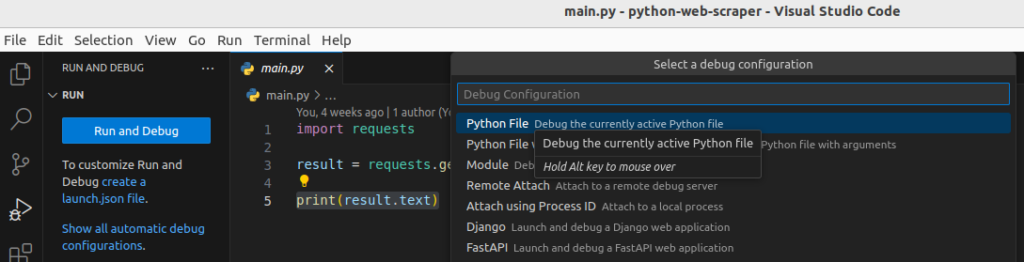
Finally, select “Python File”:
Selecting these options will create launch.json:
{
    // Use IntelliSense to learn about possible attributes.
    // Hover to view descriptions of existing attributes.
    // For more information, visit: https://go.microsoft.com/fwlink/?linkid=830387
    "version": "0.2.0",
    "configurations": [
        {
            "name": "Python Debugger: Current File",
            "type": "debugpy",
            "request": "launch",
            "program": "${file}",
            "console": "integratedTerminal"
        }
    ]
}
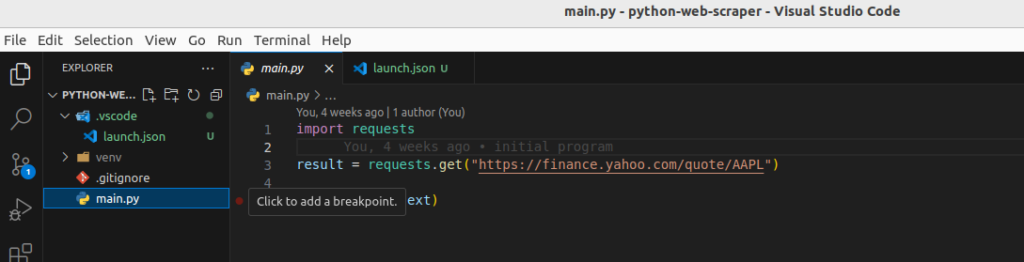
Now let’s set a breakpoint on line 5 of the main.py file:
Then run the program with the debugger by pressing F5 or going into the “Run” menu in Visual Studio Code:
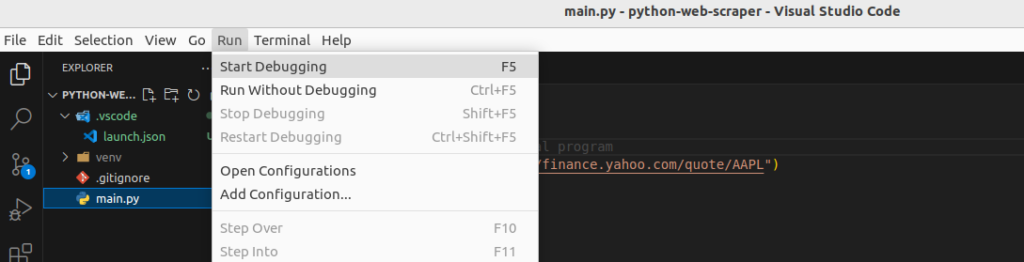
The debugger pauses the program on the line where the breakpoint is.
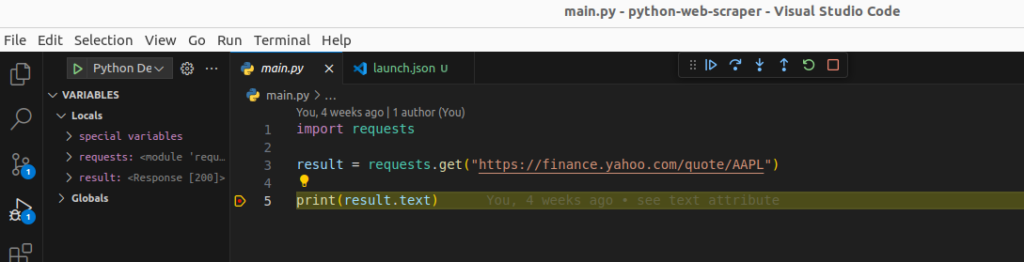
Now we can either hover over the result variable or look at the VARIABLES pane and the Locals list to see all the properties of the object.
We can expand the result variable’s value like this:
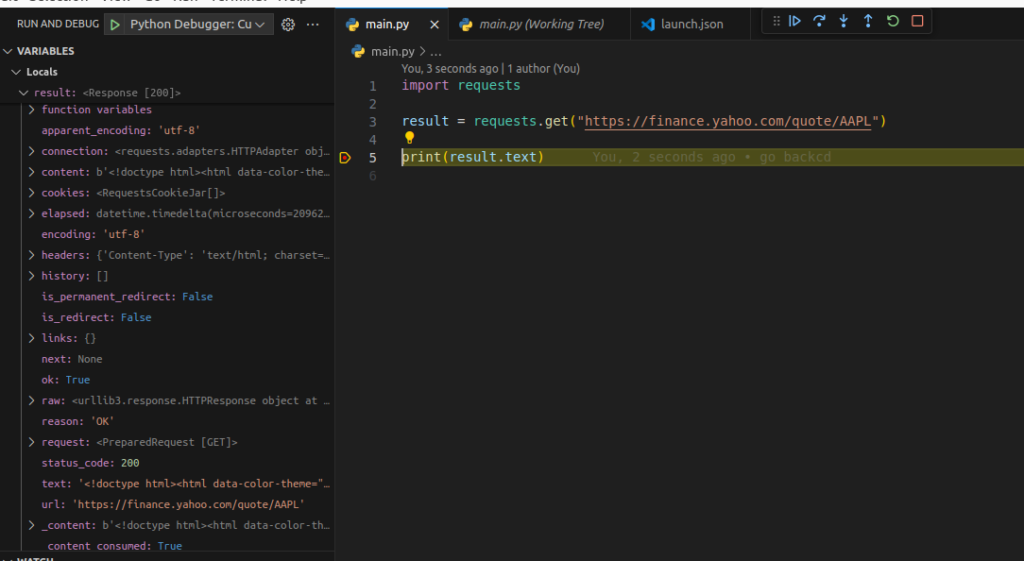
By viewing the response object value assigned to result like this we can discover all the properties the object has. If we didn’t know this object had a text property before we can see it here and see what its value is. There are also status_code, and reason as interesting properties. Because these properties can give us more information if a request has failed.
Make the Python web scraper more dynamic
Our current Python Web Scraper program is very simple and “static”. Meaning, its behavior doesn’t change: it downloads one page and always from the same web address. We only have a few lines of code now, what can we do to build on this and make something more interesting?
Our goal is to make a web scraper that can download several web pages and extract information from the data.
So to achieve that goal some functionality we can add are:
- do something useful with the data we downloaded in the current program
- make it easier to download other pages with the program
First, we will go for the second option and make it easier to download other pages by making the Python web scraper more dynamic.
Hardcoded versus Dynamic
Since we have “hardcoded” the address in our code our Python web scraper can only download a page from a different address if we change the value of the URL parameter in our code. The term “hardcoded” is used to refer to a value that is defined in the code and that stays the same every time the program runs. In this case "https://finance.yahoo.com/quote/AAPL" is the hardcoded value.
Our program would be much more useful if we could change the address “dynamically”. meaning, without having to change our code first. So that every time we run the program we can input a different page to download if we want.
We can do this by allowing dynamic input from somewhere.
Get input from the command line
To be able to get user input there are several methods we can implement. Here are some options:
- read arguments that we can enter when starting the program
- read what is typed in while the program is running
- read a file that contains a list of web addresses
In this section, we will read the command line arguments entered when starting the program.
Python library: sys
We can use the standard sys library to do this. The sys library comes standard with an installation of Python and does not have to be installed like the requests library we used earlier.
The sys library has an attribute argv (this stands for “Argument Values”). This holds all the arguments that were entered in the command to execute the Python program. For example, earlier we started the Python program with:
python main.py
In this case, 'main.py' is the first argument.
Updating the program to use sys.argv
Let’s Update the program to print these command line argument(s) instead of printing the web page HTML:
import requests
import sys

result = requests.get("https://finance.yahoo.com/quote/AAPL")

print(sys.argv)
The changes in the code are highlighted. On line 2 we import the sys to be able to access sys.argv on line 6 and print the command line argument values.
Now when we run the program with python main.py we will see this output a list ['main.py']:
![command line output showing a list ['main.py']](https://tms-dev-blog.com/wp-content/uploads/2024/02/image-15.png)
This 'main.py' is a string argument to the Python program. It tells Python which script file to run. Next, let’s type another command, this time with extra arguments, and see what happens:
python main.py test1 test2
![command line output showing a list ['main.py', 'test1', 'test2']](https://tms-dev-blog.com/wp-content/uploads/2024/02/image-16.png)
The extra arguments are automatically added to the argv list thanks to the sys library. We can use this to make our program more dynamic.
Download a page based on a command line argument
Let’s now change the code so that the second argument in the list is used as the URL parameter for the requests.get() function call. Since sys.argv is a list of strings we can use an index of 1 to get the second value. Remember that Python starts counting the index of lists at 0. Let’s also print the result text again:
import requests
import sys

result = requests.get(sys.argv[1])

print(result.text)
print(sys.argv)
Then let’s run the program again, this time with the URL we had been using before as a command line argument:
python main.py https://finance.yahoo.com/quote/AAPL
We should get a similar output as before, including the contents of the page:
Now try it with a different URL. For example:
python main.py https://finance.yahoo.com/quote/NVDA
To get the page related to NVidia’s stock ticker:
Unfortunately, there is so much data that it doesn’t fit in the command line window and it is hard to tell the difference between the output for the two URLs. There is too much noise.
However, we have made our program much more dynamic already. Thanks to this simple change of reading command line arguments we can easily download web pages from any URL just by starting our program with a different argument.
Error when no URL argument is entered
What happens when we leave the argument empty? Or enter a value that is not a valid or existing URL? Try it and find out:
python main.py
Results in this error:
Traceback (most recent call last):
  File "/home/tim/projects/writing/programming-blog/repos/python-web-scraper/main.py", line 4, in <module>
    result = requests.get(sys.argv[1])
IndexError: list index out of range
Since we didn’t add an argument after main.py there is no argument in the sys.argv list at index 1 and an error occurs.
If we add an argument that is not a valid URL:
python main.py test1
We get:
Traceback (most recent call last):
  File "/home/tim/projects/writing/programming-blog/repos/python-web-scraper/main.py", line 4, in <module>
    result = requests.get(sys.argv[1])
  File "/home/tim/projects/writing/programming-blog/repos/python-web-scraper/venv/lib/python3.10/site-packages/requests/api.py", line 73, in get
    return request("get", url, params=params, **kwargs)
  File "/home/tim/projects/writing/programming-blog/repos/python-web-scraper/venv/lib/python3.10/site-packages/requests/api.py", line 59, in request
    return session.request(method=method, url=url, **kwargs)
  File "/home/tim/projects/writing/programming-blog/repos/python-web-scraper/venv/lib/python3.10/site-packages/requests/sessions.py", line 575, in request
    prep = self.prepare_request(req)
  File "/home/tim/projects/writing/programming-blog/repos/python-web-scraper/venv/lib/python3.10/site-packages/requests/sessions.py", line 486, in prepare_request
    p.prepare(
  File "/home/tim/projects/writing/programming-blog/repos/python-web-scraper/venv/lib/python3.10/site-packages/requests/models.py", line 368, in prepare
    self.prepare_url(url, params)
  File "/home/tim/projects/writing/programming-blog/repos/python-web-scraper/venv/lib/python3.10/site-packages/requests/models.py", line 439, in prepare_url
    raise MissingSchema(
requests.exceptions.MissingSchema: Invalid URL 'test1': No scheme supplied. Perhaps you meant https://test1?
The requests.get function recognizes that test1 is not a valid URL and gives this error.
So our program will crash with an error if it gets these unexpected inputs. We will cover how to handle these kinds of errors later.
Python web scraper: extracting information from downloaded pages
Because we want to see what we’re doing and don’t want to look at all the noise in the HTML data we will extract some information from the page in this section.
Extracting information from an HTML page is quite difficult to do. As we can see there is a lot of data to make sense of. That’s why we will use a Python library to make it a lot easier. This library is called: Beautiful Soup.
Python library: Beautiful Soup
Beautiful Soup has functions for loading and parsing an HTML document and then searching through that document to get specific HTML tags and the contents of those tags. For example, we could find and print the content of all <h1> tags on the page.
First, let’s make sure we have installed the Beautiful Soup library. Make sure the virtual environment is still activated:
source ./venv/bin/activate (on Linux based systems)
Then:
pip install beautifulsoup4
Print all titles on the page with Beautiful Soup
For our first experiment let’s print all the text of the <h1> tags on the page. To do this we have to:
- Download a web page
- Load the web page data into an object with Beautiful Soup
- Call a function to get all the
<h1>tags - Loop through the list of
<h1>tag results and print them
Update the code
Here is the updated code. The explanation follows:
import requests
import sys
from bs4 import BeautifulSoup

result = requests.get(sys.argv[1])

soup = BeautifulSoup(result.text, 'html.parser')

h1_tags = soup.find_all('h1')

for tag in h1_tags:
    print(tag.get_text())

print(sys.argv)
On line 3 we import the BeautifulSoup class that is at the core of this library. With this class, we can create an object by passing it an HTML document. Then we can use that object’s function to search through the document.
Then on line 7, we create a Beautiful Soup object instance by passing the text of our result. As we saw earlier, this text contains the entire HTML data for the downloaded page.
The html.parser argument tells Beautiful Soup what kind of parser to use. In this case, it’s using Python’s built-in HTML parser. Other options might include ‘lxml’ or ‘html5lib’, which are external parsers and can be more lenient or strict in parsing HTML content.
On line 9, we call find_all('h1') on the object instance soup. This will look through all child elements to find all the page elements that match the search criteria. In this case, it will look through the entire document, since we’re calling the function on the soup object itself, get all the h1 elements and return a list.
Finally, on lines 11 and 12 instead of printing the entire text of the HTML page we only loop through each tag in the list of tag results and print their text. The get_text() function is a function from Beautiful Soup as well and extracts all the text within a tag.
Running the simple <h1> tag-extracting Python web scraper
Let’s run the program again and see the result:
python main.py https://finance.yahoo.com/quote/AAPL

Looks like there is only one <h1> tag on the page and it is the name of the company. In this case, “Apple Inc. (AAPL)”. This is much more readable.
Next, try it with https://finance.yahoo.com/quote/NVDA:
python main.py https://finance.yahoo.com/quote/NVDA
The result is:

So now we see “NVIDIA Corporation (NVDA)”. Thanks to Beautiful Soup and our changes it becomes a lot clearer what we’re downloading and looking at.
What happens if we change soup.find_all('h1') to soup.find_all('h2') or even 'h3'? Experiment by changing small things like this in the code and learn:
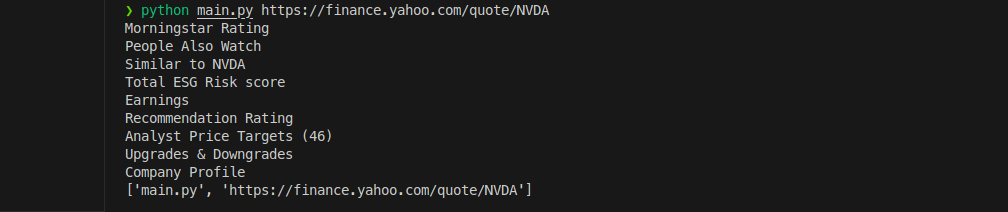
Now we see a lot more text:
Morningstar Rating
People Also Watch
Similar to NVDA
Total ESG Risk score
Earnings
Recommendation Rating
Analyst Price Targets (46)
Upgrades & Downgrades
Company Profile
Feel free to change the h2 back to h1 before moving on.
Extracting stock information from the data
As we found out by experimenting with the h2 tag it seems difficult to get meaningful information by just selecting tags. If we want to have something more meaningful it is best to first examine the page and then find a way to drill down to specific search criteria to find what we want.
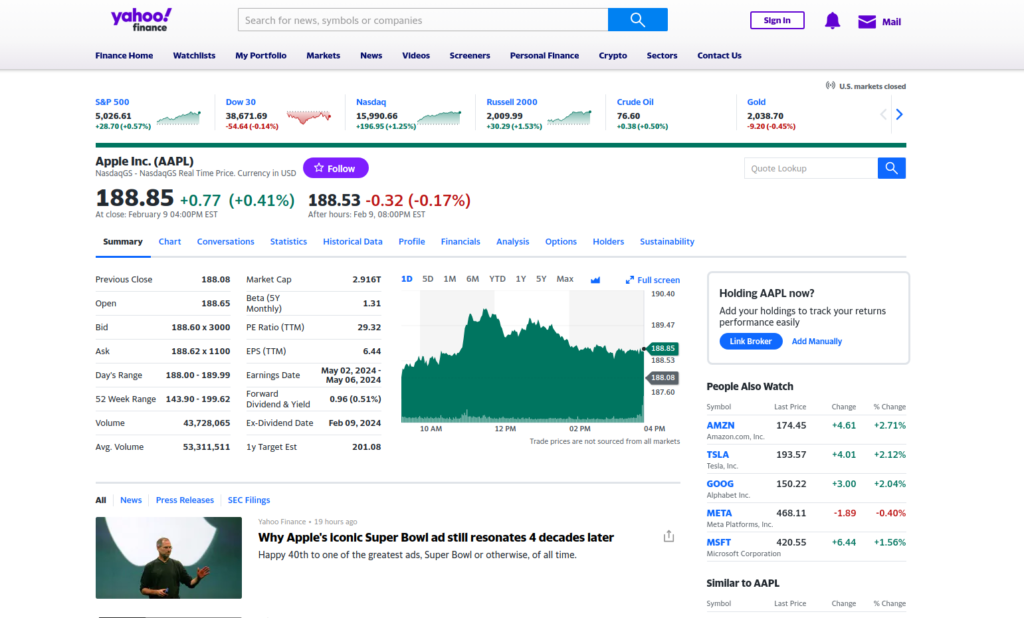
There is a lot of information here. But let’s say we wanted to get the information from the tables listing things like “Previous Close”, “Open”, “Market Cap”, “PE Ratio (TTM)”, etc.
If we want to know what HTML elements and properties these tables have, we should use our web browser’s built-in developer tools to find the tags. Let’s use Chrome as an example. Here is an overview page from Google on the Chrome dev tools.
Looking at a page’s source with Chrome Developer Tools
To make finding HTML tags easy, developer tools usually have a tag selector tool. The developer tools can be opened in the browser’s menu (top right three vertical dots), then under “More tools”:
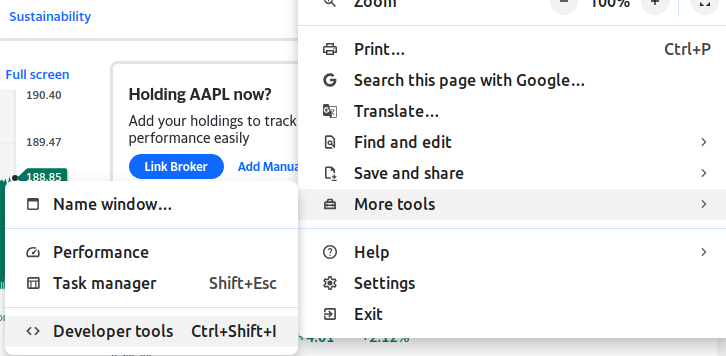
Or by pressing Ctrl+Shift+i.
Another window or pane should open up next to the web page with all kinds of information:
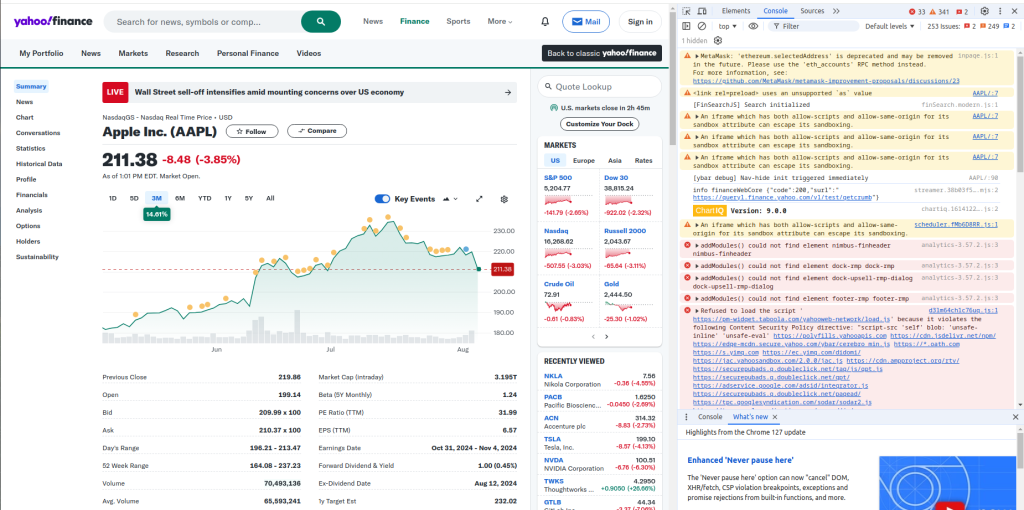
Going into what all this means is outside the scope of this tutorial. In short, the lines of text here are basically what the website code prints to the web console similar to how we’re printing information to the command line / terminal in our Python program.
At the top of this pane is a small arrow icon:

When we click this we can select an element and jump to the element in the page’s source directly instead of having to wade through all the HTML elements ourselves. If we move our mouse cursor over to the table it should light up like so:
Then when we click on the table the right pane in the developers tools should switch to the elements tab and show the selected element:
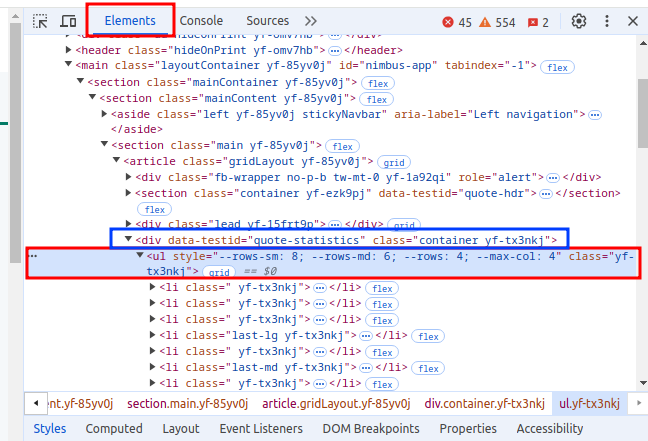
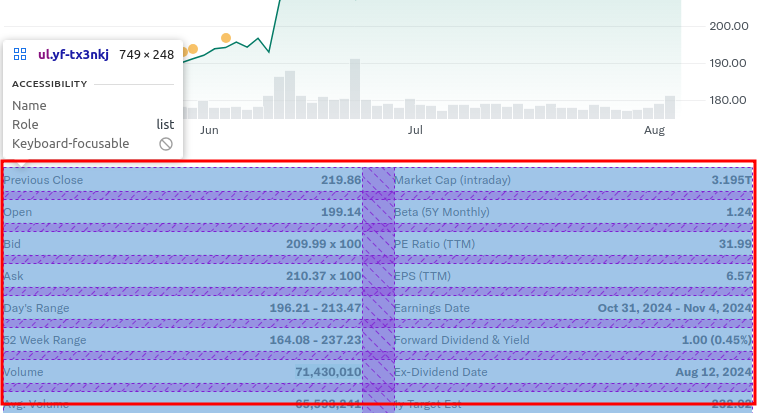
It looks like the table isn’t actually a table element but a <ul> element. Which stands for “unordered list”. We could use this tag to select tables on the page. However, there might be other <ul> elements so we could get several of them. Is there no distinguishing property? The class property: class="yf-tx3nkj" isn’t very informative, neither is the style property.
What if we look at the parent element of this <ul>? Look at the blue rectangle in the screenshot. This parent <div> has a data-testid property that looks like this data-testid="quote-statistics". That sounds pretty specific so we can probably easily use that.
First, let’s try the hard way and use the <ul> element, to see what we get.
To get the list of <ul> elements is easy. Similar to what we did with the h1 tag, we can use the find_all function. We will again loop through the list of results and print the text with the get_text function. However, in this case, let’s use the enumerate class so that we can also print the index of each entry. That way we can more easily see which unordered list holds the information we are looking for.
Here is the updated code for our growing Python web scraper code:
import requests
import sys
from bs4 import BeautifulSoup

result = requests.get(sys.argv[1])

soup = BeautifulSoup(result.text, 'html.parser')

h1_tags = soup.find_all('h1')

for tag in h1_tags:
    print(tag.get_text())

ul_list = soup.find_all('ul')

print(f"number of items: {len(ul_list)}")

for index, ul_element in enumerate(ul_list):
    print(f"{index}: {ul_element.get_text()}")
    print("-----")

print(sys.argv)
On line 14, we call find_all('ul') to get a list of table elements.
On line 16, we print the “length” (number of items) of the list called ul_list using the len function and what is called an “f” string. By putting an f in front of the "we can then use {} to insert variables or expressions into the string. In this case len(ul_list). This is very useful for printing information to see what is happening while the program runs. Without having to step through the code in debug mode.
Then on line 18, we have another for loop. This time we use enumerate to which gives us an index value of each iteration and a value of what is in the list. The code assigns these to the variables index and table respectively.
Finally, we print this index value together with the text from the unordered list to be able to see the content and know which index is associated with it. The print("-----")line is there to make it clear in the output to the command line where the information of each table ends.
Running the program to list tables
Let’s run the program again now with: python main.py https://finance.yahoo.com/quote/AAPL
Yahoo Finance
Apple Inc. (AAPL)
number of items: 55
0:  Today's news  US  Politics  World  Tech  Reviews and deals  Audio  Computing  Gaming  Health  Home  Phones  Science  TVs    Climate change  Health  Science  2024 election  Originals  The 360
-----
1:  Reviews and deals  Audio  Computing  Gaming  Health  Home  Phones  Science  TVs
-----
2:  The 360
-----
3:  Health  COVID-19  Fall allergies  Health news  Mental health  Relax  Sexual health  Studies  The Unwind    Parenting  Family health  So mini ways    Style and beauty  It Figures  Unapologetically    Horoscopes  Shopping  Buying guides    Food  Travel  Autos  Gift ideas  Buying guides
-----
4:  COVID-19  Fall allergies  Health news  Mental health  Relax  Sexual health  Studies  The Unwind
-----
5:  Family health  So mini ways
Notice that we only see text and no tags. Since we are listing the contents of a <ul> element we might expect to see row and column elements like <li> (list item) and other kinds of HTML elements. However, because we used the get_text() function we only get the text contents and not all the HTML elements.
There appear to be a lot of <ul> elements on this page, currently 55 in fact. We have to search a bit to see which one holds the statistics we’re looking for. This is not ideal.
Now let’s use the parent <div> we saw earlier to do more specific filtering.
Side track: understanding HTML page structure
HTML elements are often very nested. Meaning, one HTML element usually contains many other HTML elements (children) and those child elements can also contain HTML elements. Here is a simple example HTML page:
<!DOCTYPE html>
<html>
<head>
<title>My Simple Page</title>
</head>
<body>
<div class="container">
<div class="navigation">
<ul>
<li><a href="#home">Home</a></li>
<li><a href="#about">About</a></li>
<li><a href="#contact">Contact</a></li>
</ul>
</div>
<div class="main-content">
<section id="home">
<h2>Home Section</h2>
<p>This is the introduction to my simple HTML page.</p>
</section>
<div class="schedule-table-section">
<h2>My Schedule</h2>
<table border="1">
<tr>
<th>Day</th>
<th>Activity</th>
</tr>
<tr>
<td>Monday</td>
<td>Learn HTML</td>
</tr>
<tr>
<td>Tuesday</td>
<td>Practice CSS</td>
</tr>
<tr>
<td>Wednesday</td>
<td>Explore JavaScript</td>
</tr>
</table>
</div>
<div class="about-me-table-section">
<h2>About Me</h2>
<table border="1">
<tr>
<th>Attribute</th>
<th>Details</th>
</tr>
<tr>
<td>Name</td>
<td>John Doe</td>
</tr>
<tr>
<td>Occupation</td>
<td>Web Developer</td>
</tr>
<tr>
<td>Hobbies</td>
<td>Coding, Reading, Hiking</td>
</tr>
<tr>
<td>Favorite Language</td>
<td>JavaScript</td>
</tr>
</table>
</div>
</div>
</div>
<footer>
<p>© 2024 My Simple Page</p>
</footer>
</body>
</html>
Here we see that the <table> elements are nested in “parent” <div> elements. Usually a web page is divided into logical sections and groupings like this using <div> elements or other elements. If we know this, we can use that knowledge to our advantages to more easily find and extract the information we are looking for.
For example, the first one has a parent: <div class="schedule-table-section>". In this case, we could use this CSS class schedule-table-section to filter for the <div> containing the <table> we want and then get the table element by further filtering for all tables within the <div>. Naturally, a real website is much more complicated but this is just to show what type of nesting we can expect.
Using beautiful soup to filter on an HTML element’s attribute
In this section, we will select the parent <div> we found earlier using its property. For this we will use the find function, it returns the first element matching the search parameters. If we look at what parameters this function has in the documenation. We can see there is an argument attrs this can be used to specify the attributes and attribute values to search for.
Here is the full code:
import requests
import sys
from bs4 import BeautifulSoup

result = requests.get(sys.argv[1])

soup = BeautifulSoup(result.text, 'html.parser')

h1_tags = soup.find_all('h1')

for tag in h1_tags:
    print(tag.get_text())

ul_list = soup.find_all('ul')

print(f"number of items: {len(ul_list)}")

for index, ul_element in enumerate(ul_list):
    print(f"{index}: {ul_element.get_text()}")
    print("-----")

parent_div = soup.find('div', {'data-testid': 'quote-statistics'})
stats_ul = parent_div.find('ul')
print(f"stats: {stats_ul.get_text()}")

print(sys.argv)
The new lines of code are highlighted.
Line 22 we call find and tell it to use a HTML element’s attribute to filter results. Essentially it says “find a div where the data-testid attribute has the value quote-statistics“. And because we are using find it will only return one result.
Then we can use the resulting object assigned to the parent_div variable to do another search with find. On line 23 we filter for the ul (unordered list) . Assuming there is only one ul in the div.
Finally, on line 24 we print the text in the ul using print and an “f string”.
When we run the program we will see the statistics data:
-----
stats:  Previous Close 219.86   Open 199.14   Bid 209.03 x 300  Ask 210.68 x 100  Day's Range 196.21 - 213.47   52 Week Range 164.08 - 237.23   Volume 76,835,976   Avg. Volume 65,593,241   Market Cap (intraday) 3.202T   Beta (5Y Monthly) 1.24  PE Ratio (TTM) 32.06   EPS (TTM) 6.57   Earnings Date Oct 31, 2024 - Nov 4, 2024  Forward Dividend & Yield 1.00 (0.45%)  Ex-Dividend Date Aug 12, 2024  1y Target Est 232.02
This data is not very structured and hard to work with. We want to turn this into structured like a dictionary object with a key/label and a number value.
To do that we have to look a bit closer at the HTML.
Turning the data into structured information
If we want to turn the entire text in the <ul> element into structured information we should go through each row of the HTML table structure individually. In this case, each row is represented by a <li> element and the “columns” are <span> elements. We can see this if we expand the elements in the web browser’s development tools:
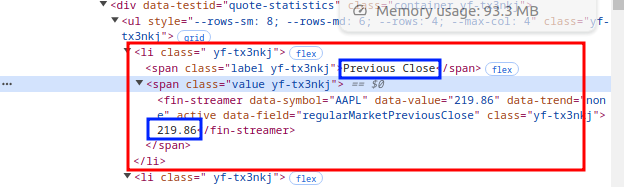
Here we see that a <li> element has two <span> elements, one with a name for the value and the other has a value in a <fin-streamer> element. We can ignore the <fin-streamer> element because if we use the get_text() function of the parent <span> we will get the number value too.
So, for the next step we should get the list of the <li> elements and then loop through them to get the information we need:
list_items = stats_ul.find_all('li')
for item in list_items:
    columns = item.find_all('span')
    print(f"{columns[0].get_text()}: {columns[1].get_text()}")
Here we loop through all the list items on line 26, then use find_all('span') to find all span elements. Then we use indexing to print the “label” text and the associated value.
Running our Python web scraper now should give a more structured and readable result:
-----
Previous Close: 219.86
Open: 199.14
Bid: 209.07 x 100
Ask: 217.39 x 100
Day's Range: 196.21 - 213.47
52 Week Range: 164.08 - 237.23
Volume: 117,397,952
Avg. Volume: 66,365,595
Market Cap (intraday): 3.182T
Beta (5Y Monthly): 1.24
PE Ratio (TTM): 31.85
EPS (TTM): 6.57
Earnings Date: Oct 31, 2024 - Nov 4, 2024
Forward Dividend & Yield: 1.00 (0.48%)
Ex-Dividend Date: Aug 12, 2024
1y Target Est: 232.02
['main.py', 'https://finance.yahoo.com/quote/AAPL']
Storing web scraper data with Python
Next we will store the data in a file so that we can use that data later for analysis. We can easily do this with the json standard library if we put the data into a dict object.
We will will store the data as a list of dict objects. It is also a good idea to save a timestamp with the data so that we know when we scraped this data. So that we can sort data by date, or take only the latest scrape of the day if we scrape the same data multiple times a day.
Furthermore, when we save the data let’s append it to existing data (if we have any) so that we can create a history of scrapes we have done.
Saving dict objects
Let’s update the imports first:
from datetime import datetime, timezone
import json
import os
import requests
import sys

from bs4 import BeautifulSoup
We’re importing:
datetime:timezone: to be able to use the global standard time Coordinated Universal Time (UTC). It is common to use UTC for saving time so that no matter what time zone the code runs in it will always produce the same time.os: used for operating system function. In this case, we will use it to check if our scraped data file exists or not. If it does exist, we can then load that file and append new data to it.
Turn data into a dict
Then update the li loop to store everything in a dictionary using the first span text as the key in the dictionary and the second as the value:
parent_div = soup.find("div", {"data-testid": "quote-statistics"})
stats_ul = parent_div.find("ul")

list_items = stats_ul.find_all("li")
data = {}
for item in list_items:
    columns = item.find_all("span")
    data[columns[0].get_text()] = columns[1].get_text()

data["timestamp"] = str(datetime.now(timezone.utc))
print(json.dumps(data, indent=2))
On line 30 we create an empty dictionary, so that we can create keys and values in the loop.
On line 33 we use the first column to create a key in the dictionary. If you assign a value to a key in the dictionary like this the dict will create that key automatically.
Then we add a timestamp on line 35 outside of the loop. Otherwise the timestamp would be updated for each row of stats. Which doesn’t make sense, we only need to set the timestamp value once.
Lastly, we print the dict object using json.dumps(data, indent=2) which turns the dict of data into a nicely formatted string for printing.
Save data to a file
Now, let’s save the data to a file called scraped_data.json. We should also write some code to load an existing file so that we can append to it. But before loading a file we have to check that it exists or else we will get an error:
scraped_data = []
data_file = "data.json"
if os.path.exists(data_file):
    with open(data_file, "r") as file:
        scraped_data = json.load(file)

scraped_data.append(data)
with open(data_file, "w") as file:
    json.dump(scraped_data, file, indent=2)
On line 38 we start with an empty list for the scraped data, so that we have something to append our newly scraped data to and then save later to a file.
On line 39 we create a variable to hold the filename and use that variable in other places where needed. Doing that allows us to easily change the filename later since we would only have to change one place here.
Then on lines 40-42 we check to see if the file exists. And if it does we load it using the json library. This with open code is a way to cleanly open a file and close it after we’re done using it. We specify the open mode as "r" which means “read mode”.
Finally, on lines 44-46, we append the data to the scraped_data list. We open the data file now in “write mode” ("w"), and then save the file using json.dump. Earlier we used json.dumps with an s at the end. The difference is that json.dump saves to a file, and json.dumps produces a string.
Running the Python web scraper code
When we run the code now our Python web scraper will produce a file in the project directory called data.json:
[
  {
    "Previous Close": "219.86 ",
    "Open": "199.14 ",
    "Bid": "209.07 x 100",
    "Ask": "217.39 x 100",
    "Day's Range": "196.21 - 213.47 ",
    "52 Week Range": "164.08 - 237.23 ",
    "Volume": "117,397,952 ",
    "Avg. Volume": "66,365,595 ",
    "Market Cap (intraday)": "3.182T ",
    "Beta (5Y Monthly)": "1.24",
    "PE Ratio (TTM)": "31.85 ",
    "EPS (TTM)": "6.57 ",
    "Earnings Date": "Oct 31, 2024 - Nov 4, 2024",
    "Forward Dividend & Yield": "1.00 (0.48%)",
    "Ex-Dividend Date": "Aug 12, 2024",
    "1y Target Est": "214.63 ",
    "timestamp": "2024-08-06 07:33:39.295913+00:00"
  }
]
If we run the program again we should see two entries:
[
  {
    "Previous Close": "219.86 ",
    "Open": "199.14 ",
    "Bid": "209.07 x 100",
    "Ask": "217.39 x 100",
    "Day's Range": "196.21 - 213.47 ",
    "52 Week Range": "164.08 - 237.23 ",
    "Volume": "117,397,952 ",
    "Avg. Volume": "66,365,595 ",
    "Market Cap (intraday)": "3.182T ",
    "Beta (5Y Monthly)": "1.24",
    "PE Ratio (TTM)": "31.85 ",
    "EPS (TTM)": "6.57 ",
    "Earnings Date": "Oct 31, 2024 - Nov 4, 2024",
    "Forward Dividend & Yield": "1.00 (0.48%)",
    "Ex-Dividend Date": "Aug 12, 2024",
    "1y Target Est": "214.63 ",
    "timestamp": "2024-08-06 07:33:39.295913+00:00"
  },
  {
    "Previous Close": "219.86 ",
    "Open": "199.14 ",
    "Bid": "209.07 x 100",
    "Ask": "217.39 x 100",
    "Day's Range": "196.21 - 213.47 ",
    "52 Week Range": "164.08 - 237.23 ",
    "Volume": "117,397,952 ",
    "Avg. Volume": "66,365,595 ",
    "Market Cap (intraday)": "3.182T ",
    "Beta (5Y Monthly)": "1.24",
    "PE Ratio (TTM)": "31.85 ",
    "EPS (TTM)": "6.57 ",
    "Earnings Date": "Oct 31, 2024 - Nov 4, 2024",
    "Forward Dividend & Yield": "1.00 (0.48%)",
    "Ex-Dividend Date": "Aug 12, 2024",
    "1y Target Est": "214.63 ",
    "timestamp": "2024-08-06 07:35:02.122402+00:00"
  }
]
Looking at this output, it feels like something is missing. We can’t really tell where this data is from! If we first scrape the AAPL ticker and then NVDA there is no way to tell them apart.
We should at least include the ticker in the data set. It is also a good idea to include the source URL so we know where the data came from.
Adding ticker and URL information to the data
Adding this information is very easy. We already have the URL and we can get the ticker from the end of the URL.
We can add the updated code after the timestamp code:
data["timestamp"] = str(datetime.now(timezone.utc))
data["url"] = sys.argv[1]
data["ticker"] = sys.argv[1].split("/")[-1]
print(json.dumps(data, indent=2))
Line 36 is self explanatory, this is just getting the URL argument and putting it in the dictionary at the "url" key.
On line 37 we get the ticker by splitting the URL into pieces on the forward slashes in the path ("/") then we get the last piece by using the [-1] index. This basically means “first index from the end”.
Let’s delete the old data.json file and run the code again so that we don’t have any items without the url and ticker properties:
[
  {
    "Previous Close": "219.86 ",
    "Open": "199.14 ",
    "Bid": "209.07 x 100",
    "Ask": "217.39 x 100",
    "Day's Range": "196.21 - 213.47 ",
    "52 Week Range": "164.08 - 237.23 ",
    "Volume": "117,397,952 ",
    "Avg. Volume": "66,365,595 ",
    "Market Cap (intraday)": "3.182T ",
    "Beta (5Y Monthly)": "1.24",
    "PE Ratio (TTM)": "31.85 ",
    "EPS (TTM)": "6.57 ",
    "Earnings Date": "Oct 31, 2024 - Nov 4, 2024",
    "Forward Dividend & Yield": "1.00 (0.48%)",
    "Ex-Dividend Date": "Aug 12, 2024",
    "1y Target Est": "214.63 ",
    "timestamp": "2024-08-06 07:53:01.531945+00:00",
    "url": "https://finance.yahoo.com/quote/AAPL",
    "ticker": "AAPL"
  }
]
The complete code so far
Here is the complete code listing for what we have built so far:
from datetime import datetime, timezone
import json
import os
import requests
import sys

from bs4 import BeautifulSoup

result = requests.get(sys.argv[1])

soup = BeautifulSoup(result.text, "html.parser")

h1_tags = soup.find_all("h1")

for tag in h1_tags:
    print(tag.get_text())

ul_list = soup.find_all("ul")

print(f"number of items: {len(ul_list)}")

for index, ul_element in enumerate(ul_list):
    print(f"{index}: {ul_element.get_text()}")
    print("-----")

parent_div = soup.find("div", {"data-testid": "quote-statistics"})
stats_ul = parent_div.find("ul")

list_items = stats_ul.find_all("li")
data = {}
for item in list_items:
    columns = item.find_all("span")
    data[columns[0].get_text()] = columns[1].get_text()

data["timestamp"] = str(datetime.now(timezone.utc))
data["url"] = sys.argv[1]
data["ticker"] = sys.argv[1].split("/")[-1]
print(json.dumps(data, indent=2))

scraped_data = []
data_file = "data.json"
if os.path.exists(data_file):
    with open(data_file, "r") as file:
        scraped_data = json.load(file)

scraped_data.append(data)
with open(data_file, "w") as file:
    json.dump(scraped_data, file, indent=2)

print(sys.argv)
Improving the Python web scraper
We have a nice basic program but the code isn’t very well organized, it is just one script file without functions. On top of that there is some code that isn’t needed for web scraping the statistics data. Namely, the part for printing the <h1> and <ul> elements.
Also, if we want to scrape multiple tickers we have to keep starting the program with a different parameter. Wouldn’t it be move convenient if we could give our program a list of URLs to scrape instead?
These are areas in our Python web scraper we will improve in this section of the tutorial.
Here is what we will change:
- improve the command line interface using the
clickpackage - allow multiple URLs as parameters to scrape all at once
- add option to specify a filename to save the data to
- clean up the code
Using the click package
The click package is a package that helps with creating command line interfaces in an easy and fast way with little code. Click stands for “Command Line Interface Creation Kit”.
Let’s install the click package for our project:
pip install click
Then we will put all of the code in a function add decorators from the click package so the function can receive the command line parameters. Similar to what we did with sys.argv but nicer.
A side note on decorators
Decorators are a feature of Python that allows us to modify the behavior of functions or classes. They are often used for logging, access control, instrumentation, caching, and more. Decorators themselves are just functions that take another function as an argument and return a new function that usually extends the behavior of the original function.
A decorator is denoted by a @ and then the decorator function name. Here’s a simple example to illustrate how decorators work:
def my_decorator(func):
    def wrapper():
        print("Something is happening before the function is called.")
        func()
        print("Something is happening after the function is called.")
    return wrapper

@my_decorator
def say_hello():
    print("Hello!")

say_hello()
When the scripts runs code will first print the message “Something is happening before the function is called.” then “Hello!” and finally: “Something is happening after the function is called.”
Full code for click changes and code clean up
Here is the full code, we will go through it in parts:
import click
from datetime import datetime, timezone
import json
import os
import requests

from bs4 import BeautifulSoup


@click.command()
@click.argument("urls", nargs=-1)
@click.option(
    "--output", default="data.json", help="The file to save the scraped data to."
)
def scrape_data_to_file(urls, output):
    scraped_data = []

    if os.path.exists(output):
        with open(output, "r") as file:
            scraped_data = json.load(file)

    for url in urls:
        result = requests.get(url)
        soup = BeautifulSoup(result.text, "html.parser")

        parent_div = soup.find("div", {"data-testid": "quote-statistics"})
        if not parent_div:
            print(f"No statistics div found for URL: {url}")
            continue

        stats_ul = parent_div.find("ul")
        if not stats_ul:
            print(f"No statistics found for URL: {url}")
            continue

        list_items = stats_ul.find_all("li")
        data = {}
        for item in list_items:
            columns = item.find_all("span")
            data[columns[0].get_text()] = columns[1].get_text()

        data["timestamp"] = str(datetime.now(timezone.utc))
        data["url"] = url
        data["ticker"] = url.split("/")[-1]
        print(json.dumps(data, indent=2))

        scraped_data.append(data)

    with open(output, "w") as file:
        json.dump(scraped_data, file, indent=2)


if __name__ == "__main__":
    scrape_data_to_file()
Updated import
Here the only new addtion to the imports is click and sys is no longer needed so we can remove it:
import click
from datetime import datetime, timezone
import json
import os
import requests

from bs4 import BeautifulSoup
Function definition with decorators
This code defines the function and the parameters available to the command line interface:
@click.command()
@click.argument("urls", nargs=-1)
@click.option(
    "--output", default="data.json", help="The file to save the scraped data to."
)
def scrape_data_to_file(urls, output):
So this scrape_data_to_file function has three decorators:
@click.command(): this decorator designates thescrape_data_to_filefunction as a command line command. This sets up the function to receive command line arguments.@click.argument("urls", nargs=-1): here we indicate that theurlsargument can accept any number of values. In other words, this allows us to put in multiple URLs to scrape at the same time.@click.option("--output", default="data.json", help="The file to save the scraped data to."): specify optional argument. Thehelp=part is to show a description for this option if we use the help command on the command line interface.
❯ python main.py --help
Usage: main.py [OPTIONS] [URLS]...

Options:
  --output TEXT  The file to save the scraped data to.
  --help         Show this message and exit.
The click package makes sure to map the "urls" and "--output" argument/option names to the function parameters on line 15.
Loading the file
In the updated code we load the file first because we are looping through multiple URLs we have to have the scraped_data list ready before the for loop to be able to append data to it:
    scraped_data = []

    if os.path.exists(output):
        with open(output, "r") as file:
            scraped_data = json.load(file)
Loop through the URLs and scrape data
The main part of the code is looping through URLs and scraping the data from the web pages:
    for url in urls:
        result = requests.get(url)
        soup = BeautifulSoup(result.text, "html.parser")

        parent_div = soup.find("div", {"data-testid": "quote-statistics"})
        if not parent_div:
            print(f"No statistics div found for URL: {url}")
            continue

        stats_ul = parent_div.find("ul")
        if not stats_ul:
            print(f"No statistics found for URL: {url}")
            continue

        list_items = stats_ul.find_all("li")
        data = {}
        for item in list_items:
            columns = item.find_all("span")
            data[columns[0].get_text()] = columns[1].get_text()

        data["timestamp"] = str(datetime.now(timezone.utc))
        data["url"] = url
        data["ticker"] = url.split("/")[-1]
        print(json.dumps(data, indent=2))

        scraped_data.append(data)
The main things changed here are some checks on empty values for the parent_div on line 27 and stats_ul on line 32. There we have a condition like if not parent_div: this means: “if parent_div does not have a value then do the following… in this case it is printing a message that the statistics div was not found and then on line 29 the keyword continue. This continue keyword makes the loop stop executing the code of the current item and instead continue on with the next item in the list from the start of the loop.
At the end of the loop code we append the web page data to the scraped_data list.
Saving the scraped data to a file
Finally, when the loop, has completed running through all the URLs we save the total scraped data list. Here using the output variable value as the filename:
 with open(output, "w") as file:
        json.dump(scraped_data, file, indent=2)
Main check
The last addition to the code is adding a condition to check if this Python file is being executed as a script or included as a module. If it is being used as a Python module we don’t want any code to run. We only want to run the web scraper if Python executes this file directly:
if __name__ == "__main__":
    scrape_data_to_file()
Testing the Python web scraper CLI
With the new code changes finished we can test the Python web scraper with multiple URLs at the same time. This is how to use the new CLI:
python main.py https://finance.yahoo.com/quote/AAPL https://finance.yahoo.com/quote/NVDA https://finance.yahoo.com/quote/CRSP --output scraped.json
After running this command we should have a new file called scraped.json containing three entries.
Conclusion
With this tutorial we have learned how to start with nothing to a few lines of Python code to a CLI web scraper program that downloads web page data and extracts some information from it. We also learned some basics of how to analyze the HTML of a web page to locate which elements on the page have the information we want.
We also learned some basics of click and beautifulsoup4 packages among others.
Please experiment with getting other data from the Yahoo! Finance web page like news article headlines to get a better understanding of how scraping works.
The code for the complete project can be found on my GitHub page: https://github.com/tmsdev82/basic-python-web-scraper
To keep up to date with new tutorials coming out please follow me on X:
Follow @tmdev82