
In this tutorial, we will learn how to use Cascading Style Sheets (CSS) and JavaScript in a WebAssembly (WASM) Rust front-end using the Yew framework. This is part 2 in a series of tutorials about the basics of the Yew framework. We will look at how to reference CSS and dynamically use CSS classes with Yew, and how to interact with a JavaScript library.
For the JavaScript library interaction example, we will use chart.js, which is a library for visualizing data using charts.
Part 1 of this tutorial series on Yew can be found here: WebAssembly Rust front-end with Yew: how to P1
The completed project can be found on my GitHub here: https://github.com/tmsdev82/yew-css-and-js-tutorial
Contents
- 1 Prerequisites
- 2 Why use JavaScript in our WASM Rust app?
- 3 Project setup
- 4 Basic Yew App foundation
- 5 How to make use of Cascading Style Sheets (CSS)
- 6 Setting CSS classes on an element with Rust code
- 7 Adding JavaScript interoperability to our project
- 8 Using Chart.js with Rust via WebAssembly
- 9 Updating our chart with user input
- 10 Conclusion
Prerequisites
Going through the first tutorial is helpful as is prior Rust experience. This tutorial is not aimed at complete beginners.
The WASM application bundler called Trunk is required to be installed, see the official website here.
Why use JavaScript in our WASM Rust app?
We are going to look at how to call JavaScript code from our Rust code. But why would we even want to do that? Why not do everything with Rust and Yew?
Well, for example, it could be that web functionality we often use does not have any mature crates for Rust yet. Or we just really like a particular JS library.
Even though, Rust has some charting crates for WebAssembly projects we’re using a JavaScript chart library, chart.js, as an example of JavaScript integration here.
Project setup
Let’s set up our CSS and JavaScript WASM Rust project now using the cargo command: cargo yew-routing-and-js-tutorial.
Next, we’ll add the required dependencies in the Cargo.toml file:
- yew: A framework for making client-side single-page apps.
- wasm-bindgen: Easy support for interacting between JS and Rust.
- log: A lightweight logging facade for Rust.
- wasm-logger: A logger that sends a message with its Rust source’s line and filename to the browser console.
- gloo: A toolkit for building fast, reliable Web applications and libraries with Rust and Wasm. We’ll use this for the
Timerfunctionality. - web-sys: Bindings for all Web APIs, a procedurally generated crate from WebIDL.
[package]
name = "yew-css-and-js-tutorial"
version = "0.1.0"
edition = "2021"

# See more keys and their definitions at https://doc.rust-lang.org/cargo/reference/manifest.html

[dependencies]
yew = "0.19.3"
wasm-bindgen = "0.2.81"
log = "0.4.6"
wasm-logger = "0.2.0"
gloo = "0.8"
web-sys = "0.3.57"
Basic Yew App foundation
In this section, we are going to implement a simple minimal application.
Let’s start with the same basic setup as in the previous tutorial: WebAssembly Rust front-end with Yew: how to P1.
First, let’s add index.html to the root of our CSS and JavaScript WASM Rust project:
<!DOCTYPE html>
<html lang="en">
<head>
    <meta charset="UTF-8">
    <meta http-equiv="X-UA-Compatible" content="IE=edge">
    <meta name="viewport" content="width=device-width, initial-scale=1.0">
    <title>Routing and Chart.js</title>
</head>
<body>

</body>
</html>
And then update main.rs with the following code:
use yew::prelude::*;

struct App;

impl Component for App {
    type Message = ();
    type Properties = ();

    fn create(ctx: &Context<Self>) -> Self {
        Self
    }

    fn view(&self, ctx: &Context<Self>) -> Html {
        html! {
            <div>
                <h1>{"Main page"}</h1>
            </div>
        }
    }
}

fn main() {
    wasm_logger::init(wasm_logger::Config::default());
    yew::start_app::<App>();
}
We write a struct-based Component implementation here. This requires us to implement certain things like: type Message, type Properties and functions: fn create, and fn view.
The view function contains code that determines what the component will ultimately show as HTML.
Then in the fn main function of main.rs we init the wasm_logger which allows us to use log to print logs to the web console. For example by writing log::debug!("this is a debug line").
Finally, we start the application on line 24.
Now we have the basic foundation for the rest of the project.
How to make use of Cascading Style Sheets (CSS)
In this section, we are going to add CSS to our CSS and JavaScript WASM Rust with Yew project. Even though it is straightforward, looking at an example can be helpful.
Adding our own CSS to our project
Normally it is very easy to add CSS to your web page, and the same is true with a WASM / Yew frontend. Because it only takes a single line to add CSS, which is not really different from how it’s typically done. We just need to add a keyword, data-trunk to the HTML tag attributes. This will tell the Trunk bundler tool to pick up the CSS and package it.
So, let’s create a new directory in the root of our project called css and then add a file called main.css in there with a few simple lines:
h1 {
    color: rgb(11, 142, 165);
}
Now let’s add a link tag to our index.html file to reference this CSS:
<!DOCTYPE html>
<html lang="en">
<head>
    <meta charset="UTF-8">
    <meta http-equiv="X-UA-Compatible" content="IE=edge">
    <meta name="viewport" content="width=device-width, initial-scale=1.0">
    <link data-trunk rel="css" href="/css/main.css">
    <title>Routing and Chart.js</title>
</head>
<body>

</body>
</html>
If we run our web app now we should see a different color header text:

Adding external CSS to our project
Now let’s add external CSS through a content delivery network (CDN). However, there is no special extra needed. We’ll use the Bulma framework to make our front-end look nicer:
<!DOCTYPE html>
<html lang="en">
<head>
    <meta charset="UTF-8">
    <meta http-equiv="X-UA-Compatible" content="IE=edge">
    <meta name="viewport" content="width=device-width, initial-scale=1.0">
    <link
    rel="stylesheet"
    href="https://cdn.jsdelivr.net/npm/bulma@0.9.0/css/bulma.min.css"
    />
    <link data-trunk rel="css" href="/css/main.css">
    <title>Routing and Chart.js</title>
</head>
<body>

</body>
</html>
Let’s update our own CSS file main.css:
h1.title {
    color: rgb(11, 142, 165);
}
Finally, we’ll update main.rs to include some extra styling. We can use classes in our Yew html! macro in the normal HTML way:
use yew::prelude::*;

struct App;

impl Component for App {
    type Message = ();
    type Properties = ();

    fn create(ctx: &Context<Self>) -> Self {
        Self
    }

    fn view(&self, ctx: &Context<Self>) -> Html {
        html! {
            <div class="section">
                <div class="container">
                    <h1 class="title">{"Main page"}</h1>
                </div>
            </div>
        }
    }
}

fn main() {
    wasm_logger::init(wasm_logger::Config::default());
    yew::start_app::<App>();
}
Now our app should have some better styling, though we only have one element to look at:

We can also set CSS classes dynamically using Rust code. We’ll look at how to do that next.
Setting CSS classes on an element with Rust code
It is common to want to set styling on one or more elements dynamically depending on some conditions. For example to highlight some field that is required to be filled in or to draw attention to data represented in the UI.
So let’s look at some examples of conditional styling in this section.
Change class based on match conditional
We’ll pretend we have some data we want to display in a table and change the color of the text depending on a value in the data.
Some dummy data
So let’s add a file called data_source.rs where we will put the data struct and a function that simulates retrieving data:
pub struct DataPoint {
    pub item_name: String,
    pub quantity: f32,
    pub value: f32
}

pub fn get_data() -> Vec<DataPoint> {
    vec![DataPoint{
        item_name: "item1".to_string(),
        quantity: 105.0,
        value: 0.0
    },DataPoint{
        item_name: "item1".to_string(),
        quantity: 10.0,
        value: 30.0
    },
    DataPoint{
        item_name: "item2".to_string(),
        quantity: 5.0,
        value: -5.0
    },
    DataPoint{
        item_name: "item2".to_string(),
        quantity: 25.0,
        value: 105.0
    }
    ]
}
We define a simple data structure (DataPoint) here with some fields we can show in the HTML table later. Then we set up the get_data() function that simply creates a Vec with a number of DataPoint instances.
CSS colors for data conditions
Let’s update the CSS so we can color the text in our data table later appropriately:
h1.title {
    color: rgb(11, 142, 165);
}

.success {
    color: green;
}

.warning {
    color: orange;
}


.danger {
    color: red;
}
Updating main.rs to display a data table
Now let’s update main.rs to display this data on our page:
use yew::prelude::*;

mod data_source;

struct App;

impl Component for App {
    type Message = ();
    type Properties = ();

    fn create(ctx: &Context<Self>) -> Self {
        Self
    }

    fn view(&self, ctx: &Context<Self>) -> Html {

        let data = data_source::get_data();
        let cur_data_html = data.iter().map(|data_point| {
            html! {
                <tr class={match data_point.value {
                    x if x >= 100.0 => "success".to_string(),
                    x if x == 0.0 => "warning".to_string(),
                    x if x < 0.0 => "danger".to_string(),
                    _ => "".to_string()
                }}>
                    <td>{data_point.item_name.clone()}</td>
                    <td>{data_point.quantity}</td>
                    <td>{data_point.value}</td>
                </tr>
            }
        });

        html! {
            <div class="section">
                <div class="container">
                    <h1 class="title">{"Main page"}</h1>
                    <div>
                        <table class="table is-hoverable is-striped">
                            <thead>
                                <tr>
                                    <th>{"Item"}</th>
                                    <th>{"Quantity"}</th>
                                    <th>{"Value"}</th>
                                </tr>
                            </thead>
                            <tbody>
                            {for cur_data_html}
                            </tbody>
                        </table>
                    </div>
                </div>
            </div>
        }
    }
}

fn main() {
    wasm_logger::init(wasm_logger::Config::default());
    yew::start_app::<App>();
}
Let’s go through the main changes in the file here. First, the section where we’re getting the data and generating table rows:
        let data = data_source::get_data();
        let cur_data_html = data.iter().map(|data_point| {
            html! {
                <tr class={match data_point.value {
                    x if x >= 100.0 => "success".to_string(),
                    x if x == 0.0 => "warning".to_string(),
                    x if x < 0.0 => "danger".to_string(),
                    _ => "".to_string()
                }}>
                    <td>{data_point.item_name.clone()}</td>
                    <td>{data_point.quantity}</td>
                    <td>{data_point.value}</td>
                </tr>
            }
        });
On line 17 we get the data from our data_source module. Then we loop through the Vec<DataPoint> using map to generate an iterator containing the results of our html! macro calls.
Then on lines 20 to 25 we use a match expression to set the CSS class based on the value of data_point.value. We use boolean conditionals in this case as patterns for the match expression.
The table definition is simple, in the <tbody> content we loop through cur_data_html on line 47:
        html! {
            <div class="section">
                <div class="container">
                    <h1 class="title">{"Main page"}</h1>
                    <div>
                        <table class="table is-hoverable is-striped">
                            <thead>
                                <tr>
                                    <th>{"Item"}</th>
                                    <th>{"Quantity"}</th>
                                    <th>{"Value"}</th>
                                </tr>
                            </thead>
                            <tbody>
                            {for cur_data_html}
                            </tbody>
                        </table>
                    </div>
                </div>
            </div>
        }
The classes table is-hoverable is-striped are CSS classes defined by the Bulma framework mentioned earlier.
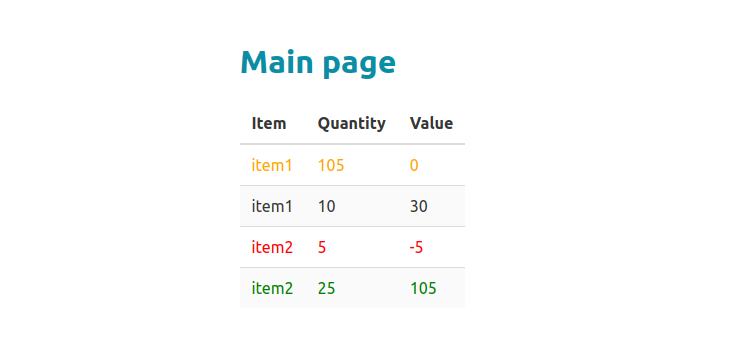
Now when we run the web app we should see a table with different colored text depending on the value of the “value” field:
Settings classes with a Vec or Array
Yew also allows us to use a Vec or Array to set classes on an element. For example, if we had a component where we can configure the styling through properties. In that case, we could have a variable number of styling classes applied to elements in the component.
Let’s write an example of that. We’ll create a new function component in a new file configurable_styling_component.rs:
use yew::prelude::*;

#[derive(Properties, PartialEq)]
pub struct ConfigurableStylingProps {
    pub message: &'static str,
    pub has_shadow: bool,
    pub is_dark_mode: bool,
    pub is_rounded: bool
}

#[function_component(ConfigurableStylingComponent)]
pub fn configurable_styling(props: &ConfigurableStylingProps) -> Html {
    let mut styles = vec!["test-element"];

    if props.has_shadow {
        styles.push("shadow");
    }

    if props.is_dark_mode {
        styles.push("dark");
    }

    if props.is_rounded {
        styles.push("rounded");
    }

    html! {
        <div class={styles}>
        {props.message}
        </div>
    }
}
Here we have a simple function_component with properties. This component will show a message. We also build up a mutable Vec for the CSS classes to apply to our element.
Next, let’s update the main.css file to add these styling classes:
h1.title {
    color: rgb(11, 142, 165);
}

.success {
    color: green;
}

.warning {
    color: orange;
}

.danger {
    color: red;
}

.test-element {
    margin-top: 15px;
    width: 200px;
    padding: 5px 10px;
    text-align: center;
}

.dark {
    color: white;
    background-color: black;
}

.shadow {
    box-shadow: 5px 5px lightblue;
}

.rounded {
    border-radius: 25px;
}
Finally, we’ll update main.rs to use our new component and use the properties to style it in different ways:
use yew::prelude::*;
use configurable_styling::ConfigurableStylingComponent;

mod data_source;
mod configurable_styling;

struct App;

impl Component for App {
    type Message = ();
    type Properties = ();

    fn create(ctx: &Context<Self>) -> Self {
        Self
    }

    fn view(&self, ctx: &Context<Self>) -> Html {

        let data = data_source::get_data();
        let cur_data_html = data.iter().map(|data_point| {
            html! {
                <tr class={match data_point.value {
                    x if x >= 100.0 => "success".to_string(),
                    x if x == 0.0 => "warning".to_string(),
                    x if x < 0.0 => "danger".to_string(),
                    _ => "".to_string()
                }}>
                    <td>{data_point.item_name.clone()}</td>
                    <td>{data_point.quantity}</td>
                    <td>{data_point.value}</td>
                </tr>
            }
        });

        html! {
            <div class="section">
                <div class="container">
                    <h1 class="title">{"Main page"}</h1>
                    <div>
                        <table class="table is-hoverable is-striped">
                            <thead>
                                <tr>
                                    <th>{"Item"}</th>
                                    <th>{"Quantity"}</th>
                                    <th>{"Value"}</th>
                                </tr>
                            </thead>
                            <tbody>
                            {for cur_data_html}
                            </tbody>
                        </table>
                    </div>
                    <ConfigurableStylingComponent message="element 1" is_dark_mode={true} has_shadow={true} is_rounded={true} />
                    <ConfigurableStylingComponent message="element 2" is_dark_mode={false} has_shadow={true} is_rounded={true} />
                    <ConfigurableStylingComponent message="element 3" is_dark_mode={false} has_shadow={true} is_rounded={false} />
                </div>
            </div>
        }
    }
}

fn main() {
    wasm_logger::init(wasm_logger::Config::default());
    yew::start_app::<App>();
}
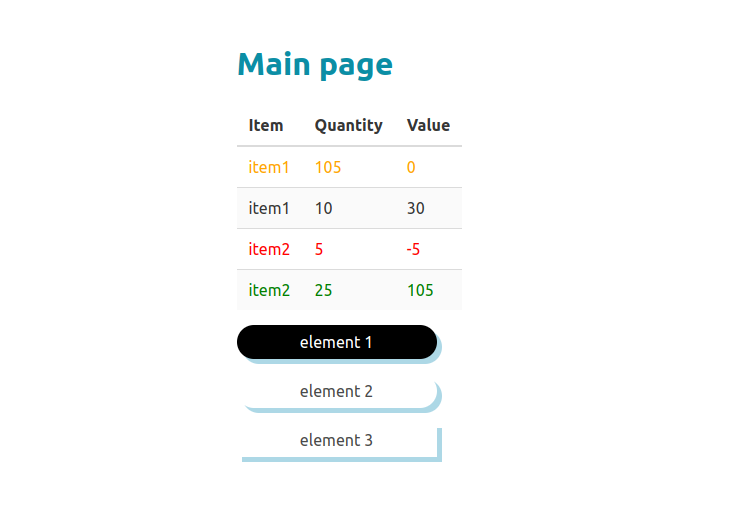
On lines 53 to 55 we create our Configurable styling components with differing settings. The end result looks like this:
Adding JavaScript interoperability to our project
In this section, we are going to add a simple JavaScript function and call it from our Rust code. Then in the section after this one, we will apply the same concepts to using the chart.js framework.
To call this JavaScript in our Rust code we have to use WASM bindgen. This is a library and tool to help Rust talk to JavaScript.
… this project allows JS/wasm to communicate with strings, JS objects, classes, etc, as opposed to purely integers and floats. Using
wasm-bindgenfor example you can define a JS class in Rust or take a string from JS or return one.
A simple JS function
Let’s add a directory js to the root of our Routing and JS WebAssembly Rust project and add a file called js_time.js. This file will export a single function for getting the current date string:
export function get_now_date() {
    console.log("get_now_date called!");
    var curr_date = new Date();
    return curr_date.toDateString();
}
Here on line 2 we simply log a message to the console so it’s easier for us to follow when our function is called. Then on line 3 we create a new Date object instance and return the date string at the end.
Defining the JavaScript function interface in Rust with bindgen
Now let’s define the function in our Rust code. Let’s add a file called bindings.rs:
use wasm_bindgen::prelude::*;

#[wasm_bindgen(module = "/js/js_time.js")]
extern "C" {
    #[wasm_bindgen]
    pub fn get_now_date() -> String;
}
We include wasm_bindgen here to have access to the wasm_bindgen attribute.
On line 4 we declare an external function interface with extern "C" as explained here and specify which JS module should be loaded. So with this, we define a so-called “foreign function interface” to enable Rust to call foreign code. This would also allow us to call C code for example, but in this case we will be calling JavaScript code.
On line 5 and 6 we specify the function signature from our JS file and add the wasm_bindgen attribute.
Now we just have to include this bindings.rs module in our main.rs and use the function somewhere to display the result.
Update main.rs to use our JavaScript function
Let’s open main.rs to add two lines of code to make use of this JavaScript function:
use yew::prelude::*;
use configurable_styling::ConfigurableStylingComponent;

mod data_source;
mod configurable_styling;
mod bindings;

struct App;

impl Component for App {
    type Message = ();
    type Properties = ();

    fn create(ctx: &Context<Self>) -> Self {
        Self
    }

    fn view(&self, ctx: &Context<Self>) -> Html {

        let data = data_source::get_data();
        let cur_data_html = data.iter().map(|data_point| {
            html! {
                <tr class={match data_point.value {
                    x if x >= 100.0 => "success".to_string(),
                    x if x == 0.0 => "warning".to_string(),
                    x if x < 0.0 => "danger".to_string(),
                    _ => "".to_string()
                }}>
                    <td>{data_point.item_name.clone()}</td>
                    <td>{data_point.quantity}</td>
                    <td>{data_point.value}</td>
                </tr>
            }
        });

        html! {
            <div class="section">
                <div class="container">
                    <h1 class="title">{"Main page"}</h1>
                    <h2 class="subtitle">{bindings::get_now_date()}</h2>
                    <div>
                        <table class="table is-hoverable is-striped">
                            <thead>
                                <tr>
                                    <th>{"Item"}</th>
                                    <th>{"Quantity"}</th>
                                    <th>{"Value"}</th>
                                </tr>
                            </thead>
                            <tbody>
                            {for cur_data_html}
                            </tbody>
                        </table>
                    </div>
                    <ConfigurableStylingComponent message="element 1" is_dark_mode={true} has_shadow={true} is_rounded={true} />
                    <ConfigurableStylingComponent message="element 2" is_dark_mode={false} has_shadow={true} is_rounded={true} />
                    <ConfigurableStylingComponent message="element 3" is_dark_mode={false} has_shadow={true} is_rounded={false} />
                </div>
            </div>
        }
    }
}

fn main() {
    wasm_logger::init(wasm_logger::Config::default());
    yew::start_app::<App>();
}
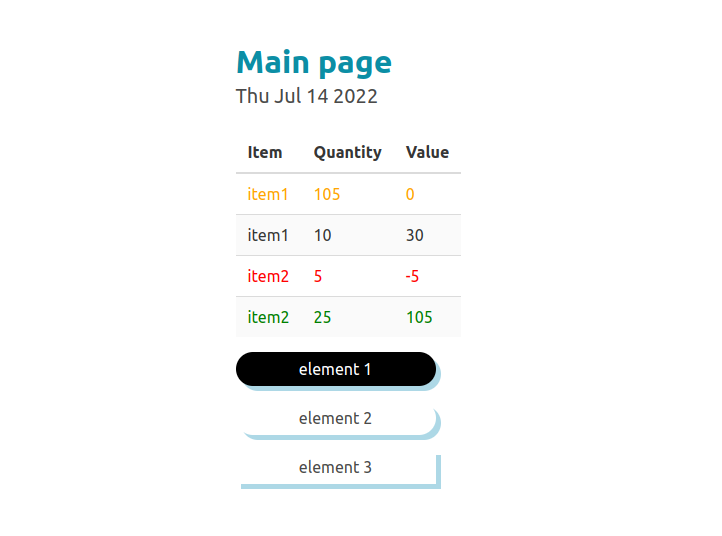
We bring the module bindings.rs into scope on line 3 and then on line 20 we call the function get_now_date() to put the output between our <h2> tags.
When we run the web app or refresh the page we should see a date show up below the title:
Using Chart.js with Rust via WebAssembly
In this section, we will integrate chart.js with our CSS and JavaScript WASM Rust front-end project code. We’ll configure a simple line chart that displays static dummy data. Later we will also add a function to update the chart with user input.
Chart.js configuration and bindings
First, let’s add a link to the chart.js framework to our index.html file:
<!DOCTYPE html>
<html lang="en">
<head>
    <meta charset="UTF-8">
    <meta http-equiv="X-UA-Compatible" content="IE=edge">
    <meta name="viewport" content="width=device-width, initial-scale=1.0">
    <link
    rel="stylesheet"
    href="https://cdn.jsdelivr.net/npm/bulma@0.9.0/css/bulma.min.css"
    />
    <script src="https://cdn.jsdelivr.net/npm/chart.js@3.8.0/dist/chart.min.js"></script>
    <link data-trunk rel="css" href="/css/main.css">
    <title>Routing and Chart.js</title>
</head>
<body>

</body>
</html>
Next, let’s write the JavaScript that will serve as a bridge between chart.js functionality and our own Rust code. We’ll create a new file my_chart.js in the js directory.
In this JavaScript file we will set up the basic configuration for our chart and a function to draw the chart:
export class MyChart {
    chart;
    constructor() {
        let data = {
            labels: [1,2,3,4,5,6],
            datasets: [{
                label: 'Widget data',
                backgroundColor: 'rgb(255, 99, 132)',
                borderColor: 'rgb(255, 99, 132)',
                data: [10,35,30,20,25,15],
            }]
        };

        this.config = {
            type: 'line',
            data: data,
            options: {
                responsive: false,
                scales: {
                    y: {
                        suggestedMin: 0,
                        suggestedMax: 50
                    }
                }
            }
        };
    }

    draw(element_id) {
        this.chart = new Chart(
            document.getElementById(element_id),
            this.config
        )
    }
}
In constructor we set up our chart configuration. The datasets is an array of objects that describe the data. In this case what the label for the data, what color the line should be, and the values of the data points.
Then in this.config on lines 14-26 we describe what type of chart this should be
Finally, the draw function instantiates a new Chart object from the Chart.js library and passes the element id of the element it should be drawn on.
Now let’s add bindings and the like to our bindings.rs module. These bindings will enable us to instance a Chart object and call functions related to chart.js:
use wasm_bindgen::prelude::*;

#[wasm_bindgen(module = "/js/js_time.js")]
extern "C" {
    #[wasm_bindgen]
    pub fn get_now_date() -> String;
}

#[wasm_bindgen(module = "/js/my_chart.js")]
extern "C" {
    pub type MyChart;

    #[wasm_bindgen(constructor)]
    pub fn new() -> MyChart;

    #[wasm_bindgen(method)]
    pub fn draw(this: &MyChart, element_id: &str);
}
Our chart Yew Component
In this section, we will write a simple Yew component that draws the chart and allows users to add values to it.
Let’s add a new file chart_component.rs to write our component code in:
use gloo::timers::callback::Timeout;
use yew::prelude::*;
use crate::bindings::MyChart;


pub enum Msg {
    Draw,
    DoNothing
}

pub struct ChartComponent {
    pub chart: MyChart,
    pub input_ref: NodeRef,
    pub draw_timer: Timeout
}

impl Component for ChartComponent {
    type Message = Msg;
    type Properties = ();

    fn create(ctx: &Context<Self>) -> Self {
        let link = ctx.link();
        let stand_alone_timer = {
            let link = link.clone();
            Timeout::new(10, move|| {
                link.send_message(Msg::Draw)
            })
        };
        Self {
            chart: MyChart::new(),
            draw_timer: stand_alone_timer,
            input_ref: NodeRef::default()
        }
    }

    fn update(&mut self, _ctx: &Context<Self>, msg: Self::Message) -> bool {
        match msg {
            Msg::Draw => {
                self.chart.draw("myChart");
                true
            },
            Msg::DoNothing => {
                true
            }
        }
    }

    fn view(&self, ctx: &Context<Self>) -> Html {
        html! {
            <section class="section">
            <div class="container">
                <canvas id="myChart" width="600" height="500"></canvas>
            </div>
            </section>
        }
    }
}
The important part here is that we create a TimeOut instance which ends up sending a Draw message to trigger drawing the chart. We do it with a delay to make sure the canvas element exists before we call the code that calls getElementById in the JavaScript code. Because chart.js need a canvas element to exist to draw to:
    fn create(ctx: &Context<Self>) -> Self {
        let link = ctx.link();
        let stand_alone_timer = {
            let link = link.clone();
            Timeout::new(10, move|| {
                link.send_message(Msg::Draw)
            })
        };
        Self {
            chart: MyChart::new(),
            draw_timer: stand_alone_timer,
            input_ref: NodeRef::default()
        }
    }
We create a Timeout instance here on line 25. This will result in Yew executing the closure passed to the Timeout after 10 milliseconds. As mentioned this will then send a Draw message which will be picked up by our component’s update function:
    fn update(&mut self, _ctx: &Context<Self>, msg: Self::Message) -> bool {
        match msg {
            Msg::Draw => {
                self.chart.draw("myChart");
                true
            },
            Msg::DoNothing => {
                true
            }
        }
    }
This will then call the draw function on our chart instance, the myChart &str here is the id value on the canvas element. Which will then in turn call this code from my_chart.js:
    draw(element_id) {
        this.chart = new Chart(
            document.getElementById(element_id),
            this.config
        )
    }
Using our chart component in main.rs
Finally, we can use our chart component in our main HTML. We simply add it like we always do:
use yew::prelude::*;
use configurable_styling::ConfigurableStylingComponent;
use chart_component::ChartComponent;

mod data_source;
mod configurable_styling;
mod bindings;
mod chart_component;

struct App;

impl Component for App {
    type Message = ();
    type Properties = ();

    fn create(ctx: &Context<Self>) -> Self {
        Self
    }

    fn view(&self, ctx: &Context<Self>) -> Html {

        let data = data_source::get_data();
        let cur_data_html = data.iter().map(|data_point| {
            html! {
                <tr class={match data_point.value {
                    x if x >= 100.0 => "success".to_string(),
                    x if x == 0.0 => "warning".to_string(),
                    x if x < 0.0 => "danger".to_string(),
                    _ => "".to_string()
                }}>
                    <td>{data_point.item_name.clone()}</td>
                    <td>{data_point.quantity}</td>
                    <td>{data_point.value}</td>
                </tr>
            }
        });

        html! {
            <div class="section">
                <div>
                    <div class="container">
                        <h1 class="title">{"Main page"}</h1>
                        <h2 class="subtitle">{bindings::get_now_date()}</h2>
                        <div >
                            <table class="table is-hoverable is-striped">
                                <thead>
                                    <tr>
                                        <th>{"Item"}</th>
                                        <th>{"Quantity"}</th>
                                        <th>{"Value"}</th>
                                    </tr>
                                </thead>
                                <tbody>
                                {for cur_data_html}
                                </tbody>
                            </table>
                        </div>
                        <ConfigurableStylingComponent message="element 1" is_dark_mode={true} has_shadow={true} is_rounded={true} />
                        <ConfigurableStylingComponent message="element 2" is_dark_mode={false} has_shadow={true} is_rounded={true} />
                        <ConfigurableStylingComponent message="element 3" is_dark_mode={false} has_shadow={true} is_rounded={false} />
                    </div>
                </div>
                <div>
                    <ChartComponent />
                </div>
            </div>
        }
    }
}

fn main() {
    wasm_logger::init(wasm_logger::Config::default());
    yew::start_app::<App>();
}
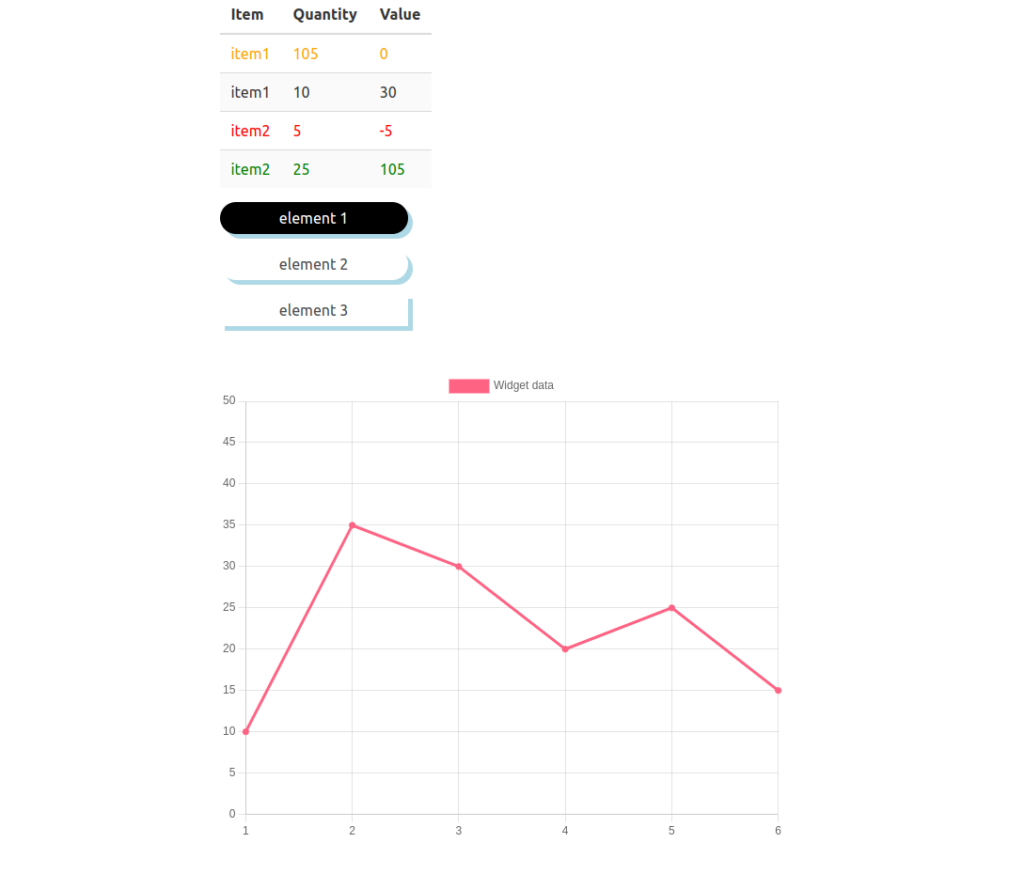
Then when we start or refresh the web app we should see a chart being drawn below our other elements:
Updating our chart with user input
In this final section, we are going to a small bit of interaction to our CSS and JavaScript WASM Rust front-end project. This will enable a user to add values to the chart and have it automatically update itself. Thanks to chart.js this is easy, though, because it is built-in functionality. All we have to do is write the bridge function and take input from the user.
Updating the JavaScript and Bindings with the update function
Let’s start by adding a function called update to our JavaScript file my_chart.js. We can also clear the labels and data arrays:
export class MyChart {
    constructor() {
        this.chart = null;
        let data = {
            labels: [],
            datasets: [{
                label: 'Widget data',
                backgroundColor: 'rgb(255, 99, 132)',
                borderColor: 'rgb(255, 99, 132)',
                data: [],
            }]
        };

        this.config = {
            type: 'line',
            data: data,
            options: {
                responsive: false,
                scales: {
                    y: {
                        suggestedMin: 0,
                        suggestedMax: 50
                    }
                }
            }
        };
    }

    draw(element_id) {
        this.chart = new Chart(
            document.getElementById(element_id),
            this.config
        )
    }

    update(value) {
        let labels = this.chart.data.labels;
        console.log("Updating chart labels");
        labels.push(labels.length+1);
        console.log("Updating chart data");
        this.chart.data.datasets[0].data.push(value);
        this.chart.update()
    }
}
The update function takes the labels array from the chart instance on line 37, gets the length +1 and pushes that value into the labels array as a new label for the chart to display.
Then on line 41 we push the new value in to the first data set (since it is the only one).
Finally, we call update() on our chart instance. This is a function provided by the chart.js framework.
Next, we should update bindings.rs to enable us to interface with this new function:
use wasm_bindgen::prelude::*;

#[wasm_bindgen(module = "/js/js_time.js")]
extern "C" {
    #[wasm_bindgen]
    pub fn get_now_date() -> String;
}

#[wasm_bindgen(module = "/js/my_chart.js")]
extern "C" {
    pub type MyChart;

    #[wasm_bindgen(constructor)]
    pub fn new() -> MyChart;

    #[wasm_bindgen(method)]
    pub fn draw(this: &MyChart, element_id: &str);

    #[wasm_bindgen(method)]
    pub fn update(this: &MyChart, value: i32);
}
The signature is similar to that of the draw function only we expect an i32 as additional parameter next to this: &MyChart.
Adding an input element to our Yew chart component
In this section, we will add an input field that will allow a user to input values for display on our chart. So, let’s open chart_component.rs and update it.
First, we need a new enum to represent the action of adding a new value and add use web_sys::HtmlInputElement:
use gloo::timers::callback::Timeout;
use web_sys::HtmlInputElement;
use yew::prelude::*;
use crate::bindings::MyChart;


pub enum Msg {
    Draw,
    AddValue(i32),
    DoNothing
}
This will allow us to send a message with a value from the input so that the component’s update function can call the chart’s update function with that value.
Second, we need a helper function for parsing the value from the input element which comes out as a String:
fn parse_input_val(input_ref: NodeRef) -> Msg {
    let num_input_element = input_ref.cast::<HtmlInputElement>().unwrap();
    let new_value = num_input_element.value();
    num_input_element.set_value("");
    match new_value.parse() {
        Ok(val) => Msg::AddValue(val),
        Err(_) => {
            log::error!("Error occurred parsing '{}'", new_value);
            Msg::DoNothing
        }
    }
}
Here we cast the NodeRef object input_ref to a HtmlInputElement so that we can get the value from the number input box.
We then clear the text box on line 16. Following that we attempt to parse the String value into an i32 value. If the parse is successful we return a Msg::AddValue(val) otherwise Msg::DoNothing.
We have to add a new arm to our match expression in the update function for the AddValue message. In this case, we will call the update function on the chart object:
    fn update(&mut self, _ctx: &Context<Self>, msg: Self::Message) -> bool {
        match msg {
            Msg::Draw => {
                self.chart.draw("myChart");
                true
            },
            Msg::AddValue(val) => {
                log::debug!("Adding value: {}", val);
                self.chart.update(val);
                true
            },
            Msg::DoNothing => {
                true
            }
        }
    }
Then we’ll add the input element and a button. We’ll also add callback functions for getting the value from the input, one for when the user presses the enter key and one for the button click:
    fn view(&self, ctx: &Context<Self>) -> Html {
        let link = ctx.link();

        let on_key_press = {
            let cur_input_ref = self.input_ref.clone();
            link.callback(move| e: KeyboardEvent| {
                match e.key().as_str() {
                    "Enter" => {
                        parse_input_val(cur_input_ref.clone())
                    },
                    _ => {
                        Msg::DoNothing
                    }
                }
            })
        };

        let on_click = {
            let cur_input_ref = self.input_ref.clone();
            link.callback(move |_e: MouseEvent| {
                parse_input_val(cur_input_ref.clone())
            })
        };

        html! {
            <section class="section">
            <div class="container">
                <input onkeypress={on_key_press} ref={self.input_ref.clone()} class="input is-primary" type="number" placeholder="input value for chart"/>
                <button class="button" onclick={on_click}>{ "Add value" }</button>
                <canvas id="myChart" width="600" height="500"></canvas>
            </div>
            </section>
        }
    }
Our on_key_press callback function tries to match for the Enter key from the KeyboardEvent and then calls the parse_input_val function or otherwise does nothing.
Then in the HTML for our component, we add a “number input” element and a button and hook up the callbacks to the appropriate events.
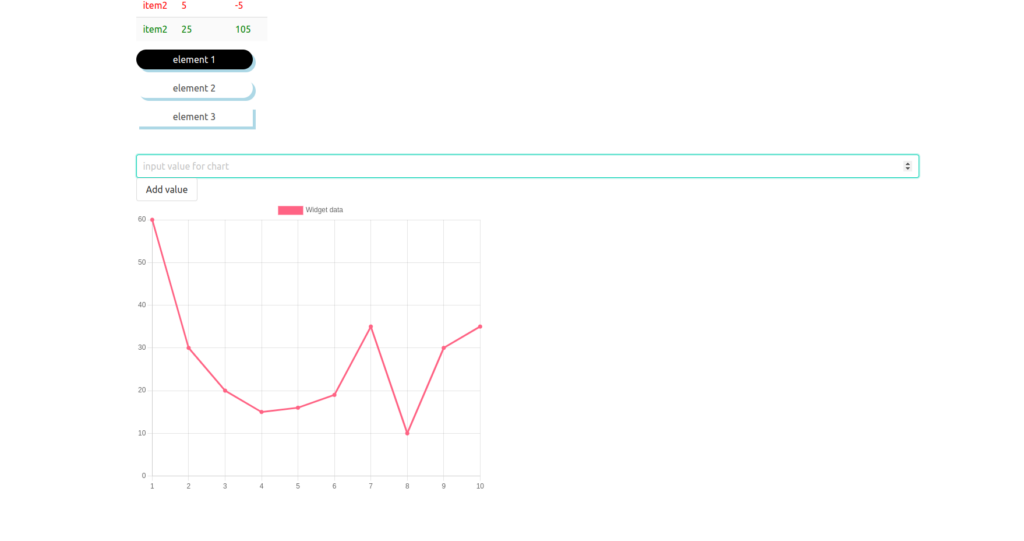
Now when we look at our WASM and Rust powered CSS and JavaScript frontend we should see an empty chart with an input field and button above it. We can submit values by typing a number and pressing enter or the button and the value will be added to the chart:
Conclusion
With this, we have a basic understanding of how to style our Yew and WASM Rust frontend with CSS and how to interact with JavaScript. We used our own CSS to conditionally style text in a data table based on values in the data. Then we also used an external CSS framework.
For JavaScript, we start with a simple function and then integrated it with the charting framework chart.js.
With this and the previous tutorial: WebAssembly Rust front-end with Yew: how to P1 we have a solid foundation for building a serious web application and web frontend with Yew and Rust.
The completed project can be found on my GitHub here: https://github.com/tmsdev82/yew-css-and-js-tutorial
Please follow me on Twitter to get notified of new Rust programming articles:
Follow @tmdev82