
In this tutorial, we are going to build a crypto wallet with Rust. The aim of this tutorial is to be educational. To learn the concepts of what it takes to implement a crypto wallet. That means we will dive a bit deeper than if we were to use more helper crates.
We will go through the process of creating our very own crypto wallet step by step. Our end result will be a wallet that is able to manage Ethereum based assets. Specifically, it will be able to send and receive cryptocurrency.
The completed project can be found on my GitHub: https://github.com/tmsdev82/rust-eth-crypto-wallet-tutorial.
This tutorial will use some of the concepts described in earlier tutorials as well:
Contents
- 1 What is a cryptocurrency wallet?
- 2 The private keys and elliptic curve cryptography
- 3 Set up the build a crypto wallet using Rust project
- 4 A Simple Rust wallet
- 5 Getting the public crypto wallet address
- 6 Saving and loading our wallet information
- 7 Generating a safer more random private key
- 8 Connecting to the Ethereum Rinkeby test network
- 9 Receiving Eth in your Rust crypto wallet
- 10 Executing a crypto currency transaction
- 11 Conclusion
What is a cryptocurrency wallet?
Before we start to build a crypto wallet using Rust, let’s first answer the question: “what is a cryptocurrency wallet?”
When we think about a “wallet” we might think of something that holds items of value (cash, credit cards). However, a crypto wallet is different. A crypto wallet only holds the public and/or private keys required for accessing crypto assets. The assets themselves are stored on a blockchain.
This means a cryptocurrency wallet can be nothing more than a private key. In fact, we could create a crypto wallet on a piece of paper. To do that we would calculate a value using the appropriate algorithm and write down the result. With our private key, we can then sign transactions and derive a public address for receiving cryptocurrency.
So, the core functionality of a digital cryptocurrency wallet is storing private keys for making cryptocurrency transactions. Aside from that, it would also be useful if the wallet could show the public wallet address. Otherwise, we wouldn’t know where to send the cryptocurrency to increase the balance of assets in our wallets.
A program implementing a wallet can also provide other functionality. For example, sending cryptocurrency to other wallet addresses. Other features could be: basing the private key on a passphrase, a nice user interface, etc. However, for this tutorial, we will keep it simple. We will only program generating the key/address and sending cryptocurrency.
The private keys and elliptic curve cryptography
Before we get into the code and build the crypto wallet using Rust, let’s get an overview of the cryptography behind the keys. These keys are the core of the wallet after all. Please feel free to skip over this section if you are already familiar with these concepts.
What is the private key?
The private key for Ethereum (and Bitcoin) is simply a really long number. And preferably a randomly generated number using a random seed. It is 256 bits in length. Why such a long number? Because the longer the number the harder it is to guess or find using brute force mechanisms. Usually, a private key is represented as a hexadecimal string containing numbers and letters.
What is the public key?
The public key is, of course, based on the private key. To generate the public key an advanced form of cryptography is used called Elliptic Curve Cryptography (ECC). The number of the private key is multiplied by the predetermined “generator point” on this elliptic curve.
We don’t need to know the details, but the important point is that this makes it pretty much impossible to get the private key from the public key.
Ethereum (and Bitcoin originally) uses the secp256k1 implementation of the Elliptic Curve Digital Signature Algorithm (ECDSA). That is why we import the crate called secp256k1 into our project.
Set up the build a crypto wallet using Rust project
First, we start by setting up our project directory using the cargo command: cargo new rust-crypto-wallet.
Next, we need to add the following dependencies to the Cargo.toml file:
- anyhow: Flexible concrete Error type built on std::error::Error. Convenient for defining
Result<Ok,Error>type return values. - dotenv: A dotenv implementation for Rust. For reading environment variables from a
.env. - secp256k1: Rust wrapper library for Pieter Wuille’s `libsecp256k1`. Implements ECDSA and BIP 340 signatures for the SECG elliptic curve group secp256k1 and related utilities. This will be used to generate public and private keys.
- serde: A generic serialization/deserialization framework.
- serde_json: A JSON serialization file format.
- tokio: An event-driven, non-blocking I/O platform for writing asynchronous I/O backed applications.
- web3: Ethereum JSON-RPC client. We will use this to connect to the Ethereum network and perform actions.
Let’s add them now:
[package]
name = "rust-crypto-wallet"
version = "0.1.0"
edition = "2021"

# See more keys and their definitions at https://doc.rust-lang.org/cargo/reference/manifest.html

[dependencies]
anyhow = "1.0"
dotenv = "0.15.0"
secp256k1 = { version = "0.20.3", features = ["rand"] }
tokio = { version= "1", features = ["full"] }
web3 = "0.17.0"
serde = { version = "1.0", features = ["derive"]}
serde_json = "1.0"
tiny-keccak = { version = "1.4" }
It is important to note that we have to use an older version of secp256k1 or else we might run into incompatibility issues with some web3 functions.
Now we can start work on the actual program.
A Simple Rust wallet
In this section, we will implement the core of a crypto wallet. This means writing functionality for generating public and private keys. Later in this tutorial, we will write code to store the keys in a file and execute transactions.
Implementing key generation
Let’s create a new file called eth_wallet.rs. Here we will add our function for generating a key pair:
use secp256k1::{
    rand::{rngs, SeedableRng},
    PublicKey, SecretKey,
};

pub fn generate_keypair() -> (SecretKey, PublicKey) {
    let secp = secp256k1::Secp256k1::new();
    let mut rng = rngs::StdRng::seed_from_u64(111);
    secp.generate_keypair(&mut rng)
}
Using the secp256k1 crate generating the keys is very easy.
We define the generate_keypair function on line 6. It has no input and returns a tuple with a SecretKey and a PublicKey instance.
We create an instance of Secp256k1 on line 7. Then on line 8, we create a random number generator from a fixed seed number of 111. We do this for simplicity for now.
Finally, we pass this random number generated into the generate_keypair function on line 9 and return the result.
As mentioned, for this first iteration, we use a fixed seed for the random number. We will change this to a random seed later. Otherwise, everyone running this program would get the same keys every time.
Generating and printing keys
Now let’s call the generate_keypair function in main.rs and see what these keys look like:
mod eth_wallet;
fn main() {
    let (secret_key, pub_key) = eth_wallet::generate_keypair();

    println!("secret key: {}", &secret_key.to_string());
    println!("public key: {}", &pub_key.to_string());
}
Calling the function gives us a tuple as mentioned, we can simply print these using their to_string() methods.
The result should look something like this:
cargo run
   Compiling rust-eth-crypto-wallet v0.1.0 (/Users/steemant/projects/writing/blog-projects/rust-eth-crypto-wallet)
    Finished dev [unoptimized + debuginfo] target(s) in 2.58s
     Running `target/debug/rust-eth-crypto-wallet`
secret key: 9eb2ee60393aeeec31709e256d448c9e40fa64233abf12318f63726e9c417b69
public key: 026220268e36da1d799a67c3ac5ecac224b45cea2b047d1b68a8ffbf31f08b2750
We should note, again, that every time we run this program we will get the same keys. As well as anyone else that uses 111 as the seed for their random number generator. We will change that later, but first, we will derive a public wallet address from the public key. That way we can compare results to see that everything is correct.
Getting the public crypto wallet address
Typically if we want to receive cryptocurrency or other assets we have to provide our wallet address to the sender. In this section, we will implement a function to get the wallet address from the public key.
Implementing the function
In this section, we will briefly look at the method of deriving the public address from the public key. For more detailed information please see this page on GitHub explaining it: Ethereum book.
Let’s open the eth_wallet.rs file and add the following code. First, we will pull some more items into scope with use:
use secp256k1::{
    rand::{rngs, SeedableRng},
    PublicKey, SecretKey,
};
use tiny_keccak::keccak256;
use web3::types::Address;
Then we can write the function that returns an Address, which is a hex string:
pub fn public_key_address(public_key: &PublicKey) -> Address {
    let public_key = public_key.serialize_uncompressed();

    debug_assert_eq!(public_key[0], 0x04);
    let hash = keccak256(&public_key[1..]);

    Address::from_slice(&hash[12..])
}
Here our function takes a reference to a PublicKey object and returns an Address. We want a reference because we don’t need or want to take ownership of the object.
First, we serialize the public key in uncompressed form to get a byte encoded pair of values. Then we check that the first byte is hex 4 or (0x04), this verifies the correct start of the value. However, the prefix hex 4 is not used when calculating the address. Therefore it is left off when we create the hash using keccak256 on line 18. This produces a 32-byte string of letters and numbers.
Keccak is a family of sponge functions for hashing. This means that it can take a variable-length input and output something that is also of variable-length. Meaning it can make the output longer by padding if needed, or it can compress the length. For more information see this website: https://keccak.team/keccak_specs_summary.html.
Finally, on line 20 we keep only the last 20 bytes (start at index 12 and take until the end) for the address. These last 20 bytes are the least significant bytes. Then the value is returned as a Address type, which is an alias for a H160 which is a hash type with 160 bits in length (20 bytes).
Printing the wallet address to the terminal
In this short section, we will add some code to main.rs for calling public_key_address and printing the resulting value.
Let’s open main.rs and add the following lines:
mod eth_wallet;
fn main() {
    let (secret_key, pub_key) = eth_wallet::generate_keypair();

    println!("secret key: {}", &secret_key.to_string());
    println!("public key: {}", &pub_key.to_string());

    let pub_address = eth_wallet::public_key_address(&pub_key);
    println!("public address: {:?}", pub_address);
}
We simply pass the public key we generated earlier into the public_key_address function.
If we run the program the result should look like this:
secret key: 9eb2ee60393aeeec31709e256d448c9e40fa64233abf12318f63726e9c417b69
public key: 026220268e36da1d799a67c3ac5ecac224b45cea2b047d1b68a8ffbf31f08b2750
public address: 0x559bfec75ad40e4ff21819bcd1f658cc475c41ba
This address 0x559bfec75ad40e4ff21819bcd1f658cc475c41ba can actually be used to send assets to right now. However, anyone reading this tutorial will be able to access this wallet address. So, let’s not send anything here.
Saving and loading our wallet information
Before we move on to generating a more randomized private key for our wallet we will take a short sidestep. We should have a way to save our wallet’s information for later use. That way we can’t forget our private key and keep using it in the other sections where we receive assets and execute transactions.
In this section, we will set up a data struct that can be serialized and deserialized for the information about our wallet. We will also add some helper functions.
Bring new items into scope
First, we have to bring a lot of items into scope:
use anyhow::{bail, Result};
use secp256k1::{
    rand::{rngs, SeedableRng},
    PublicKey, SecretKey,
};
use serde::{Deserialize, Serialize};
use std::io::BufWriter;
use std::str::FromStr;
use std::{fs::OpenOptions, io::BufReader};
use tiny_keccak::keccak256;
use web3::types::Address;
These mostly have to do with reading from and writing to a file. And there is some error handling helper items in there too: use anyhow::{bail, Result}.
Now we can add the data struct and the impl functions.
Defining the data struct
We will add this simple data struct:
#[derive(Serialize, Deserialize, Debug)]
pub struct Wallet {
    pub secret_key: String,
    pub public_key: String,
    pub public_address: String,
}
This is a simple struct with String fields for each of the pieces of information. We add the Serialize and Deserialize trait annotations here. This allows us to serialize and deserialize the data. The Debug trait enables us to debug print the data struct when needed.
The struct helper functions
To help with saving the data and loading saved data into the program we will implement some functions. A new() function to construct the object, a function for saving the data to a file, and a function for loading the data from a file.
Constructing the object with new()
impl Wallet {
    pub fn new(secret_key: &SecretKey, public_key: &PublicKey) -> Self {
        let addr: Address = public_key_address(&public_key);
        Wallet {
            secret_key: secret_key.to_string(),
            public_key: public_key.to_string(),
            public_address: format!("{:?}", addr),
        }
    }
}
This impl Wallet block means we are defining functions for the Wallet struct. There are struct functions such as the new constructor. And there are also object instance functions that can be used on an instance of the object.
The new function takes references to SecretKey and PublicKey. First, we get the address from the public_key on line 36. Then we turn all these values into strings and return an instance of Wallet at the same time. We use the format! macro and debug printing with {:?} on line 40 in order to get the full hex string. Otherwise, it will get truncated.
Let’s update main.rs to create an instance of the wallet using this new function:
mod eth_wallet;
fn main() {
    let (secret_key, pub_key) = eth_wallet::generate_keypair();

    println!("secret key: {}", &secret_key.to_string());
    println!("public key: {}", &pub_key.to_string());

    let pub_address = eth_wallet::public_key_address(&pub_key);
    println!("public address: {:?}", pub_address);

    let crypto_wallet = eth_wallet::Wallet::new(&secret_key, &pub_key);
    println!("crypto_wallet: {:?}", &crypto_wallet);
}
If we run the program now we will get the following output:
secret key: 9eb2ee60393aeeec31709e256d448c9e40fa64233abf12318f63726e9c417b69
public key: 026220268e36da1d799a67c3ac5ecac224b45cea2b047d1b68a8ffbf31f08b2750
public address: 0x559bfec75ad40e4ff21819bcd1f658cc475c41ba
crypto_wallet: Wallet { secret_key: "9eb2ee60393aeeec31709e256d448c9e40fa64233abf12318f63726e9c417b69", public_key: "026220268e36da1d799a67c3ac5ecac224b45cea2b047d1b68a8ffbf31f08b2750", public_address: "0x559bfec75ad40e4ff21819bcd1f658cc475c41ba" }
Saving wallet information to a file
Next, let’s add a function for serializing and saving this data to disk to the impl Wallet code block:
    pub fn save_to_file(&self, file_path: &str) -> Result<()> {
        let file = OpenOptions::new()
            .write(true)
            .create(true)
            .open(file_path)?;
        let buf_writer = BufWriter::new(file);

        serde_json::to_writer_pretty(buf_writer, self)?;

        Ok(())
    }
For the function signature, we pass a reference to self (&self) to indicate that this is an “object function”.
Other than that, the main point of interest we have here is the use OpenOptions from the standard library. This lets us configure a file object that will create a file if it does not exist yet or overwrite it when it does. The use of the question mark on line 60 is for error handling. The question mark unwraps valid values or returns the error value to propagate it to the calling function.
Because we do error handling in our function we define the return value of the function as -> Result<()> which indicates that the function can return an error or an empty Ok result.
Finally, we use serde_json::to_writer_pretty to write a nicely formatted JSON structure to the file.
Now let’s use this save_to_disk in main.rs to save our wallet information to a file. Because we will call a function that can produce an error now, we will add a return value to main() as well. This allows us to use the question mark operator:
use anyhow::Result;
mod eth_wallet;
fn main() -> Result<()> {
    let (secret_key, pub_key) = eth_wallet::generate_keypair();

    println!("secret key: {}", &secret_key.to_string());
    println!("public key: {}", &pub_key.to_string());

    let pub_address = eth_wallet::public_key_address(&pub_key);
    println!("public address: {:?}", pub_address);

    let crypto_wallet = eth_wallet::Wallet::new(&secret_key, &pub_key);
    println!("crypto_wallet: {:?}", &crypto_wallet);

    crypto_wallet.save_to_file("crypto_wallet.json")?;

    Ok(())
}
Running the program will result in a file called crypto_wallet.json in the root directory of the project with the following contents:
{
  "secret_key": "9eb2ee60393aeeec31709e256d448c9e40fa64233abf12318f63726e9c417b69",
  "public_key": "026220268e36da1d799a67c3ac5ecac224b45cea2b047d1b68a8ffbf31f08b2750",
  "public_address": "0x559bfec75ad40e4ff21819bcd1f658cc475c41ba"
}
Before we continue to build our crypto wallet using Rust, a note of caution. Please be sure to exclude the file containing your wallet’s information from any commits to a public repository. Add the file name you’re using to .gitignore for example.
Loading crypto wallet information from file
Of course, now we need to be able to load this information into our program to complete the circle.
Let’s add a new function to the impl Wallet code block in eth_wallet.rs for that:
    pub fn from_file(file_path: &str) -> Result<Wallet> {
        let file = OpenOptions::new().read(true).open(file_path)?;
        let buf_reader = BufReader::new(file);

        let wallet: Wallet = serde_json::from_reader(buf_reader)?;
        Ok(wallet)
    }
This function is not an object instance function so we do not put self in the parameters. We return a Result that contains Ok(Wallet) if successful.
Then we use the OpenOptions functionality again, but this time for opening a file to read it.
Next, we use serde_json::from_reader to load data from a file using the BufReader instance. We have to specify the variable type to be Wallet to tell serde_json what to deserialize to.
Finally, we return the wallet object instance wrapped in an Ok() result.
Let’s update main.rs to use this functionality:
use anyhow::Result;
mod eth_wallet;
fn main() -> Result<()> {
    let (secret_key, pub_key) = eth_wallet::generate_keypair();

    println!("secret key: {}", &secret_key.to_string());
    println!("public key: {}", &pub_key.to_string());

    let pub_address = eth_wallet::public_key_address(&pub_key);
    println!("public address: {:?}", pub_address);

    let crypto_wallet = eth_wallet::Wallet::new(&secret_key, &pub_key);
    println!("crypto_wallet: {:?}", &crypto_wallet);

    let wallet_file_path = "crypto_wallet.json";
    crypto_wallet.save_to_file(wallet_file_path)?;

    let loaded_wallet = eth_wallet::Wallet::from_file(wallet_file_path)?;
    println!("loaded_wallet: {:?}", loaded_wallet);

    Ok(())
}
When we run the program the output for printing the loaded_wallet should be the same as the crypto_wallet:
crypto_wallet: Wallet { secret_key: "9eb2ee60393aeeec31709e256d448c9e40fa64233abf12318f63726e9c417b69", public_key: "026220268e36da1d799a67c3ac5ecac224b45cea2b047d1b68a8ffbf31f08b2750", public_address: "0x559bfec75ad40e4ff21819bcd1f658cc475c41ba" }
loaded_wallet: Wallet { secret_key: "9eb2ee60393aeeec31709e256d448c9e40fa64233abf12318f63726e9c417b69", public_key: "026220268e36da1d799a67c3ac5ecac224b45cea2b047d1b68a8ffbf31f08b2750", public_address: "0x559bfec75ad40e4ff21819bcd1f658cc475c41ba" }
Turning key strings into objects
We can now load the saved wallet data into String fields. However, to be useful to the rest of the program, we have to be able to convert those strings into key objects. We will do that now.
Add the following functions to the impl Wallet block:
    pub fn get_secret_key(&self) -> Result<SecretKey> {
        let secret_key = SecretKey::from_str(&self.secret_key)?;
        Ok(secret_key)
    }

    pub fn get_public_key(&self) -> Result<PublicKey> {
        let pub_key = PublicKey::from_str(&self.public_key)?;
        Ok(pub_key)
    }
We simply call the from_str methods for the respective key types and then return an Ok result containing the key object.
Generating a safer more random private key
In this section, we implement code to generate a private key that is more unique. We will use a JitterRng with a timer. This is supposed to get randomness from CPU time and jitter in memory access time.
However, be careful. This is still not the strongest randomizer you can get, so it should not be used for a real wallet. Unfortunately, generating a more secure number is beyond the scope of this tutorial.
Because we only need one private key for the rest of the tutorial we will disable the generation code after generating our unique key. We will then continue the rest of the tutorial using our saved wallet information.
Helper function for getting the timer
Let’s write some helper functions for getting a number representing a timestamp. This number can then be used as the seed for the random number generator for getting a secret key.
We will put the functions in a file called utils.rs:
use std::time::{SystemTime, UNIX_EPOCH};

pub fn get_nstime() -> u64 {
    let dur = SystemTime::now().duration_since(UNIX_EPOCH).unwrap();
    // The correct way to calculate the current time is
    // `dur.as_secs() * 1_000_000_000 + dur.subsec_nanos() as u64`
    // But this is faster, and the difference in terms of entropy is
    // negligible (log2(10^9) == 29.9).
    dur.as_secs() << 30 | dur.subsec_nanos() as u64
}
This is pretty straightforward. We have a function get_nstime that converts a SystemTime to a number representing the number of seconds since the epoch until the time passed into the function. Then bitshifts to the left and “Bitwise Ors” with nanoseconds.
Random number generator based on timestamp
Now, let’s replace the seedable StdRng::seed_from_u64 with the Jitter generator. We have to update the generate_keypairs method in eth_wallet.rs:
use crate::utils;
use anyhow::Result;
use secp256k1::{
    rand::{rngs, SeedableRng},
    PublicKey, SecretKey,
};
use serde::{Deserialize, Serialize};
use std::io::BufWriter;
use std::str::FromStr;
use std::{fs::OpenOptions, io::BufReader};
use tiny_keccak::keccak256;
use web3::types::Address;

pub fn generate_keypair() -> (SecretKey, PublicKey) {
    let secp = secp256k1::Secp256k1::new();
    let mut rng = rngs::JitterRng::new_with_timer(utils::get_nstime);
    secp.generate_keypair(&mut rng)
}
Now we will get a new private key every time we run the program.
Connecting to the Ethereum Rinkeby test network
We are now almost ready to start using this crypto wallet we managed to build ourselves using Rust. However, before we can start doing things with our wallet we have to establish a connection to an Ethereum network. For this tutorial, we want to connect to a test network. For example the Rinkeby network. This allows us to test our wallet’s functionality without having to use real cryptocurrency.
Setting up an endpoint to connect to
An earlier tutorial on this blog explained one relatively easy method for how to set up a connection: Easy to set up Ethereum connection and wallet. Please refer to that tutorial to set up an endpoint to connect to.
Let’s add a .env file to the root of our project where we will put the endpoint information. And let’s not forget to add this file to our .gitignore:
/target
crypto_wallet.json
.env
The .env itself should contain a line like: INFURA_RINKEBY_WS=wss://rinkeby.infura.io/ws/v3/xxxxx.
Let’s also load the values in .env as environment variables using the dotenv crate, at the top of our main() function in main.rs:
fn main() -> Result<()> {
    dotenv::dotenv().ok();
    let (secret_key, pub_key) = eth_wallet::generate_keypair();

    println!("secret key: {}", &secret_key.to_string());
    println!("public key: {}", &pub_key.to_string());
Implementing a connect function
Now we can implement a function for connecting to the Rinkeby network using web3. Let’s add a function to eth_wallet.rs. First, we have to bring some more items from web3 into scope:
use crate::utils;
use anyhow::Result;
use secp256k1::{
    rand::{rngs, SeedableRng},
    PublicKey, SecretKey,
};
use serde::{Deserialize, Serialize};
use std::io::BufWriter;
use std::str::FromStr;
use std::{fs::OpenOptions, io::BufReader};
use tiny_keccak::keccak256;
use web3::{
    transports,
    types::{Address, U256},
    Web3,
};
Then write the function:
pub async fn establish_web3_connection(url: &str) -> Result<Web3<WebSocket>> {
    let transport = web3::transports::WebSocket::new(url).await?;
    Ok(web3::Web3::new(transport))
}
This is an async function, taking a URL string slice as a parameter and returning a web3 WebSocket connection.
Establishing the connection to the Rinkeby Ethereum test network
Next, we will update main.rs to establish a connection to the Rinkeby network. Because we now have to use an async function, we have to make main() async too. We can do that using the tokio async run time. At the bottom we add our connection code:
use anyhow::Result;
mod eth_wallet;
mod utils;
use std::env;

#[tokio::main]
async fn main() -> Result<()> {
    dotenv::dotenv().ok();
    let (secret_key, pub_key) = eth_wallet::generate_keypair();

    println!("secret key: {}", &secret_key.to_string());
    println!("public key: {}", &pub_key.to_string());

    let pub_address = eth_wallet::public_key_address(&pub_key);
    println!("public address: {:?}", pub_address);

    let crypto_wallet = eth_wallet::Wallet::new(&secret_key, &pub_key);
    println!("crypto_wallet: {:?}", &crypto_wallet);

    let wallet_file_path = "crypto_wallet.json";
    crypto_wallet.save_to_file(wallet_file_path)?;

    let loaded_wallet = eth_wallet::Wallet::from_file(wallet_file_path)?;
    println!("loaded_wallet: {:?}", loaded_wallet);

    let endpoint = env::var("INFURA_RINKEBY_WS")?;
    let web3_con = eth_wallet::establish_web3_connection(&endpoint).await?;

    let block_number = web3_con.eth().block_number().await?;
    println!("block number: {}", &block_number);

    Ok(())
}
We retrieve the current block number with .eth().block_number() and print it on lines 29 and 30 to check if the connection is working.
Receiving Eth in your Rust crypto wallet
In the previous sections, we were learned how to build a crypto wallet using Rust. In the next sections, we will actually use our wallet on an Ethereum test network.
Preparation
But before we continue on, we have to make sure we have generated a unique secret key using the timestamp method and have the information saved to a file. Then we should disable the code that generates the keys and saves them to a file in main.rs:
use anyhow::Result;
mod eth_wallet;
mod utils;
fn main() -> Result<()> {
    // let (secret_key, pub_key) = eth_wallet::generate_keypair();

    // println!("secret key: {}", &secret_key.to_string());
    // println!("public key: {}", &pub_key.to_string());

    // let pub_address = eth_wallet::public_key_address(&pub_key);
    // println!("public address: {:?}", pub_address);

    // let crypto_wallet = eth_wallet::Wallet::new(&secret_key, &pub_key);
    // println!("crypto_wallet: {:?}", &crypto_wallet);

    let wallet_file_path = "crypto_wallet.json";
    // crypto_wallet.save_to_file(wallet_file_path)?;

    let loaded_wallet = eth_wallet::Wallet::from_file(wallet_file_path)?;
    println!("loaded_wallet: {:?}", loaded_wallet);

    Ok(())
}
Retrieving our wallet’s balance
Let’s write some code for displaying the balance in our wallet before we start sending assets (Eth) to it. That way we can quickly see if the transaction of sending was successful.
We can add a function to the impl Wallet code block in eth_wallet.rs. But first, we should get some more items from the web3 crate into scope:
use crate::utils;
use anyhow::Result;
use secp256k1::{
    rand::{rngs, SeedableRng},
    PublicKey, SecretKey,
};
use serde::{Deserialize, Serialize};
use std::io::BufWriter;
use std::str::FromStr;
use std::{fs::OpenOptions, io::BufReader};
use tiny_keccak::keccak256;
use web3::{
    transports::WebSocket,
    types::{Address, U256},
    Web3,
};
Then we can implement the get_balance function in the impl Wallet code block:
    pub async fn get_balance(&self, web3_connection: &Web3<WebSocket>) -> Result<U256> {
        let wallet_address = Address::from_str(&self.public_address)?;
        let balance = web3_connection.eth().balance(wallet_address, None).await?;

        Ok(balance)
    }
We expect a working web3 WebSocket connection as input. and return a U256 which is a very large number. The balance is returned in a unit called “wei”. One ether is equal to 1,000,000,000,000,000,000 wei (1018).
Displaying our wallet’s balance wei vs Eth
Let’s display the balance in main.rs:
    let block_number = web3_con.eth().block_number().await?;
    println!("block number: {}", &block_number);

    let balance = loaded_wallet.get_balance(&web3_con).await?;
    println!("wallet balance: {}", &balance);

    Ok(())
The value of the balance should be 0. However, if there was something in there we would see something like: wallet balance: 248957865935034000 or some other large number. As mentioned earlier, this is because the values are expressed in terms of wei.
Because the balance value in wei is hard to relate to, let’s add a function to convert the wei value to a value in eth.
First, we will add a function to utils.rs for doing the conversion:
use std::time::{SystemTime, UNIX_EPOCH};
use web3::types::U256;

pub fn get_nstime() -> u64 {
    let dur = SystemTime::now().duration_since(UNIX_EPOCH).unwrap();
    // The correct way to calculate the current time is
    // `dur.as_secs() * 1_000_000_000 + dur.subsec_nanos() as u64`
    // But this is faster, and the difference in terms of entropy is
    // negligible (log2(10^9) == 29.9).
    dur.as_secs() << 30 | dur.subsec_nanos() as u64
}

pub fn wei_to_eth(wei_val: U256) -> f64 {
    let res = wei_val.as_u128() as f64;
    res / 1_000_000_000_000_000_000.0
}
Our wei_to_eth method here does some type conversions first. Since a U256 can not be converted to a f64 directly. We first convert it to u128. Then f64 so we can divide it by a large number to get decimal precision.
Let’s also add a new function to our eth_wallet module in the impl Wallet code block to make use of this conversion:
    pub async fn get_balance_in_eth(
        &self,
        web3_connection: &Web3<transports::WebSocket>,
    ) -> Result<f64> {
        let wei_balance = self.get_balance(web3_connection).await?;
        Ok(utils::wei_to_eth(wei_balance))
    }
Now we can express our balance in Eth which is more common, of course. Let’s update the main.rs code to call this function instead:
    let block_number = web3_con.eth().block_number().await?;
    println!("block number: {}", &block_number);

    let balance = loaded_wallet.get_balance_in_eth(&web3_con).await?;
    println!("wallet balance: {} eth", &balance);

    Ok(())
Now instead of the big number from the earlier example reads like this: wallet balance: 0.248957865935034 eth.
Using a faucet to receive Eth for testing
We have come a long way in the “build a crypto wallet using Rust” project. Finally, we are ready to receive Eth into our wallet. And will also be able to display the balance.
We can request Eth for testing on the Rinkeby network from so-called faucets. These are services provided by people mining on the test network. Such a service will send a small amount of Eth to any address if requested. For example: https://rinkeby-faucet.com/
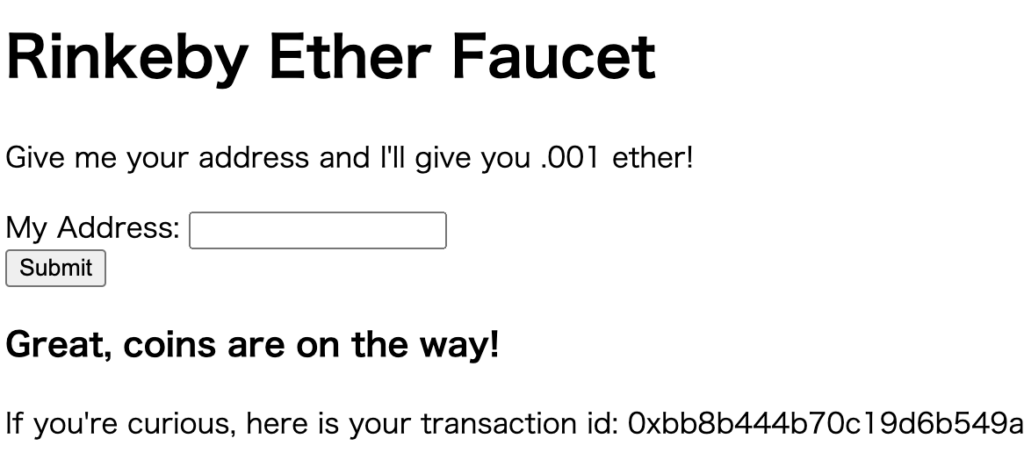
Just put in the public_address value from our wallet and submit. It could take some time before the Eth is received.
There is also this faucet: https://faucets.chain.link/rinkeby
After receiving Eth from the faucets our balance would look something like this: wallet balance: 0.101 eth.
Executing a crypto currency transaction
Now that we have some Eth in our wallets we can look at how to do a transaction. In this section, we will implement a function for creating a transaction and a function for signing the transaction with our secret key and then sending it.
I recommend setting up a Metamask wallet if you don’t have one already so that we can the Eth there. That way we can send Eth to ourselves back and forth for testing purposes.
Implementing the create transaction function
Before we implement the main functions, we need another helper function. The value sent with the transaction is expected to be in units of wei. To make it easier on us we will write a function converting an Eth value to a wei value.
Let’s open the utils.rs file and add the following function:
pub fn eth_to_wei(eth_val: f64) -> U256 {
    let result = eth_val * 1_000_000_000_000_000_000.0;
    let result = result as u128;

    U256::from(result)
}
Next up we will write the function for making transactions at the bottom of eth_wallet.rs:
pub fn create_eth_transaction(to: Address, eth_value: f64) -> TransactionParameters {
    TransactionParameters {
        to: Some(to),
        value: utils::eth_to_wei(eth_value),
        ..Default::default()
    }
}
This function simply fills in the appropriate fields on a TransactionParameters object. On line 104, we fill in default values using ..Default::default(). These are gas and gas price for example. We don’t have to worry about those for a transaction like this.
Implementing the sign and send function
We are getting close now to the end of our “build a crypto wallet using Rust” project.
Let’s add the final function to eth_wallet.rs, the function for signing a transaction and then sending it:
pub async fn sign_and_send(
    web3: &Web3<transports::WebSocket>,
    transaction: TransactionParameters,
    secret_key: &SecretKey,
) -> Result<H256> {
    let signed = web3
        .accounts()
        .sign_transaction(transaction, secret_key)
        .await?;

    let transaction_result = web3
        .eth()
        .send_raw_transaction(signed.raw_transaction)
        .await?;
    Ok(transaction_result)
}
This function takes a web3 connection reference, a transaction object, and a secret key reference as parameters. Then it returns a Result<> containing the resulting transaction Id.
First, we sign the transaction object with our secret key on lines 113-116. Then we send the raw transaction on lines 118-121.
If all goes well we will get the transaction Id as a result.
Sending Eth from our Rust wallet to a Metamask wallet
Let’s now send Eth from our very own Rust wallet to our Metamask wallet (or a other wallet that you prefer). We do this by updating main.rs. The updated/added lines are marked below:
use anyhow::Result;
mod eth_wallet;
mod utils;
use std::env;
use std::str::FromStr;
use web3::types::Address;

#[tokio::main]
async fn main() -> Result<()> {
    dotenv::dotenv().ok();
    // let (secret_key, pub_key) = eth_wallet::generate_keypair();

    // println!("secret key: {}", &secret_key.to_string());
    // println!("public key: {}", &pub_key.to_string());

    // let pub_address = eth_wallet::public_key_address(&pub_key);
    // println!("public address: {:?}", pub_address);

    // let crypto_wallet = eth_wallet::Wallet::new(&secret_key, &pub_key);
    // println!("crypto_wallet: {:?}", &crypto_wallet);

    let wallet_file_path = "crypto_wallet.json";
    // crypto_wallet.save_to_file(wallet_file_path)?;

    let loaded_wallet = eth_wallet::Wallet::from_file(wallet_file_path)?;
    println!("loaded_wallet: {:?}", loaded_wallet);

    let endpoint = env::var("INFURA_RINKEBY_WS")?;
    let web3_con = eth_wallet::establish_web3_connection(&endpoint).await?;

    let block_number = web3_con.eth().block_number().await?;
    println!("block number: {}", &block_number);

    let balance = loaded_wallet.get_balance_in_eth(&web3_con).await?;
    println!("wallet balance: {} eth", &balance);

    let transaction = eth_wallet::create_eth_transaction(
        Address::from_str("0x4...fill in a different wallet address here")?,
        0.01,
    );
    let transact_hash =
        eth_wallet::sign_and_send(&web3_con, transaction, &loaded_wallet.get_secret_key()?).await?;

    println!("transaction hash: {:?}", transact_hash);

    Ok(())
}
On lines 37-40 we create the transaction object.
Please use your own Metamask wallet address or other address you are familiar with for the “to address”.
Then we call the sign_and_send function and use the transaction object and our Rust wallet’s secret key as parameters. The response will be a hash value of the transaction.
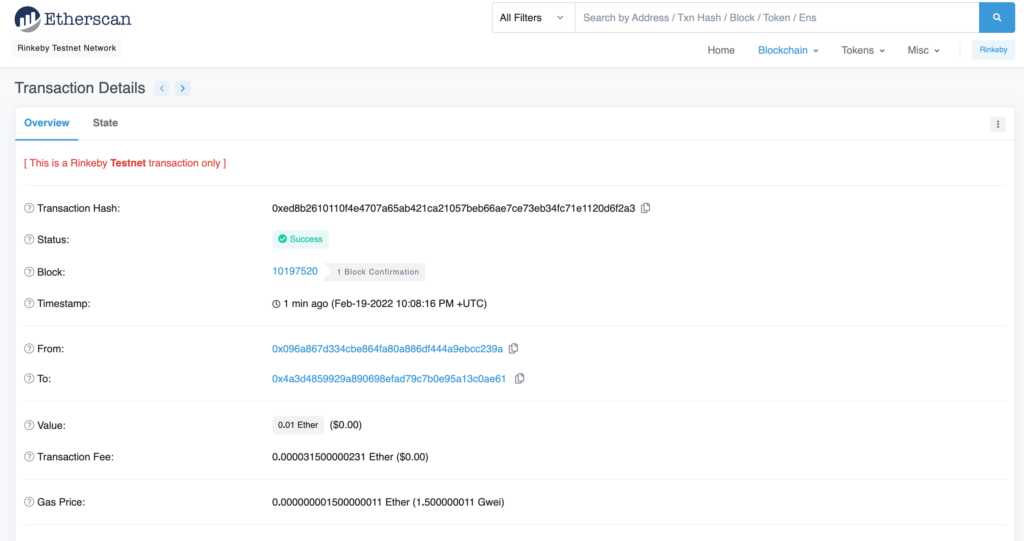
We can use this hash value to look up the transaction on https://rinkeby.etherscan.io/. Make sure to go to the Rinkeby subdomain for etherscan to look up the transaction.
Terminal result:
block number: 10197519
wallet balance: 0.101 eth
transaction hash: 0xed8b2610110f4e4707a65ab421ca21057beb66ae7ce73eb34fc71e1120d6f2a3
Below is an example of a completed transaction:
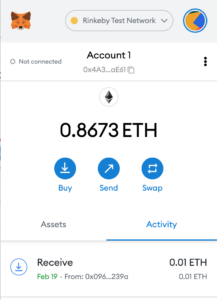
The transaction will also appear on your Metamask activity list, of course:
Conclusion
In this tutorial, we have learned how to build a crypto wallet using Rust. Our wallet can store a randomly generated secret key. Then we learned how to get a public address from this private key. How to receive test Eth in our Rust wallet. Finally, we learned how to create a transaction for sending Eth to a different address. how to sign it and then send it.
We now have a simple basis for our very own Eth wallet implementation built in Rust.
The completed project can be found on my GitHub: https://github.com/tmsdev82/rust-eth-crypto-wallet-tutorial.
Please follow me on Twitter to be updated on tutorials I am working on:
Follow @tmdev82
In section 6.4, in the example code window, I think the value for the key ‘secret_key’ should be ‘secret_key’, and not ‘private_key”. If you copy the example from the code block you currently have, you’ll get a compile-time error for ‘private_key.to_string()’ not being in scope of the module.