
In this tutorial, you will gain programming skills by learning how to build a Python and React web app from scratch. Namely, we will build a simple app for writing notes. We will learn what a back end is and what a front end is.
The app we are going to build will have a Python back end and a TypeScript React front end. The back end can process and store data, and it also handles requests from the React front end. Our project’s front end will let users see and edit the data. Because this tutorial is aimed at beginners we will start small and every step will be explained along the way to building up a bigger project.
What you will learn with this beginner project:
- How to build a back end REST API using Python and FastAPI (a popular back-end framework)
- How to build a front end with React (a popular front-end framework)
- How to let the front end talk to the back end
- How to store data in a file
The final app will look like this:
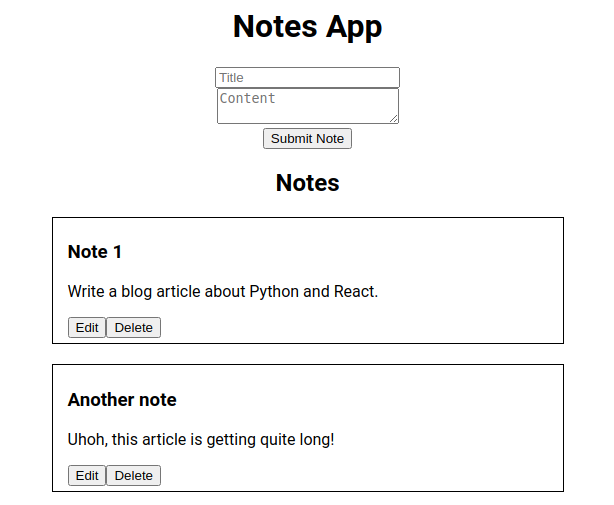
Nothing fancy, simple but functional.
The completed code for the project can be found on my GitHub pages:
- back end: https://github.com/tmsdev82/note-app-back-end
- front end: https://github.com/tmsdev82/note-app-front-end
I have a Python backend and simple JavaScript frontend tutorial as well: Python backend with JavaScript frontend: how to
Contents
- 1 Prerequisites
- 2 A typical Web App’s components
- 3 Our Python and React web app components
- 4 Python and React web app foundations
- 4.1 Create a project directory
- 4.2 Create the Python back end with FastAPI
- 4.3 Create the front end with React
- 4.3.1 Creating the React project
- 4.3.2 Update the main page
- 4.3.3 Clean up App.css
- 4.3.4 Implementing a data interface to represent the data
- 4.3.5 Implementing communication to the Python back end
- 4.3.6 Update App.tsx to get data and display the backend data
- 4.3.7 Failed to fetch data error
- 4.3.8 Changing the back end’s CORS policy
- 4.3.9 The final result of the basic app with front end requesting data from the back end
- 5 Programming the Python and React Note taking web app
- 6 Note-taking Python and React web app: backend
- 6.1 Get notes endpoint and file handling
- 6.2 Testing the POST notes endpoint
- 6.3 Defining a data model for incoming data for the Python and React web app
- 7 Note-taking Python and React web app: front end
- 7.1 Notes overview page
- 7.2 Create notes with React web app front end
- 7.3 Test the Python and React notes web app
- 7.4 Updating handleSubmit to refresh the list of notes
- 8 Python backend: Delete and Update notes
- 9 React front end: delete notes
- 10 React front end: update notes
- 11 Testing the edit functionality
- 12 Conclusion
Prerequisites
Even though this is a tutorial aimed at beginner some prior knowledge is helpful to follow along. Python code for this tutorial was written with Python 3.12 and React 18.2 but other versions may also work.
For example, you should:
- Know what Python is and have it installed. Here is a simple guide on how to install Python.
- Have some basic Python knowledge: variables, variable types (strings, lists, dictionaries, etc.), functions.
- Be familiar with virtual environments: Python Virtual Environment (venv): easy guide for beginners.
- Have node version manager (
nvm) installed. See this guide: How to install nvm. - Install Node.js to be able to work with npm and React from Node.js downloads. The easiest way is to use
nvmmentioned in the point above. - Some basic JavaScript or TypeScript knowledge is helpful.
- Some prior React knowledge is useful, read my tutorial on the basics here: Create your first React web app: easy basics.
This tutorial can be followed on any operating system (Windows, Mac OS, Linux), however, the commands shown can sometimes be Linux specific. Meaning, if you’re on Windows you should use the Windows equivalent command instead, which will be noted in the tutorial. If you’re on Windows it is highly recommended to install the Windows Subsystem for Linux (WSL). Here is information on how to use WSL. This enables you to easily use a Linux environment on Windows.
A typical Web App’s components
First, let’s look at what we will be programming on a conceptual level. Because, as a beginner, some of the terms mentioned in the introduction might not be familiar. Such as front end and back end, handling requests, and things like that.
A typical interactive application can be thought of as having three main components: a front end, a back end, and something that stores data. Our Python and React web app will also have these three components.

In the following sections, I will briefly explain what each component means.
Web App Front end
The front end is the component that presents information to the user in a visual way and what the user interacts with. Information is a broad term that covers things from videos on YouTube, to text like posts on a social media site and news articles on a news website.
For an application that is used to manipulate text data there are input fields to enter data, like a “title” and “content” for a note. And of course, there would be buttons for initiating a save of the data or a delete data button and things like that.
What is also important to know is that the front end app exists on the device of the user. In the case of the web app the user’s web browser will download and display the front end application.
The front end often communicates with a back end app to send data or request data using the HTTP protocol. This is a protocol for getting resources from a server. For more details on HTTP click here.
Finally, for a web app, it is common for the front end to be written with HTML, CSS, and JavaScript/TypeScript.
Why TypeScript?
We are going to program a front end using the React UI framework. React can be used with both JavaScript and TypeScript. Both are fine.
However, TypeScript supports netter code readability and maintainability thanks to the enforced typing for variables and the like. Static typing not only gives more clarity when reading code it helps the compiler catch errors. On top of that, the static typing enables the code editor to give us type hints, auto completion etc. It also works well with JavaScript so there is no worry about not having access to JavaScript libraries when using TypeScript.
Web App Back end
The back end is usually where most of the data validation, processing and logic happens. We don’t know how fast the user’s device is so it is a good idea to do most of the heavy data processing in the back end. Because we can decide what kind of machine is running our back end app.
A web app back end receives requests and information from the front end. Here are two simple examples:
- The user wants to see notes from yesterday: the back end receives a request from the front end with a date. Then the back end retrieves notes data from storage and filters on the date, finally sending the filtered notes to the front end.
- A user logs into your app sending username and password information: the back end receives password and username with the login request. Next, the back end checks to see if the username exist in its database and if it does, it compares the passwords. Then based on if the password matches or not approves or denies the login.
From a security perspective, the back end is more easily secured. For example, since the front end is downloaded by the users we don’t want the passwords or encryption methods to access the users’ data to be stored in the front end.
Many different programming languages that can be used to build a back end app: Python, Java, C++, C#, Go, JavaScript, Rust, etc.
Our Python and React web app components
To build our web app we will use Python for the back end and React, a JavaScript framework, for the front end. And for data storage, we will keep it simple and just use a file instead of a database.

The Python back end will be set up as a REST API using the FastAPI framework. The React front end will be a single-page front end app.
What is a React single-page frontend app?
In essence, the front end is everything you interact with on the screen: the user interface. React is a front end framework that makes it easy to build user interfaces for web applications. React is not the only framework for web front ends, but it is a very popular one.
Particularly, React is great for building single-page applications. Single-page applications are applications that look like they are just a single page. When you interact with them, for example, by clicking a link or entering some data the app doesn’t load a new page or reloads the page you’re currently on. To achieve this effect React loads elements and data dynamically and actively alters the content of the page.
For our note-taking app, the front end includes the layout of the app, the buttons you click to save a note, the text box where you type your note, and so on.
Think of it like this: the front end functions like a store’s interior design, aiming to be user-friendly and visually appealing. As a result, making your user’s note-taking experience enjoyable and straightforward.
What is a REST API?
As mentioned the back end we will be programming for our Python and React web app will be a REST API. Now what is a REST API?
REST API stands for Representational State Transfer Application Programming Interface, it is a communications standard for software application to communicate over the internet using HTTP methods like GET, POST, PUT, and DELETE. This standard allows apps to request and send data to each other in a structured, predicable way. Usually using data formats like JSON or XML.
You can think of it as a set of rules and agreements on how to talk to each other. With this common understanding it becomes easier to develop applications that integrate with other applications.
For more detailed information on REST see this website: https://restfulapi.net/
What will our Python REST API back end do?
In our note-taking app, the back end will receive data in the form of notes data, it will check that the data is correct (we can set rules on the maximum number of characters in the note), and then save that data. The back end also retrieves the data and sends it back to the front end upon request.
Consider it the manager of a storage room where it keeps all your notes safely.
A back end has logic it needs to perform but it also has to define a way for the other programs, called clients, to talk to it. A client can be a web page like the web front end we will be creating with React. In the case of a REST API, the method of communication is typically called an “endpoint”. An endpoint defines a path where it can be reached, for example /notes the HTTP request method(s) it listens to, and code that is executed when the endpoint receives a request.
Python and React web app foundations
In this section, we will a simple app foundation with a front end and a back end that can talk to each other. Thereby also learning how to create a simple project structure that can serve as the basis for future projects. So that we can learn the basic concept and code before we start developing our actual Python and React note-taking web app.
First, we will create the back end using the FastAPI framework. I’m choosing FastAPI because FastAPI is an easy-to-use light-weight framework for building APIs using Python and is easy to set up it is very popular. Light-weight in this case means that we can create a back end app with only a few lines of code.
Then we will create a simple front end project using the React framework.
Create a project directory
Let’s begin by creating the project directory for our web application. We will have one main directory and two sub-directories for our components: the back end and the front end. While we’re working on the code it is a good idea to have two code editors open, one for the back end project and one for the front end project.
When we’re done setting up the directory layout will look something like this:
python-react-note-app
+---note-app-back-end
+---note-app-front-end
The note-app-front-end directory will be generated by the React project generation tool, we should not create it ourselves.
Open a terminal or command prompt and enter the following command to create a new directory:
mkdir python-react-note-app
And then navigate into the directory using cd python-react-note-app. Finally, create one more directory note-app-back-end.
mkdir note-app-backend
Again, note that we are not creating the directory for the front end project yet. The directory for the front end will be created using a command line tool for creating React projects in a later section of the tutorial.
Create the Python back end with FastAPI
Let’s begin by creating the back end API with FastAPI for our Python and React web app. Navigate to the note-app-back-end directory in the command line: cd note-app-back-end.
Set up the back-end project
First, for setting up the back-end project we will quickly install some Python packages we need. Before we do this it is a good idea to create a virtual environment for our Python back end. A virtual environment keeps any libraries separate from other projects when we install using pip install. As a result, we will avoid conflicts when one project, “project A”, needs a different version of a library than a different project, “project B”.
Here are the commands to create a virtual environment using the venv module, and then activating it. Make sure you’re in the note-app-backend when executing these commands:
python -m venv venv
source ./venv/bin/activate
The windows command to activate the virtual environment (after creating venv with the Python command) is:
.\venv\Scripts\activate.bat
Next, with the venv activated we can install the required packages:
- fastapi: this is a framework for easily creating REST APIs.
- uvicorn: to be able to run our fastapi app we need a server, uvicorn provides a server. Uvicorn is an ASGI web server implementation for Python. ASGI stands for Asynchronous Server Gateway Interface. It’s a specification that defines how web servers and web applications can communicate asynchronously.
With the venv active we can install the packages with pip: pip install fastapi uvicorn
Implement a simple back end
With this set up we can start writing some code. Create a new file called main.py with your favorite code editor and add this code to the file:
from fastapi import FastAPI

app = FastAPI()

sample_data = {
    "title": "This is a test note.",
    "content": "Programming is fun!",
}

@app.get("/")
async def read_root():
    return sample_data
This is all we need to create a REST API back end with a single endpoint. As you can see it is really easy to create a basic REST API with FastAPI that returns some data to a client (ex. frontend app).
To run the back end app we should start the uvicorn server from the command line like this:
uvicorn main:app --reload
Make sure to run this command from the same directory as where the main.py file is located.
Explanation of the command:
main: the name of the Python module (the filename without “.py”).app: the name of the ASGI application instance. This is referring to the variableappwe declared on line 3 of our code.--reloadenables automatic reloading during development. So when we change a code file and save it, the application will automatically reload to use the new changes.
Then after executing this command, the application will run:

Then if you open a browser and type localhost:8000 in the address bar and press enter you should see the output of the data:

Now that we have a simple back end that can return data in response to a request, let’s write a client front end to do something with this data. Then we will basically have a very simple full-stack application. In other words, a Python and React Web App with a front end and a back end.
Auto-generated swagger documentation
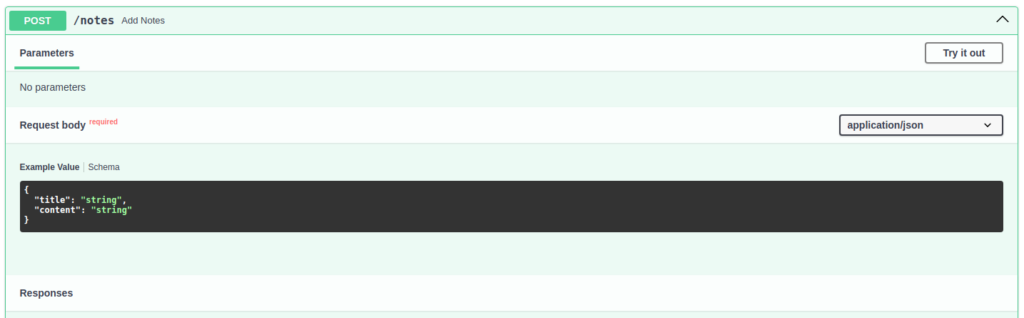
The FastAPI framework also has automatic documentation generation for our endpoints. We can see this documentation by going to http://localhost:8000/docs

If we click on this row, it opens up to reveal more information:

This user interface shows:
- Any parameters that are required or optional for this endpoint. Parameters are for getting information from a client to change the behavior of the endpoint. For example, they can be used to filter requested items before sending a response.
- What the expected responses are.
Let’s try sending a request by clicking “Try it out”:
Then click “Execute” to send a GET request to the API. Our backend will receive this request from this user interface and then send a response. The result will be displayed under the “Server response” heading:

Create the front end with React
In this section, we will create a simple React front end that can talk to our FastAPI back end. In this case, it will get the sample data from the back end and display it more nicely in the front end.
Creating the React project
First, we will use a command line tool to create the basis for the React project. For more detailed information on React and this tool see my article here: Create your first React web app: easy basics.
Open a command line or open a terminal and go to the main project directory python-react-note-app. Then using the command line tool npx we can create a React App project using the following command:
npx create-react-app note-app-front-end --template typescript
This command creates a basic React Web App project with files and directories. Next, let’s start the application from the command line by going into the project directory with cd note-app-front-end and running the command: npm start. This command starts a test server on your local machine that hosts the web app. With this server, we can easily test our web application while we’re developing it.
For example, the server has a useful functionality that watches our project’s directory for changes in files or new files. Then, when there is a change, it refreshes the app in the browser automatically to load the new changes. Thanks to that, changes are instantly visible.
After executing the npm start command your browser should automatically open and navigate to the address of the application running locally:

Now we will edit this application so that it can talk to our back end. So, let’s edit the application and make it our own. Open the project in your favorite code editor. For me that is Visual Studio Code.
Update the main page
First, we’ll clean up the code that was generated for us. Let’s remove the HTML with the spinning React logo from the application generated by the template. Then put in a temporary title and text for our app.
Open the App.tsx file, it should look like this:
import React from 'react';
import logo from './logo.svg';
import './App.css';

function App() {
  return (
    <div className="App">
      <header className="App-header">
        <img src={logo} className="App-logo" alt="logo" />
        <p>
          Edit <code>src/App.tsx</code> and save to reload.
        </p>
        <a
          className="App-link"
          href="https://reactjs.org"
          target="_blank"
          rel="noopener noreferrer"
        >
          Learn React
        </a>
      </header>
    </div>
  );
}

export default App;
Then let’s update the code to have our own title and text:
import React from 'react';
import './App.css';

function App() {
  return (
    <div className="App">
      <header>
        <h1>Frontend</h1>
      </header>
      <div>
        Content
      </div>
    </div>
  );
}

export default App;
Note that the className attribute was removed from the <header> tag. After we save the App.tsx file the running test server should automatically trigger a refresh of the page. Then the result will look like this:

Clean up App.css
Now is also a good opportunity to clean up the styling for this page while we’re at it. There is a lot of unnecessary styling in the App.css file. So, let’s update it to look like this:
.App {
  text-align: center;
}
Because we have already removed almost all elements that reference the removed styling this change will have no effect on the current look of our page.
Implementing a data interface to represent the data
Since our front end will receive response data from the back end it would be good to represent that data as an object in our code instead of raw data. We can define what the expected data looks like with an interface.
An interface is a way in TypeScript to define the shape or structure of an object. It specifies the properties / fields and can have methods it should have. Think of it as a blueprint.
Doing this makes the code easier to read. On top of that, our code editor will also give type hints, which makes writing code that involves the data easier as well.
Often these types of objects, interfaces, classes, etc. are called “data models” or “data schemas” or “models”.
Then, to keep our code base organized we’ll create a new directory in the src directory called models. Next, in the models directory create a file called TestData.ts:
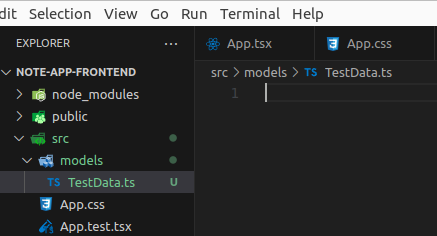
The TestData.ts file is where we will put the interface that describes the data coming from the back end. This interface should have the exact same property names as the data we wrote in our back end. As a reminder, this is the data from the back end:
sample_data = {
    "title": "This is a test note.",
    "content": "Programming is fun!",
}
These fields (title and content) all have values type string, so the TestData interface should have a title: string and a content: string property to map the data properly. Add the following code to TestData.ts:
export interface TestData {
  title: string;
  content: string;
}
The export keyword in front of the interface enables code in other files to import this interface and use it.
Next, we will implement a service class that has the code for communicating with the back end to retrieve the sample data.
Implementing communication to the Python back end
In this section, we will create what is commonly referred to as a “service” that enables our React Web App front end to communicate with our Python back end.
In application development, the term “service” is commonly used. This term refers to something that provides a “service” to the rest of the application. Usually, this takes the form of a class or module that describes a set of related functions. For example, we could have a user-service that has functionality for retrieving user information, adding users, deleting users, etc. Or in the case of our Python and React Web App a “note service” with functionalities to manage notes.
However, in this section we will keep it simple and only retrieve the sample data from the back end.
The file structure
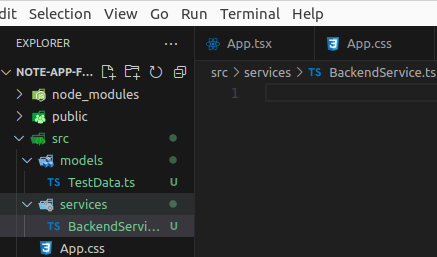
In our basic example app we don’t do anything with notes yet, so we will give the service a generic name. Let’s create a services directory and then add a file called BackendService.ts in the services directory:
The code for our back end communication service is listed below. We’ll go through the code step by step:
import { TestData } from '../models/TestData';

class BackendService {
  private baseURL: string;

  constructor(baseURL: string) {
    this.baseURL = baseURL;
  }

  public async getTestData(): Promise<TestData> {
    try {
      const response = await fetch(`${this.baseURL}/`);
      if (!response.ok) {
        throw new Error(`Error: ${response.status}`);
      }
      const data: TestData = await response.json();
      return data;
    } catch (error) {
      throw new Error('Failed to fetch data from the backend');
    }
  }
}

export default new BackendService('http://localhost:8000');
Imports
Line 1 imports the TestData type from the TestData module located in the models directory. TestData is our TypeScript class that defines the structure of the data expected to be returned from the back end.
Class declaration
Then we declare our BackendService class with all of its functions: constructor and getTestData.
The constructor function on line 6 takes in a baseURL parameter, which is a string. This parameter should hold the URL to our Python back end. The constructor function is used when creating an instance object from this class. So the first function that is call and is typically used to “configure” the object with certain values. So with this we can create an instance of the BackendService object and set the base URL at the same time. Classes typically need to be instanced as an object by using the new keyword and the name of the class.
For our back end address, we are running the back end locally on port 8000, so the value will be http://localhost:8000. In the future, we can make this value depend on an external variable so that we can change it depending on where the application is running (on local computer or on the internet). But that is outside of the scope of this article.
Function declaration: getTestData
Next on line 10 the main function called getTestData is defined. The function signature: public async getTestData(): Promise has the following meaning:
public: means that code in other files can call this function on the object instance ofBackendService.async: allows handling of asynchronous operations. In this case, it means our front end doesn’t block any other operations while it has to wait for a response from the back end. In the body of an async function, we can also useawait.- Return value is
Promise<TestData>. An async function always returns aPromiseobject. A Promise represents the eventual completion (or failure) of an asynchronous operation and its resulting value. This makes it easier and more readable to work with asynchronous functions. For more details on what a Promise is see this website.
getTestData function body
To handle errors we put try {} catch (error) {} around our code. In the event of an error fetching data from the back end we will “throw” an error with a helpful message. That way it is clear what is happening when something goes wrong here.
On line 12 we call the fetch function and assign the result to the response variable: const response = await fetch(`${this.baseURL}/`);
The fetch function is a globally (always) available function in JavaScript. This function sends a request to the given URL and returns a Promise.
Then on line 13, we check if our request failed by using a condition that checks that the ok property of the response object is not true: if(!response.ok). Then we throw an error that prints the status.
So if the response.ok value is true the code will move on to line 16. Here we call the json() function to get the JSON data from the response object. This will contain the data that was sent by the back end. It is assigned to a const data variable and then returned on line 17.
Next, we have to update our App.tsx code to make use of this service to get the data and display it.
Update App.tsx to get data and display the backend data
Here we will update the code for the main page to use the data we are fetching from the back end.
The updated code will:
- Import the
BackendService. - Define a variable a function for keeping track of the state of the data.
- Implement a function that fetches the data as soon as the page loads.
- Display the
titleandcontentvalues using HTML.
Here is the updated code in full for App.tsx, and let’s go through it piece by piece:
import React, { useState, useEffect } from 'react';
import './App.css';
import BackendService from './services/BackendService';

function App() {
  const [testData, setTestData] = useState({ title: '', content: '' });

  useEffect(() => {
    const fetchData = async () => {
      try {
        const data = await BackendService.getTestData();
        setTestData(data);
      } catch (error) {
        console.error('Failed to fetch test data:', error);
      }
    };

    fetchData();
  }, []);

  return (
    <div className="App">
      <header>
        <h1>{testData.title}</h1>
      </header>
      <div>
        {testData.content}
      </div>
    </div>
  );
}

export default App;
The imports section
First the imports:
import React, { useState, useEffect } from 'react';
import './App.css';
import BackendService from './services/BackendService';
On line 3 we’re importing the BackendService object instance from ./services/BackendService so we can use it and its methods in App.tsx.
Function and variables set up
Next the App section that sets up the App component, its variables and functions for retrieving data and storing it:
function App() {
  const [testData, setTestData] = useState({ title: '', content: '' });

  useEffect(() => {
    const fetchData = async () => {
      try {
        const data = await BackendService.getTestData();
        setTestData(data);
      } catch (error) {
        console.error('Failed to fetch test data:', error);
      }
    };

    fetchData();
  }, []);
On line 6 we’re using the useState React state hook to manage the value of testData. Hooks are functions that let you use React features in functional components. In the case of useState it is used for setting values of variables that dynamic components depend on. Like displaying text based on a variable. The variable value can change so the text is dynamic and not static. For a more detailed explanation on how React handles variables and changes see this React page.
The testData variable will hold the value of the incoming sample data from the back end. The setTestData is a function that is used to update the value of the testData variable.
Next, we set up an effect hook with useEffect. This hook enables our app to synchronize with an external system such as our back end at certain moments. In this case, the useEffect hook will be called the first time the App component is loaded.
We declare an async function inside useEffect: fetchData = async() => {} to limit the scope of use for the function. This let’s us and other developers know that only useEffect will use this fetchData function.
All the fetchData function does is call getTestData from our BackendService object to retrieve data. Then awaits this function so that the next line of code is only executed when the result for the get data request has been returned.
We make use of a try ... catch block here to handle any errors caused by retrieving data from the back end. First, the try{} part is executed, if there is an error the catch(error){} part is executed. See here more information on try...catch.
Line 12 uses the response data to set the testData variable using the setTestData function. Furthermore, this triggers the React framework to re-render elements that use this variable.
HTML updates
Finally, let’s update the HTML section of App.tsx:
 return (
    <div className="App">
      <header>
        <h1>{testData.title}</h1>
      </header>
      <div>
        {testData.content}
      </div>
    </div>
  );
Here on lines 24 and 27 we are using testData which is an object instance of the TestData interface. So we can use its fields to print text in the HTML. To have TypeScript recognize these as code instead of plain text, we have to surround them with curly braces: {}.
After saving the modified files we should see the sample data from the back end displayed on the front end page. Make sure the back end is also running before refreshing or starting the front end application.
Failed to fetch data error
However, the page will be blank! When we run the front end app something has gone wrong and the app will show nothing on the page. This is because the data request from the front end is being blocked by the back end.
If we open up the browser’s developer tools we can see an error in the console:
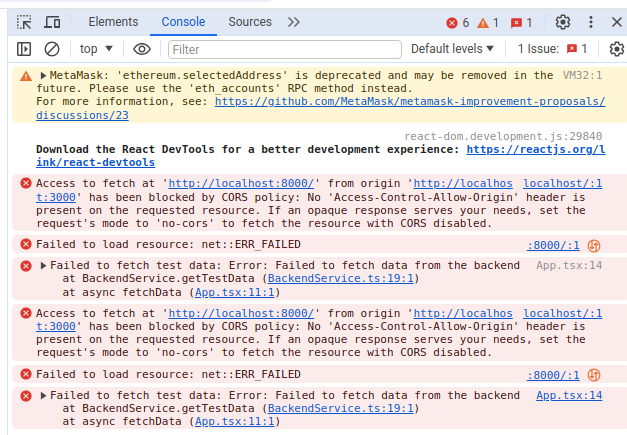
The origin (front end at http://localhost:3000) has been blocked by CORS policy. CORS means Cross Origin Resource Sharing. The default policy in the FastAPI back end framework is to block resource sharing with other origins (web locations). In other words, our back end doesn’t trust our front end.
This is a default security measure to ensure that no unknown websites or other applications contact the back end and abuse it or download its data for example. To fix this we have to configure a CORS rule that allows the front end’s address (http://localhost:3000) to make requests to our back end.
Changing the back end’s CORS policy
So let’s update the back end to change the CORS policy to allow the front end address (http://localhost:3000) to make requests to our back end.
Open main.py from the Python project and update the code like this:
from fastapi import FastAPI
from fastapi.middleware.cors import CORSMiddleware

app = FastAPI()

origins = [
    "http://localhost:3000",
]

app.add_middleware(
    CORSMiddleware,
    allow_origins=origins,
    allow_credentials=True,
    allow_methods=["*"],
    allow_headers=["*"]
)

sample_data = {
    "title": "This is a test note.",
    "content": "Programming is fun!",
}

@app.get("/")
async def read_root():
    return sample_data
On line 2 we import CORSMiddleware this allows us to configure the CORS policy.
On line 6 we declare a variable called origins as a list with one entry http://localhost:3000. This is the list of origins that are allowed by the policy. So we can allow multiple origins. Because we’re only testing our application locally we only need to allow one origin. However, if we were to deploy our application online then we would also need to allow the “online” address of the front end. Imagine if our website had the address: https://note-taking-app.com or something like that then we would have to add that to the CORS rules list as well.
Next, we add the middleware configuration to the FastAPI instance, app, and configure the allowed origins, allow credentials, allowed methods, and allowed headers.
origins: a list of allowed addresses that can make requests to the back end.allow_credentials: is a boolean to enable or disable support for credentials in the form of cookies, authorization headers, etc.allow_methods: configures which HTTP methods to support. Using a wild card"*"means all methods are allowed. So, GET, POST, PATCH, PUT, DELETE, etc. See this page for a list of HTTP methods.allow_headers: specifies which headers can be included in requests. As withallow_methodsa wild card means that all types of headers are allowed.
Here is more information on the CORS policy on the official FastAPI website: link.
The final result of the basic app with front end requesting data from the back end
Now when we save the changes to the main.py file the uvicorn server should automatically reload the backend app code. Then when we refresh the frontend page we should now see the message:

Programming the Python and React Note taking web app
In the next part of this article, we will build on the basic knowledge we have gained to make a simple app. With the foundation of the Python and React web app code we just finished writing we can program an interactive web application. We will implement the functionality for a simple note-taking app where the user can write notes, save notes and read them.
Our note-taking app will have the following functionalities:
- Display a list of notes
- Add a new note
- Delete a note
- Update a note
All of these functionalities require the back end and the front end application to work together.
Note-taking Python and React web app: backend
First, we will update the backend. Specifically, we will focus on implementing functionality for adding and reading notes data. Then, in a later section, we will add the functionality for updating and deleting notes. These actions, commonly referred to as “Create, Read, Update, and Delete (CRUD)” operations, are fundamental to applications that store, process, and manipulate data.
Because we want to be able to keep the notes to read in the future and also update them, we have to store these notes somewhere. There are several methods for storing data for applications:
- using variables to store data in a program’s memory
- writing data to a file on disk
- inserting data into a database
For the first option, we could use a list variable to store notes data in the back end’s memory. However, if the back end is stopped or crashes every value (like notes data) that was in the program’s memory will be lost. We want to keep the data even if the program stops. In other words, we want persistent storage. So, we should save the note data to a more permanent location. For example, in a file or a database.
In this article, we will use a file to store our data. Typically a database is used for this kind of application. However, learning how to use a database would add significantly to the scope of this article. We learn about databases in the next tutorial where we will continue work on this Python and React note-taking web app.
The file format we will use is JSON. Because with JSON we can easily store information in a readable way. It has a lot of similarities with Python dictionaries, but you can also save lists of dictionaries with JSON. For more, information see this mozilla page.
Get notes endpoint and file handling
Let’s add an endpoint for reading the saved notes data and returning them as a response. We don’t have any saved note data yet, so we also have to take into consideration what to do if we do not have any data. We can add a simple check on if the file exists in that case.
Updates to main.py
Open the back end’s main.py file and add a new endpoint. The added lines are highlighted:
import os
import json

from fastapi import FastAPI
from fastapi.middleware.cors import CORSMiddleware

DATA_FILENAME = "notes-data.json"

app = FastAPI()

origins = [
    "http://localhost:3000",
]

app.add_middleware(
    CORSMiddleware,
    allow_origins=origins,
    allow_credentials=True,
    allow_methods=["*"],
    allow_headers=["*"]
)

sample_data = {
    "title": "This is a test note.",
    "content": "Programming is fun!",
}

@app.get("/")
async def read_root():
    return sample_data

@app.get("/notes")
async def get_notes():
    if not os.path.isfile(DATA_FILENAME):
        print("No data found!")
        return []

    with open(DATA_FILENAME, "r") as note_data_file:
        note_data = json.load(note_data_file)
        return note_data
On line 1 we import os to be able to use the isfile function to check if the data file exists.
Then on line 2, we import json to be able to load a JSON file and later to save the JSON file.
Next, on line 7 we declare a global variable DATA_FILENAME that holds the name of the data file we will be using to store our data. It is good to have one central location for values that do not change. For example, what would happen if we decided to use a different filename? Then we would have to change the filename in all places where it is used. In fact, as we add functionality to our Python and React web app we will have multiple endpoints that touch the data file. So changing all these places would be tedious even with a “find and replace” action.
Now with this central location for the filename we only have to update one place to use a different filename.
Finally, we have added a new endpoint to our back end.
Get notes endpoint code
Here is the code for the endpoint again, let’s break it down piece by piece:
@app.get("/notes")
async def get_notes():
    if not os.path.isfile(DATA_FILENAME):
        print("No data found!")
        return []

    with open(DATA_FILENAME, "r") as note_data_file:
        note_data = json.load(note_data_file)
        return note_data
Endpoint path definition
On line 32 we write another @app.get to indicate this path is for HTTP GET requests. Only this time we configure a path /notes. This means this endpoint and function will be triggered if the browser / client goes to http://localhost:8000/notes.
It is common to have endpoint paths like this that refer to some kind of data as a noun like notes this makes it easy for other developers / users of the API to understand what is being managed by this endpoint.
File exists check
We check to see if our data file exists on line 34 using os.path.isfile if the file does not exist we print a message to the console/terminal and return an empty list. Note this message will not be seen in the front end, it will only be seen where the back end program is running in the logs. So, if the file does not exist the function will not execute code after return [].
Load file and return data to the client
Then if the file does exist, the code continues with lines 38-40. Let’s break down the piece of line 38 and what they mean:
with: a Python keyword that wraps a block of code. This is often used when there are resources that need to be set up and then cleaned up after the block of code is done. In this case, we are opening a file. Then we need to close this file properly, or else it could get corrupted or other programs won’t be able to open it.open(DATA_FILENAME, "r"): Opens the file in read ("r") mode. This means data can be read but not written to. Since we are only getting the data using the read mode is all we need.as note_data_file: here the opened file is assigned to thenote_data_filevariable so that it can be used with other functions. This is a reference to the file.
Next, on line 39 we use json.load and the file reference note_data_file to load the data as JSON. This is assuming the data file is in JSON format. It will give an error if it is not JSON format. The data is then assigned to note_data as a list of dictionaries.
Finally, this data is returned as a response to the client like we did with our read_root endpoint function.
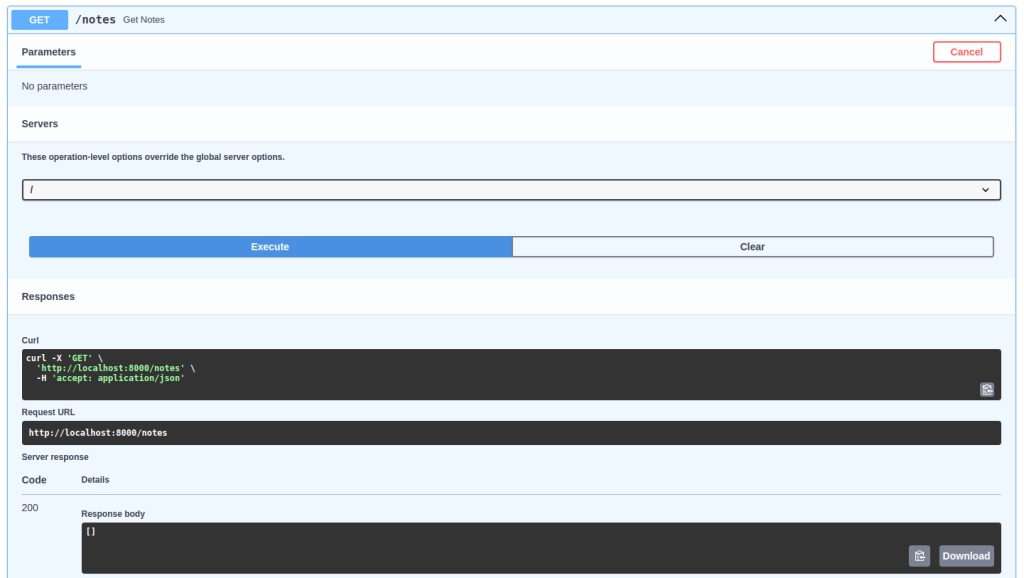
Testing the get notes endpoint
Let’s run the back end program and try out our new endpoint using the Swagger UI.
uvicorn main:app --reload
Then go to the documentation URL: http://localhost:8000/docs. A new endpoint should appear and when we try it and execute an empty list ([]) will be returned:
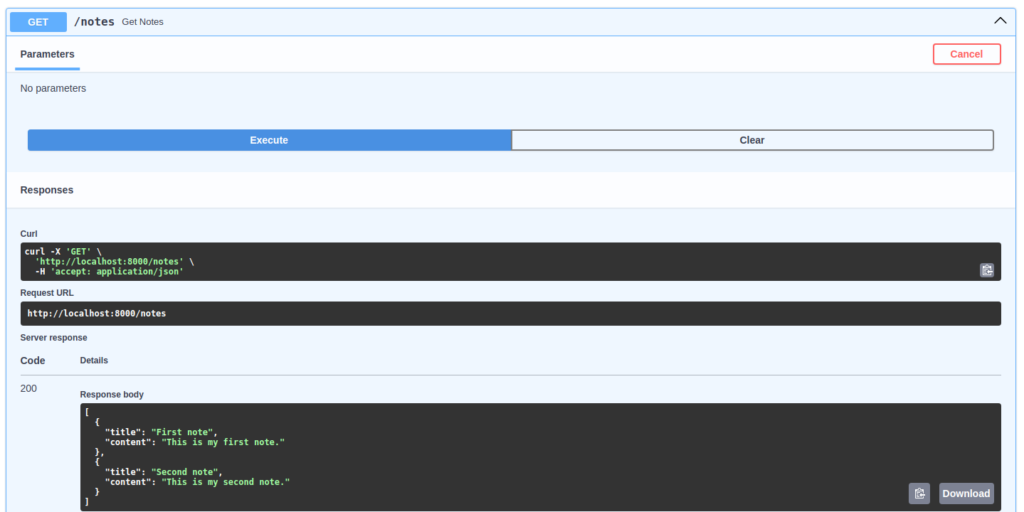
Now let’s add a file called notes-data.json to our backend project directory (so in the same directory as main.py) and write some data in there.
notes-data.json:
[
    {
        "title": "First note",
        "content": "This is my first note."
    },
    {
        "title": "Second note",
        "content": "This is my second note."
    }
]
Now when we execute the GET request to /note we should get this list as a response:
Post Notes endpoint
Our application needs to not only read notes data but it should also be able to save notes data. So our back end should be able to receive data on some endpoint and then save that data to the notes-data.json file. Typically for initiation creation of data/resources on the back end side, HTTP POST requests are used. This POST request method allows for sending JSON data as a payload. Our back end can receive this payload and then save the data contained inside.
Adding the POST endpoint
Let’s add a new endpoint method at the bottom of the main.py file:
@app.post("/notes")
async def add_notes(new_note: dict):
    current_note_data = []
    if os.path.isfile(DATA_FILENAME):
        with open(DATA_FILENAME, "r") as note_data_file:
            current_note_data = json.load(note_data_file)

    current_note_data.append(new_note)

    with open(DATA_FILENAME, "w") as write_file:
        json.dump(current_note_data, write_file)
Let’s break this code down piece by piece.
Endpoint path definition
On line 42 we define the endpoint path. It is the same as the previous endpoint for get_notes: /notes. However, the HTTP method is different. As specified by @app.post requests using the POST method will be routed to this add_notes endpoint instead of the get_notes endpoint.
Endpoint function definition
Then on line 43, we define the function for the endpoint. This time we have a parameter new_note: dict. This parameter represents the payload we will receive from the client. FastAPI will attempt to assign the value of the incoming data to this variable.
Notice that we are specifying a type here (: dict). Meaning that new_note is expected to be a dictionary. This is good for the readability of our code, on top of that FastAPI will also validate the incoming data based on this type. So if something other than a dictionary is sent to this endpoint the request will be rejected with a code 422 error: Unprocessable entity. Later we will see how to do further data validation using classes and the Pydantic package.
Open and load an existing data file and add data
In this section, we load the existing file and append new note data:
    current_note_data = []
    if os.path.isfile(DATA_FILENAME):
        with open(DATA_FILENAME, "r") as note_data_file:
            current_note_data = json.load(note_data_file)

    current_note_data.append(new_note)
First, on line 44 we initialize the list of notes as an empty list: current_note_data = []. This is so that if the data file does not exist we would still have a list to append the new note data to on line 49.
Line 45: we check if the file exists.
Lines 46 and 47 then open the file in read mode and load the data with json.load in the same way, we did for the get_notes endpoint function. The loaded data will overwrite the empty list value we set previously on line 44.
Line 49: we append the new_note data to the current_note_data list.
Writing data
In this final section of code, we simply save the file:
    with open(DATA_FILENAME, "w") as write_file:
        json.dump(current_note_data, write_file)
Similarly to when we opened the file for reading with open(DATA_FILENAME, "r"), we now open the file to write data with "w". And instead of using the json.load function, we use the json.dump function. Which needs the following parameters: the data to write and a reference to a file object to write the data to.
We don’t return any value at the end of this function, which means, unlike the GET endpoint, the response to the request will be empty (null).
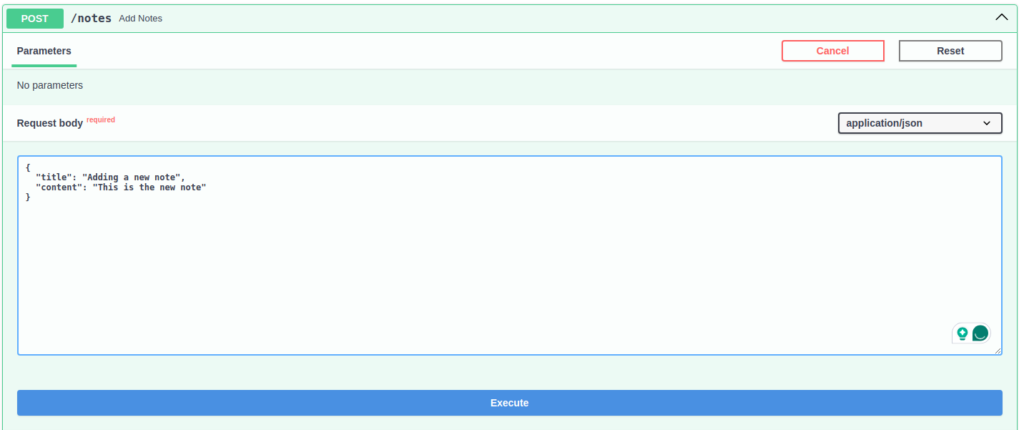
Testing the POST notes endpoint
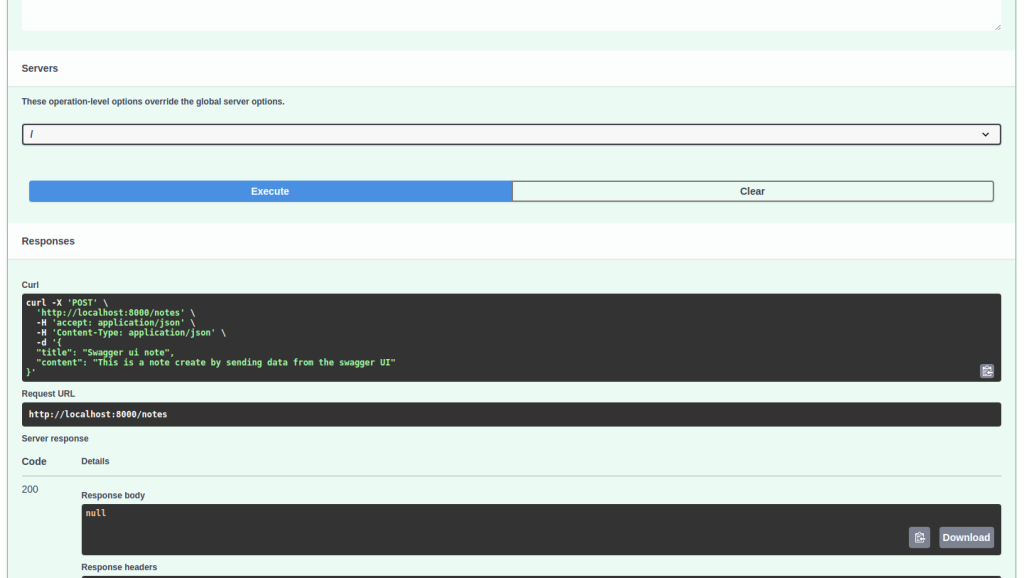
Now we will test our new endpoint. Start the back end application and use a browser to navigate to the Swagger Docs UI: http://localhost:8000/docs. In the “try it out” section of the POST /notes endpoint we can input a “Request body”. This is the data we will send to the back end.
Sending expected data
Let’s send the following data:
{
  "title": "Swagger ui note",
  "content": "This is a note create by sending data from the swagger UI"
}
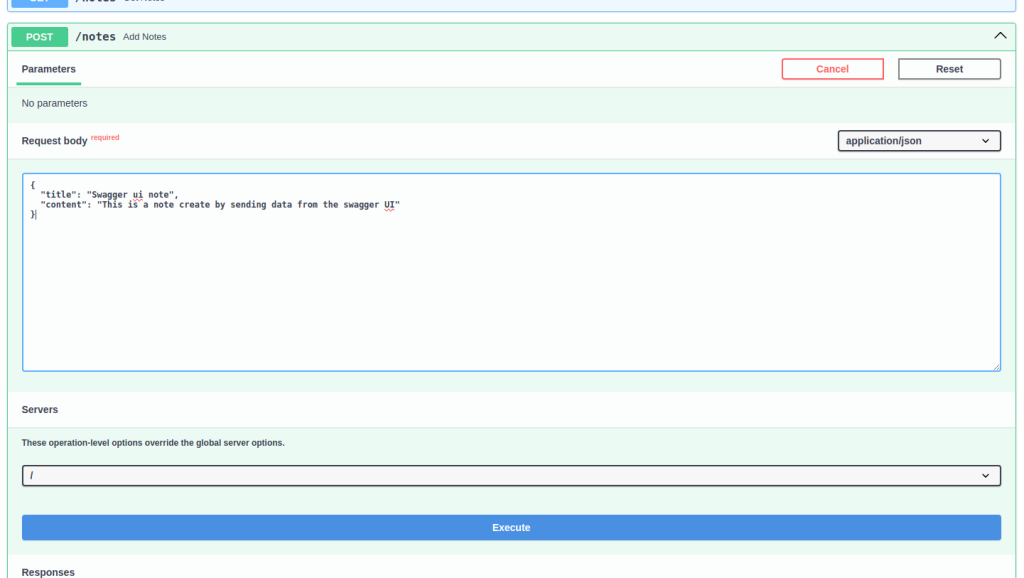
Then click execute. When we scroll down the result should be null:
We can try the GET method endpoint to see the updated data. Also, if we look at the notes-data.json file’s content in our text editor we should see the change there as well:
[
  { "title": "First note", "content": "This is my first note." },
  { "title": "Second note", "content": "This is my second note." },
  {
    "title": "Swagger ui note",
    "content": "This is a note create by sending data from the swagger UI"
  }
]
Sending unexpected data
What if we send something that isn’t in a dictionary format? For example, let’s send ["bad data"]:

The result:
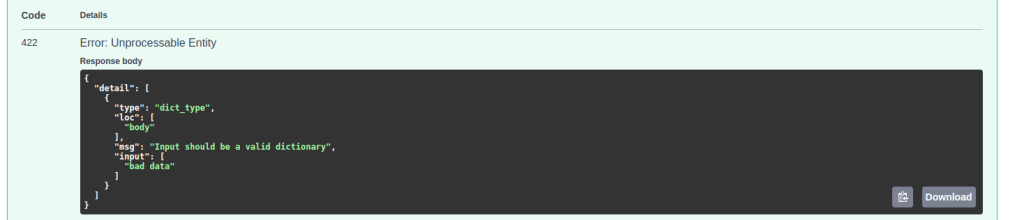
As mentioned earlier, we will get a 422 Error: Unprocessable Entity error. This means we sent data in a format the API endpoint was not expecting.
Sending correct data type dict but it is not a “note”
But what if we do send a dictionary but not one that has title and content properties? Will our API accept it?
{
  "test": "test data"
}
If we send this then the result is:
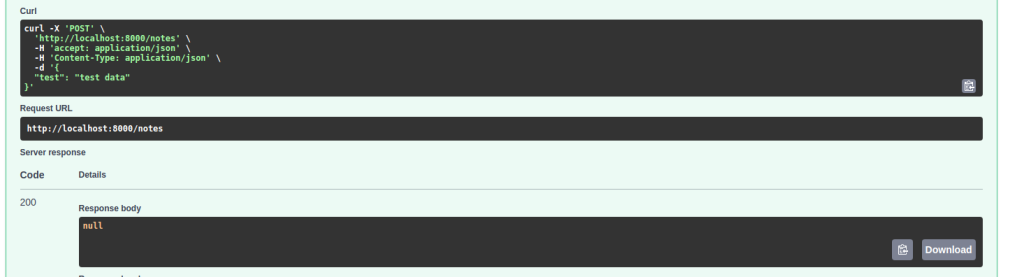
Yes, it is accepted. In fact, any kind of dictionary is accepted. However, this is not what we want. We want to have a well-defined format for our data. Because if we accept any kind of dictionary-type data our notes data file will become a mess. Especially because we’re going to build an interface to display and edit the note. The interface needs to know what properties the data has and how to display them as well.
Defining a data model for incoming data for the Python and React web app
We can use the Pydantic package and classes to define what the data coming in from the client should look like. Similar to how we defined that the data should be of type dict with new_note: dict.
Pydantic is a widely used data validation library for Python
https://docs.pydantic.dev/latest/
With Pydantic we can describe what the data we work with has to conform to. Not only for data we receive in the back end but also for data we send back to the client and anything in between.
We don’t have to install the Pydantic package separately because when we install FastAPI it was already installed as one of FastAPIs dependencies.
Defining note data model in models.py
In this section, we’ll write a Python class called Note that describes our expected note data. Let’s also begin to organize our project more cleanly. Instead of adding this Note class to our main.py file, let’s create a new file models.py and write the code there. Then we’ll import the Note class into main.py.
models.py:
from pydantic import BaseModel

class Note(BaseModel):
    title: str
    content: str
On line 1 we import BaseModel from the pydantic package. We have to base our Note class on the BaseModel class to be able to use Pydantic’s data validation features.
The Note class is defined on lines 3 to 5 and this class represents our note data. We define properties title and content and specify that these properties are of type str (string). This is how text properties should be defined.
Next, we have to update main.py to use this data model.
Using the Note class in the Python web app back end
First, let’s import the class into main.py:
import os
import json

from fastapi import FastAPI
from fastapi.middleware.cors import CORSMiddleware

from models import Note
Notice the order of imports. It is considered good coding style to import standard library packages first (example: os, json), then third-party packages (example: fastapi), and finally our own modules or packages. In this case, we import the Note from the models module.
Then we should update the add_notes endpoint function to have the new_note parameter be of type Note. There are only two lines we have to change here:
@app.post("/notes")
async def add_notes(new_note: Note):
    current_note_data = []
    if os.path.isfile(DATA_FILENAME):
        with open(DATA_FILENAME, "r") as note_data_file:
            current_note_data = json.load(note_data_file)

    current_note_data.append(new_note.model_dump())

    with open(DATA_FILENAME, "w") as write_file:
        json.dump(current_note_data, write_file)
On line 45 here we specify that the incoming data that FastAPI will assign to new_note has to be a Note type. In other words, it has to have a title property and a content property, otherwise, the data should be rejected.
Finally, we have to change how the new_note data is appended to the list of Notes. Since json.dump can’t save the Note object directly we have to convert it to JSON format data using model.dump() on line 51. This is called serialization.
Trying out the updated endpoint
Now when we save the code (models.py and main.py) and reload the back end app the “Try it out” interface for this endpoint should change to reflect the Note model we just defined.
Note before trying out the endpoint again let’s delete the note-data.json file to make sure our previous experiments with data will not mess up this scenario.
Our code should create a new file if there isn’t one.
Then let’s try out the updated endpoint:
Notice that now the UI is showing the expected structure for the payload in the Schema area. Refresh the page if it doesn’t show up.
What happens when we send the wrong data again? For example, { "test": "some test data"}:

We will see an error 422: unprocessable entity this time, the error will also mention the required properties:
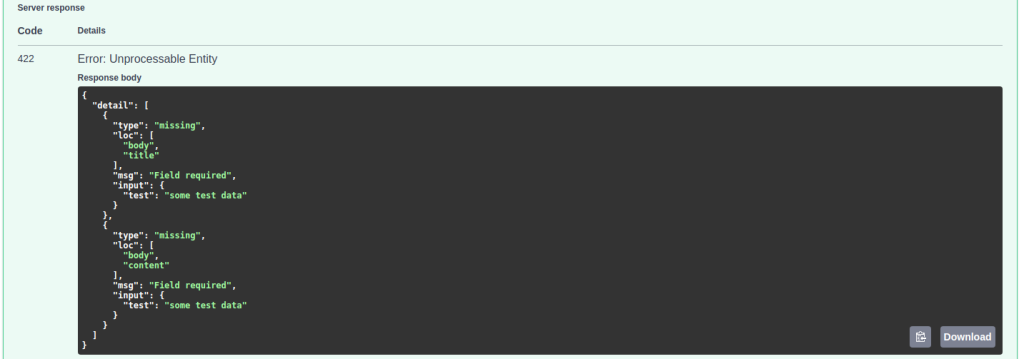
Both properties are required. Leaving one out will also result in an error.
However, when we send properly formatted data it will be accepted, of course:

The response looks like this:

Updating the GET endpoint with a response model
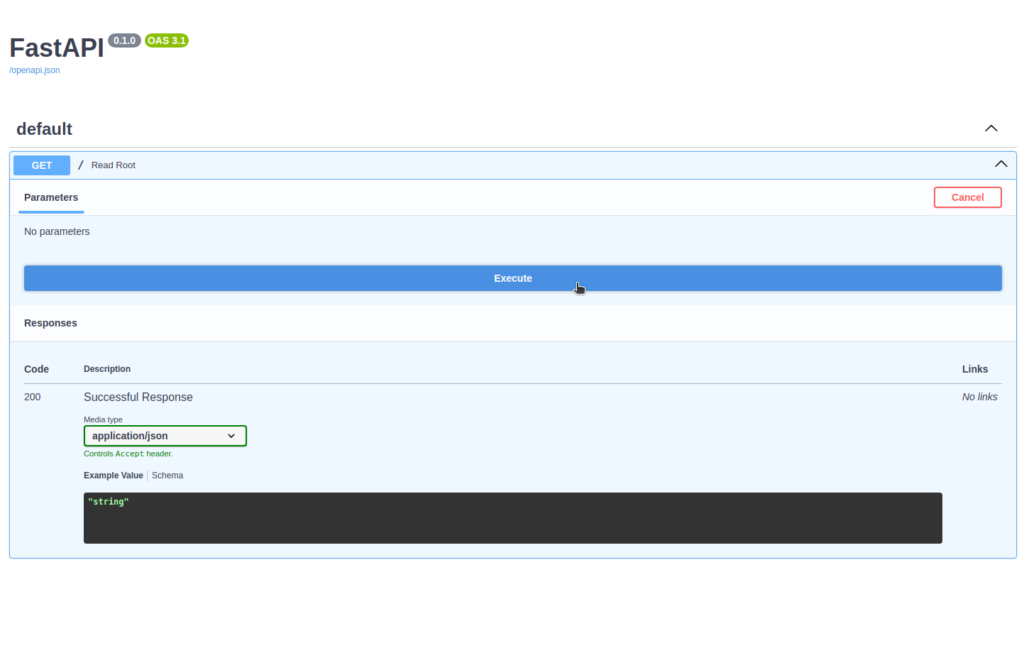
You probably noticed that the Swagger UI page has information on the response type (before clicking on “Try it out” and “execute”). Refresh the page in your browser to reset the page and look at the GET endpoint again:
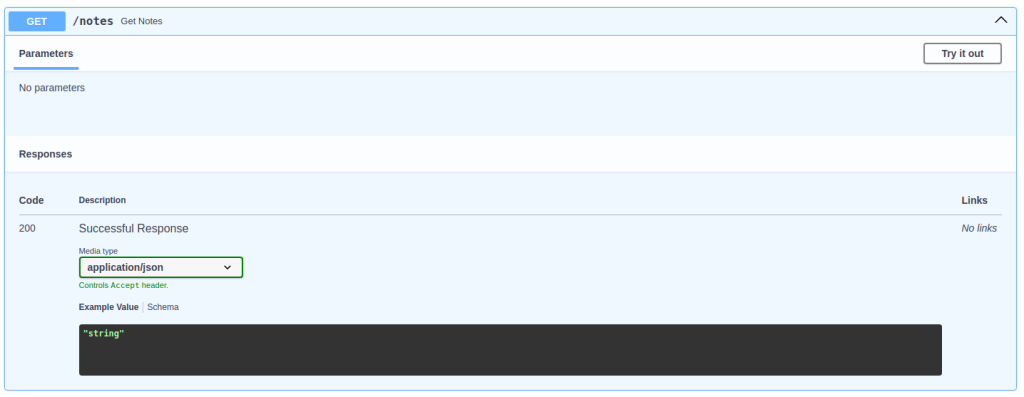
Here under “Successful Response” and “Example Value” it says "string". However, what is returned is a list of dictionaries or notes data. Because we didn’t specify the response model this Swagger UI just defaults to showing that the response is a "string". Furthermore, there is no validation on what is returned either. It is a good idea to specify a response model so that any mistakes in what we return are also caught.
Let’s fix this by configuring the response model as a list of notes with: List[Note].
To do this we should import List from typing. This is a Python built-in library. Here is the code for the updated imports in main.py:
import os
import json

from typing import List

from fastapi import FastAPI
from fastapi.middleware.cors import CORSMiddleware

from models import Note
The typing module provides a set of standard definitions and tools for working with type hints. It includes definitions for various complex types like List, Dict, Tuple, Set, Union, Optional, and more, allowing for more precise type annotations beyond the basic types like int, str, float, etc.
Next, we’ll update the endpoint definition for get_notes:
@app.get("/notes", response_model=List[Note])
async def get_notes():
    if not os.path.isfile(DATA_FILENAME):
        print("No data found!")
        return []

    with open(DATA_FILENAME, "r") as note_data_file:
        note_data = json.load(note_data_file)
        return note_data
By using the response_model parameter on line 38 we can configure what the response should be. This not only influences the Swagger UI page but also makes the FastAPI framework validate the data we send back to the client as a response.
That way we not only make sure the data we receive is correct, but also make sure the data we send back is correct.
Now the example value for the successful response looks like this:
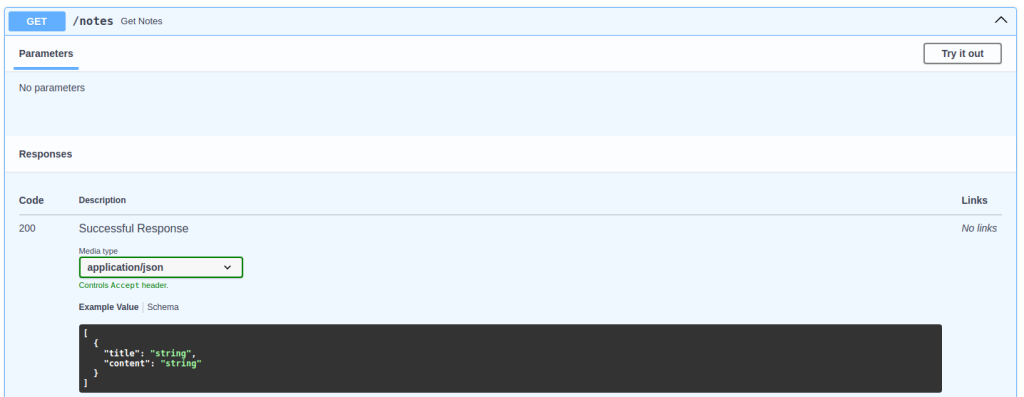
Our back end can now read and write notes data.
A little bit more about status codes
We have been mostly looking at the response value that has the form of a JSON schema, under the “Description” column in the Swagger UI. However, we haven’t touched much on the “Code” column. This column indicates some of the possible response status codes. In the previous screenshot, we can see code 200 and 422.
As noted in the description 200 is returned when the request was successful and 422 when there was a validation error with the incoming data.
Common status code types
Status codes we’ll often see or use are 2xx, 4xx, and 5xx. The status codes starting with 2 convey information about successful requests. Those starting with 4 inform the client of errors caused by the client’s request, such as the well-known 404 error indicating the requested resource (web page, or data, etc.) was not found. And status codes starting with 5 are about an error on the side of the backend. For example, status code 500 means some internal server error occurred.
List of some common status codes
Here are some other common status codes:
201Created: The request has been fulfilled, resulting in the creation of a new resource.204No Content: The server successfully processed the request, and is not returning any content.400Bad Request: The server cannot or will not process the request due to an apparent client error (e.g., malformed request syntax, size too large, invalid request message framing, or deceptive request routing).401Unauthorized: Similar to 403 Forbidden, but specifically for use when authentication is required and has failed or has not yet been provided.403Forbidden: The request contained valid data and was understood by the server, but the server is refusing action. This may be due to the user not having the necessary permissions for a resource or needing an account of some sort, or attempting a prohibited action (e.g. creating a duplicate record where only one is allowed).501Not Implemented: The server either does not recognize the request method, or it lacks the ability to fulfill the request. Usually, this implies future availability.502Bad Gateway: The server was acting as a gateway or proxy and received an invalid response from the upstream server.
For a complete list of status codes you can go to the Wikipedia page here.
Updating the status code for the add notes endpoint to 201
Currently, our add notes endpoint returns a status code of 200 upon success. This is the default status code. However, if we want to adhere to API design best practices we could be more informative. In this case, let’s return the 201 (Created) status code instead. Since we are creating a new “resource”, namely a new note item, on the back end side:
@app.post("/notes", status_code=201)
async def add_notes(new_note: Note):
    current_note_data = []
    if os.path.isfile(DATA_FILENAME):
        with open(DATA_FILENAME, "r") as note_data_file:
            current_note_data = json.load(note_data_file)

    current_note_data.append(new_note.model_dump())

    with open(DATA_FILENAME, "w") as write_file:
        json.dump(current_note_data, write_file)
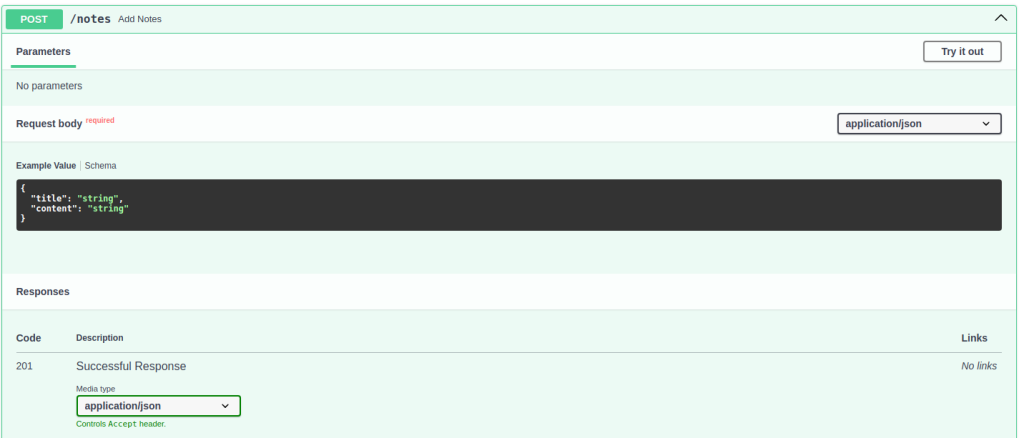
Now the POST endpoint information looks like this:
Note-taking Python and React web app: front end
With the new get_notes and add_note endpoints in place it is time to take a look at the front end code again. We should update our front end to make use of the new functionality we added to the back end.
What we will add to the front end:
- Displaying a list of notes
- Better styling for the UI
- Input controls to write new notes and submit them to the back end
Notes overview page
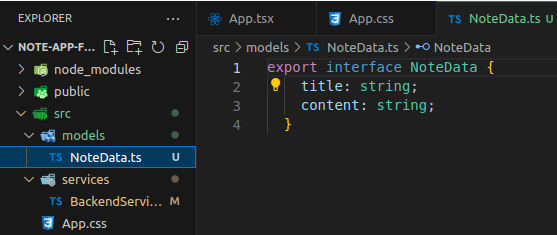
First, we will update the page and add code to show a list of notes by editing the App.tsx file. However, let’s first update the interface file and service file as well. Since TestData.ts actually already represents the Note data we’ll start by renaming the TestData.ts file.
Update models file
Let’s update the name of the interface as well:
export interface NoteData {
    title: string;
    content: string;
  }
Then rename the file itself by right-clicking on it and selecting “rename” from the menu:
We should get a message asking to update imports, let’s click “Yes”. This will update the BackendService.ts:
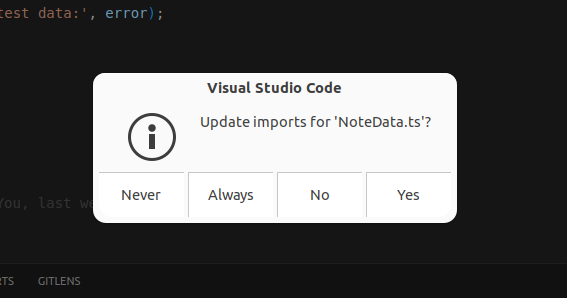
However, it only updates the path in the import to import { TestData } from '../models/NoteData.ts'; and not the name that is being imported. Then we have to update the interface name in the BackendService.ts file as well.
Update BackendService.ts
In this file, we just have to update the references to TestData to reference NoteData instead. Here is the updated code:
import { NoteData } from '../models/NoteData';

class BackendService {
  private baseURL: string;

  constructor(baseURL: string) {
    this.baseURL = baseURL;
  }

  public async getTestData(): Promise<NoteData> {
    try {
      const response = await fetch(`${this.baseURL}/`);
      if (!response.ok) {
        throw new Error(`Error: ${response.status}`);
      }
      const data: NoteData = await response.json();
      return data;
    } catch (error) {
      throw new Error('Failed to fetch data from the backend');
    }
  }
}

export default new BackendService('http://localhost:8000');
After doing this and saving the file, our application should work without errors again.
Next, we will add a function for fetching the list of notes, similar to how we fetch the test data with the getTestData function. Let’s name the function get_notes and instead of returning a single note data object (Promise<NoteData>), it should return a list or array of them. We can do this by adding a [] next to NoteData: Promise<NoteData[]>. Add this code below the getTestData function:
  public async getNotesData(): Promise<NoteData[]> {
    try {
      const response = await fetch(`${this.baseURL}/notes`);
      if (!response.ok) {
        throw new Error(`Error: ${response.status}`);
      }
      const data: NoteData[] = await response.json();
      return data;
    } catch (error) {
      throw new Error('Failed to fetch note data from the backend');
    }
  }
This function is almost the same as the getTestData function. Except that the return value is different: Promise<NoteData[]> and the URL used for fetch has notes at the end to send the request to the http://localhost:8000/notes endpoint.
Update the main page App.tsx
Now let’s update App.tsx to display the list of notes. Similar to what we did with the testData we need a useState hook and we need to call the getNotesData from our BackendService object. Then to display all the notes we have to loop through the array of notes and output HTML elements for each note containing the title and content information.
Here is the updated code and HTML with the new and changed lines highlighted:
import React, { useState, useEffect } from 'react';
import './App.css';
import BackendService from './services/BackendService';
import {NoteData} from './models/NoteData';

function App() {
  const [testData, setTestData] = useState({ title: '', content: '' });
  const [notesData, setNotesData] = useState<NoteData[]>([]);

  useEffect(() => {
    const fetchData = async () => {
      try {
        const data = await BackendService.getTestData();
        const notes = await BackendService.getNotesData();
        setTestData(data);
        setNotesData(notes);
      } catch (error) {
        console.error('Failed to fetch data:', error);
      }
    };

    fetchData();
  }, []);

  return (
    <div className="App">
      <header>
        <h1>{testData.title}</h1>
      </header>
      <div>
        {testData.content}
      </div>
      <section>
        <h2>Notes</h2>
        {notesData.length > 0 ? (
          <div>
            {notesData.map((note, index) => (
              <div key={index}>
                <h3>{note.title}</h3>
                <p>{note.content}</p>
              </div>
            ))}
          </div>
        ) : (
          <p>No notes available</p>
        )}
      </section>
    </div>
  );
}
export default App;
There are a lot of additions here. Especially in the part with the HTML elements for displaying notes. Let’s break down this code piece by piece.
Updated imports
import React, { useState, useEffect } from 'react';
import './App.css';
import BackendService from './services/BackendService';
import {NoteData} from './models/NoteData';
Here we import NoteData so that we can use it to map to the data we fetch from the back end. Previously we used a dictionary with the test data but this time we will use our defined interface NoteData.
Fetching data and storing it in a variable
In the following section of the code, we create a new useState variable and “setter” function for the data we will be retrieving from the back end. Since we are getting a list of notes we have to define it as an array using [].
function App() {
  const [testData, setTestData] = useState({ title: '', content: '' });
  const [notesData, setNotesData] = useState<NoteData[]>([]);

  useEffect(() => {
    const fetchData = async () => {
      try {
        const data = await BackendService.getTestData();
        const notes = await BackendService.getNotesData();
        setTestData(data);
        setNotesData(notes);
      } catch (error) {
        console.error('Failed to fetch data:', error);
      }
    };

    fetchData();
  }, []);
On line 8 we define the variable and set function as mentioned. To define the type of the variable to be an array of NoteData objects we have to use this notation useState<object>. In this case, useState<NoteData[]>. We also have to set a default value. By setting the value [] we are specifying that the default value is an empty array.
Then we simply fetch the data using the getNotesData from the BackendService object. Similar to how we did it for the test data. And then set the state variable on line 16.
We have modified the error message on line 18 to be more generic for the new situation. Because we are retrieving notes data as well, not only test data.
Display the notes
Next, the code for displaying the notes. We put a grouping of HTML elements below the test data’s <div> as a <section>:
 return (
    <div className="App">
      <header>
        <h1>{testData.title}</h1>
      </header>
      <div>
        {testData.content}
      </div>
      <section>
        <h2>Notes</h2>
        {notesData.length > 0 ? (
          <div>
            {notesData.map((note, index) => (
              <div key={index}>
                <h3>{note.title}</h3>
                <p>{note.content}</p>
              </div>
            ))}
          </div>
        ) : (
          <p>No notes available</p>
        )}
      </section>
    </div>
  );
On line 33 we put in a new <section> element to contain all the elements and code logic for displaying the notes. The <section> element is a “semantic” element that represents a standalone section of content. It does not have any functional properties, so it is like a <div> element. However, it can be helpful to search engines and assistive technologies like screen readers to use elements like this.
On line 35 there is, perhaps, an unfamiliar conditional with a questionmark. This is what is called a “ternary operator”. The ternary operator takes the form of condition ? expression1 : expression2. Where if the condition is true then expression1 is executed, if the condition is false then expression2 is executed.
In this case, we check to see if the length of the array is more than 0. In other words, we check to see if there are items in the notesData array. If there are items in the notesData array then this code is executed:
      (
          <div>
            {notesData.map((note, index) => (
              <div key={index}>
                <h3>{note.title}</h3>
                <p>{note.content}</p>
              </div>
            ))}
          </div>
        )
Then on line 37, the map function is called on the notesData array. This is used to execute a function for every item in the array. In this case an arrow function in the format: () => The map function passes the item and an index value to the arrow function. We use the parameter names note and index to represent these values respectively. So for each item in the array, the arrow function will create a new <div> like
              <div key={index}>
                <h3>{note.title}</h3>
                <p>{note.content}</p>
              </div>
On line 38 we set the key attribute to the index. This is so that React has a unique identifier for this element. This helps React keep track of it and for rendering changes.
Then on lines 39 and 40 we simply put the values of the title and content properties of the note object into HTML elements to be able to display them.
Display a message if there are no notes
The last block of elements and code is for displaying a default message when there is no notes-data. In other words, if the back end returns an empty list then this message will be displayed:
    : (
          <p>No notes available</p>
        )}
      </section>
It’s always good to consider what to do when things don’t go as expected. Handling errors, and handling empty data and the like.
Trying out the updated Python and React web app
Let’s run the app and see what it looks like now. We should make sure both the Python back end program and the React web app front end are running. The new front end code should automatically fetch the notes data when the page loads. Your notes content might look different, but the page should look something like this:
Now let’s add a new note using the backend’s Swagger UI (http://localhost:8000/docs) and see what happens.
After executing this POST request the data in the front end still looks the same. That is because our front end only gets the notes data when the page loads. So if we refresh the page and load it again we will see the new data:
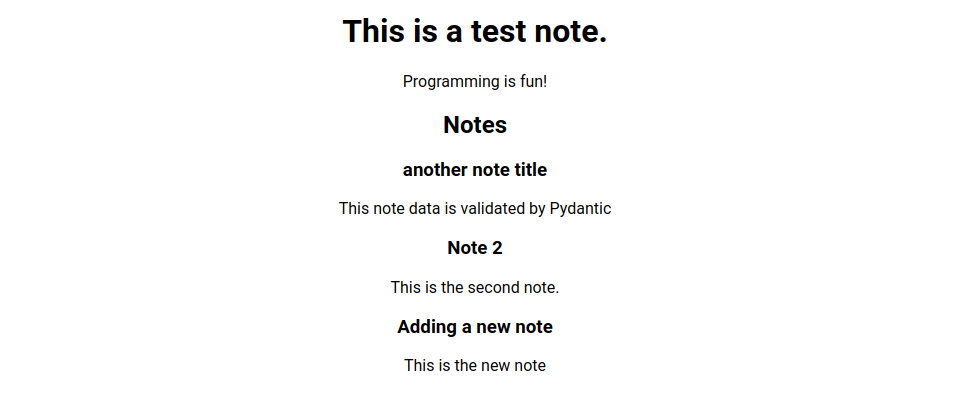
All the note data from the notes-data.json file should be displayed on the page now.
By the way, the styling of the page is a bit odd, with all the text centered on the page. Let’s adjust the styling to make it a little bit more appealing.
Updating the styling in App.css
We will add styling to draw borders around each note and align the text to the left instead of centered.
Let’s update the App.css file with the following styling:
.App {
  text-align: center;
}

.notes-container {
  display: flex;
  flex-direction: column;
  align-items: center;
  width: 100%;
}

.note-card {
  text-align: left;
  width: 80%;
  margin-bottom: 20px;
  padding: 5px 15px;
  border: 1px solid black;
}


@media (min-width: 768px) {
  .notes-container {
    max-width: 600px;
    margin: 0 auto;
  }
}
If you’re unfamiliar with CSS let’s quickly go through what this CSS does.
First, items notated with a dot (.) in front are CSS classes. These classes are a way to define a set of style rules that can be applied to one or more elements in an HTML document. By assigning the same class name to multiple elements, you can style them all with the same styling. For example, we can style each note item in our list of notes the same way easily with CSS classes.
Explaining .notes-container
This class will be use to style the <div> that contains all the notes elements. Hence the name “notes-container”.
.notes-container {
  display: flex;
  flex-direction: column;
  align-items: center;
  width: 100%;
}
The properties:
display: flex;: This property sets the.notes-containerto be a flex container. Flexbox is a layout model that allows items within the container to be aligned and distributed in various ways, making it easier to design complex layouts.flex-direction: column;: This changes the main axis of the flex container to be vertical. As a result, the direct children of.notes-container, the notes items, will be stacked vertically instead of the default row (horizontal) alignment.align-items: center;: This centers the flex container’s children (in this case, the.note-cardelements) along the cross axis (horizontally, since theflex-directioniscolumn). This makes the notes center on the screen, but does not center the text of the notes.width: 100%;: This makes the.notes-containertake up the full width of its parent container. This makes it so that whenalign-items: center;is used, it will center items relative to the entire width of the page.
Explaining .note-card
This class is for styling the elements for each individual note with the goal of making the title and content appear more as a separate grouping from the rest of the page. Basically the idea is to make it look like a note card.
.note-card {
  text-align: left;
  width: 80%;
  margin-bottom: 20px;
  padding: 5px 15px;
  border: 1px solid black;
}
text-align: left;: This aligns the text inside.note-cardelements to the left. We have to specify this alignment here because the top level parent the<div>with class.Appmakes it so every child element hastext-align: center;. So we have to override it here.width: 80%;: Each.note-cardwill take up 80% of the width of its parent container (which is.notes-container).margin-bottom: 20px;: This adds a 20px margin below each.note-card, creating space between each note.padding: 5px 15px;: This adds padding inside each.note-card, with 5px on the top and bottom and 15px on the left and right, making the content inside each card not touch the borders directly.border: 1px solid black;: This adds a 1px thick solid black border around each.note-card.
Explaining @media (min-width: 768px)
This is what is called a “media query”. CSS media queries are a feature used for applying CSS styles based on the characteristics of the device or viewport used for viewing the HTML page. For example, based on the width, height, resolution, or orientation. In other words, this allows us to adjust aspects of styling so that our app looks good on both monitors as well as mobile devices.
In this case:
@media (min-width: 768px) {
  .notes-container {
    max-width: 600px;
    margin: 0 auto;
  }
}
@media: This is the media query rule that tells the browser to apply the contained styles only under certain conditions.(min-width: 768px): This is the condition for the media query. It specifies that the styles inside should only be applied to screens with a minimum width of 768 pixels. This typically targets devices like tablets and desktops, meaning that the styles won’t apply to smaller screens such as mobile phones.- Inside the curly braces
{ ... }, you define the CSS rules that should be applied when the condition is met. In this case:.notes-container { ... }: This selects elements with the classnotes-container.max-width: 600px;: This sets the maximum width of.notes-containerto 600 pixels, ensuring that it doesn’t stretch beyond this width even on wider screens.margin: 0 auto;: This centers the.notes-containerhorizontally within its parent element by automatically adjusting the left and right margins.
Applying the styling classes to App.tsx
Now that we have define new CSS classes we have to update some of the HTML elements in our page to use them.
Let’s update the HTML part in App.tsx:
  return (
    <div className="App">
      <header>
        <h1>{testData.title}</h1>
      </header>
      <div>
        {testData.content}
      </div>
      <section>
        <h2>Notes</h2>
        {notesData.length > 0 ? (
          <div className='notes-container'>
            {notesData.map((note, index) => (
              <div key={index} className='note-card'>
                <h3>{note.title}</h3>
                <p>{note.content}</p>
              </div>
            ))}
          </div>
        ) : (
          <p>No notes available</p>
        )}
      </section>
    </div>
  );
The updated lines are line 36 and line 38. The attribute className is a React attribute for specifying the CSS class name. We can put a string here like we’re doing now or an expression. By using an expression we dynamically set the class name. For example, we can give every note on a “even” index number a different color than the “odd” ones. We’ll do that next, but first, let’s look at what our Python and React web app frontend looks like now.
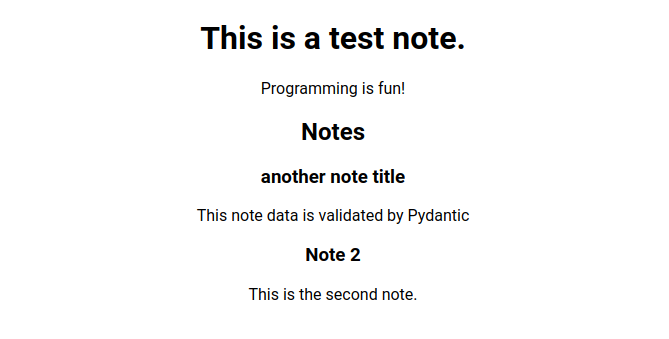
After saving the App.css and App.tsx files and running the front end and back end for our Python and React web app, the front end page should look like this:
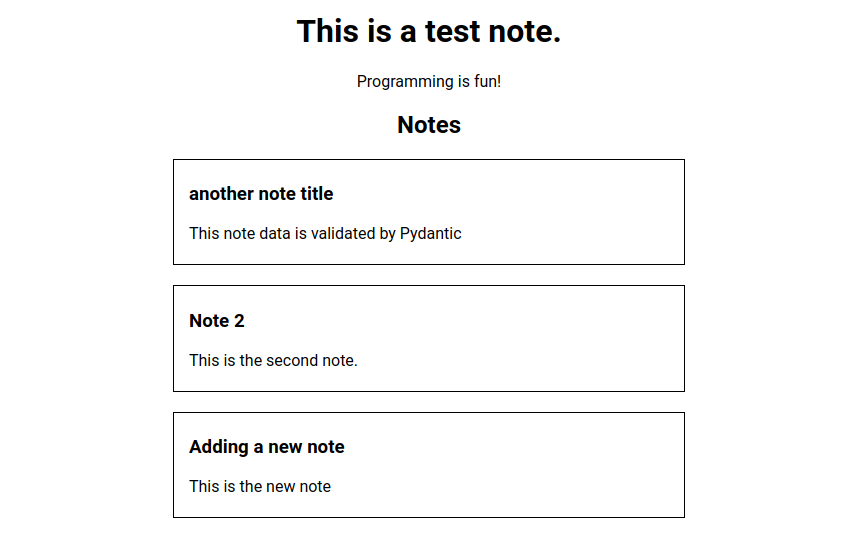
This is still very basic styling, but at least now we can easily see where a note starts and where it ends. Also, the notes are more readable now because of the text aligning to the left.
Create notes with React web app front end
Our Python and React notes web app can now display the notes data in a somewhat nice way. However, when we want to add a note we currently have to do that through the back end’s UI. Of course, this is not what we want. We want to add notes using our own front end. So, we should add some input controls to add new notes using the React front end and some functionality for sending data from the inputs to the back end.
BackendService function to POST notes
For the front end to be able to send notes data to the back end we have to write a new function that sends a HTTP POST request. An HTTP POST request can send a data payload with the request that the back end will receive. In this case, we will send JSON format data. But we could also send other types of data like XML, an image or video, etc.
Let’s update BackendService.ts with the following function:
 public async postNoteData(noteData: NoteData): Promise<void> {
    try {
      const response = await fetch(`${this.baseURL}/notes`, {
        method: 'POST',
        headers: {
          'Content-Type': 'application/json',
        },
        body: JSON.stringify(noteData),
      });
      if (!response.ok) {
        throw new Error(`Error: ${response.status}`);
      }
    } catch (error) {
      throw new Error('Failed to post note data to the backend');
    }
  }
The function signature in this case has a parameter noteData: NoteData. Because we want to send note data to the back end we have to pass that data here as a parameter. We can then use the options parameter for the fetch function to add extra data and information to the request. In this case, we configure the method as POST, specify the Content-Type to by application/json in the header and then finally assign the noteData as value to the body field.
For the fetch function the default HTTP request method is GET, and since we want to send data we have to specify the method as POST.
By setting the header to { 'Content-Type': 'application/json' } we tell the back end server that the request contains JSON data, and it should be processed like that.
Then finally we add our note data to the body of the request. Because the body of a request has to be a string or similar raw data type we convert the object or dictionary to a string using JSON.stringify.
Create note front end code and form controls
In this section, we will add input controls for writing a new note and functionality for submitting it to the back end to be saved. To submit the data we will use a <form> element.
The input for the title will be a input text box since a title isn’t usually that long. And for the content we will use a textarea. Finally, we will add a button to submit the data. In other words, to send the data to the backend so it can be saved.
While we are at it, let’s clean up the code a bit and remove the test data related code.
Here is the entire updated code for App.tsx including the form with input controls. We will go through the code piece by piece:
import React, { useState, useEffect } from "react";
import "./App.css";
import BackendService from "./services/BackendService";
import { NoteData } from "./models/NoteData";

function App() {
  const [notesData, setNotesData] = useState<NoteData[]>([]);
  const [newNote, setNewNote] = useState<NoteData>({ title: "", content: "" });

  useEffect(() => {
    const fetchData = async () => {
      try {
        const notes = await BackendService.getNotesData();
        setNotesData(notes);
      } catch (error) {
        console.error("Failed to fetch data:", error);
      }
    };

    fetchData();
  }, []);

  const handleNoteChange = (
    event: React.ChangeEvent<HTMLInputElement | HTMLTextAreaElement>
  ) => {
    const { name, value } = event.target;
    setNewNote((prevNote) => ({
      ...prevNote,
      [name]: value,
    }));
  };

  const handleSubmit = async (event: React.FormEvent) => {
    event.preventDefault();
    await BackendService.postNoteData(newNote);
    setNewNote({ title: '', content: '' });
  };

  return (
    <div className="App">
      <header>
        <h1>Notes App</h1>
      </header>
      <section>
        <form onSubmit={handleSubmit}>
          <div>
            <input
              type="text"
              name="title"
              placeholder="Title"
              value={newNote.title}
              onChange={handleNoteChange}
            />
          </div>
          <div>
            <textarea
              name="content"
              placeholder="Content"
              value={newNote.content}
              onChange={handleNoteChange}
            />
          </div>
          <button type="submit">Submit Note</button>
        </form>
      </section>
      <section>
        <h2>Notes</h2>
        {notesData.length > 0 ? (
          <div className="notes-container">
            {notesData.map((note, index) => (
              <div key={index} className="note-card">
                <h3>{note.title}</h3>
                <p>{note.content}</p>
              </div>
            ))}
          </div>
        ) : (
          <p>No notes available</p>
        )}
      </section>
    </div>
  );
}
export default App;
Added useState function and object
Let’s take a look at what was added:
import React, { useState, useEffect } from "react";
import "./App.css";
import BackendService from "./services/BackendService";
import { NoteData } from "./models/NoteData";

function App() {
  const [notesData, setNotesData] = useState<NoteData[]>([]);
  const [newNote, setNewNote] = useState<NoteData>({ title: "", content: "" });
In this section of code the only new line is line 8. Other lines referencing testData were removed. This new useState object and function are used to keep track of the state of the new note that is being written. We will have a function that updates the title or content properties everytime the user types a letter into one of the input controls. This then makes it easy to send the up to date note data to the backend when the user clicks on the submit button.
Handler functions: handleNoteChange
We use handler functions to handle some kind of interaction event in front end code. For example, when the user clicks a button, or when the user changes a value on the page.
First the handleNoteChange function. This function is called when the user types in the input control for title or content. This function allows us to update the new note data:
  const handleNoteChange = (
    event: React.ChangeEvent<HTMLInputElement | HTMLTextAreaElement>
  ) => {
    const { name, value } = event.target;
    setNewNote((prevNote) => ({
      ...prevNote,
      [name]: value,
    }));
  };
Function signature
On lines 23-25 the function signature is defined: const handleNoteChange = (event: React.ChangeEvent<HTMLInputElement | HTMLTextAreaElement>) => { ... }: This defines an arrow function as a constant.
Declaring an arrow function like this causes the function to inherit the context from its parent where you declare it. On top of that, an arrow function also captures the scope of the parent where it was declared. That is why setNewNote can be called in the function like that.
We declare the function as const to make sure no other values can be assigned to handleNoteChange by mistake later.
It is a common pattern to define functions as a const arrow function to consistency, conciseness, and readability.
The function takes a single argument named event. This argument has the type React.ChangeEvent<HTMLInputElement | HTMLTextAreaElement>. Meaning that the event is a change event coming from an HTML input element or a textarea element.
Function body
On line 26 (const { name, value } = event.target;), we use destructuring to extract the name and value properties from event.target. Here event.target represents the DOM element that triggered the event (input or textarea). The name property maps to the name attribute of the element and value represents the current value of that element.
Next, on line 27, we have setNewNote((prevNote) => ({ ...prevNote, [name]: value }));: This line calls the state setter function from the useState hook we declared earlier.
When we pass an arrow function to a state setter function like the setNewNote function: (prevNote) => ({ ...prevNote, [name]: value }) React will call that arrow function with the previous state of the data. In other words, it will pass the state of newNote into the arrow function. This then allows us to update the note data with what the user has typed.
The arrow function returns a new object {}. We use the spread operator ... to spread the properties of prevNote into the new object: { ...prevNote, [name]: value }. Meaning, the new object gets all of the same properties and values as prevNote. However, property name stored in name do we set a specific value. For example, if name has the value "title" we would be setting the title property to a new value.
Using the spread operator in this way is the same as writing:
setNewNote(prevNote => {
  // Initialize a new object with the same properties as prevNote
  let updatedNote = {
    title: prevNote.title,
    content: prevNote.content,
  };

  // Check if the input field name is 'title'
  if (name === 'title') {
    updatedNote.title = value; // Update the title property with the new value
  }
  // Check if the input field name is 'content'
  else if (name === 'content') {
    updatedNote.content = value; // Update the content property with the new value
  }

  // Return the updated note object
  return updatedNote;
});
The code with the spread operator is less understandable at first, but after you know what it does it certainly makes writing code more concise.
Handler functions: handleSumbit
The handleSumbit function will be called when the HTML form is “submitted” by the user by clicking the “submit” button. This button will have its type attribute set to submit to register as the form’s submit button.
  const handleSubmit = async (event: React.FormEvent) => {
    event.preventDefault();
    await BackendService.postNoteData(newNote);
    setNewNote({ title: '', content: '' });
  };
As with the other handler function, this function is also declared as const and as an arrow function. However, this function is async. That is because we are calling another asyc function inside of it, namely the postNoteData function from the backend service object.
Then on line 34, we wrote event.preventDefault(). This prevents the event’s default behavior. In this case, the event is the form submit which typically results in a reload of the web page. Because we’re developing a React application the data will be processed by JavaScript/TypeScript code and elements of the page will be refreshed dynamically. In other words, a reload of the page is not necessary.
On the next line we call the postNoteData function and pass the newNote data as a parameter.
Finally, we “clear” the values of the state object by setting them to empty strings on line 36. This will result in clearing the input controls as well.
New note submission form
To complete the note creation functionality for our Python and React notes web app we also have to create some HTML elements for inputting text and a form to submit that data with:
      <header>
        <h1>Notes App</h1>
      </header>
      <section>
        <form onSubmit={handleSubmit}>
          <div>
            <input
              type="text"
              name="title"
              placeholder="Title"
              value={newNote.title}
              onChange={handleNoteChange}
            />
          </div>
          <div>
            <textarea
              name="content"
              placeholder="Content"
              value={newNote.content}
              onChange={handleNoteChange}
            />
          </div>
          <button type="submit">Submit Note</button>
        </form>
      </section>
On lines 41-43, we have changed the header to just display <h1>Notes App</h1> instead of the test data. Thereby removing some of the clutter of our previous basic app that we no longer need.
The next section contains the form definition with the UI elements for creating a new note. The <form> tag defines a section for form controls (like input fields and buttons). It has an attribute onSubmit where we can specify what function should handle the form’s submit event in React.
Our first UI element is an input element with type text for specifying the title of the new note. The name attribute is set to "title", this attribute will be used in the handleNoteChange function to set the newNote object’s title property.
The placeholder attribute is to specify a text that shows up in the input element when it is empty to hint to the user what kind of input is expected.
On line 51 we bind the input’s value to the title property of the newNote state object. This means the input’s value will be in sync with the React state.
Then on line 52 we specify a handler function for the onChange event. The onChange event is triggered when a user types in this input field.
For the content input control we use a textarea element. This element is a text input field showing multiple lines of possible input. It is like the other input field, but for changing the content property instead.
Finally, we add the button element the user can click to submit the notes data. All we have to do is create a normal button with the type attribute set to "submit". Our button will then trigger the form’s onSubmit event.
Test the Python and React notes web app
Now we are ready to use our Python and React notes web app and see what we have built. Make sure the backend and frontend are up and running
The frontend should now show a couple of input elements and a button above the list of notes:
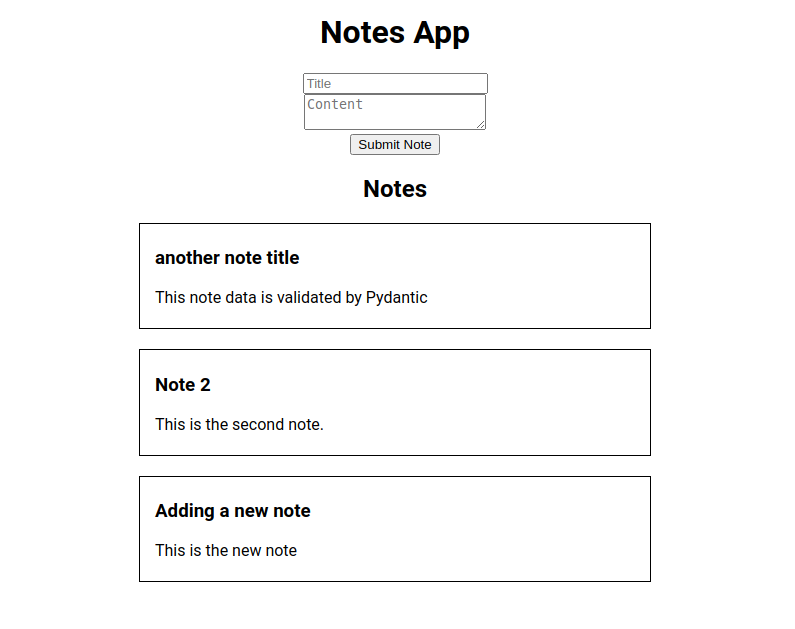
Let’s type a new note and see what happens after we press “Submit Note”:
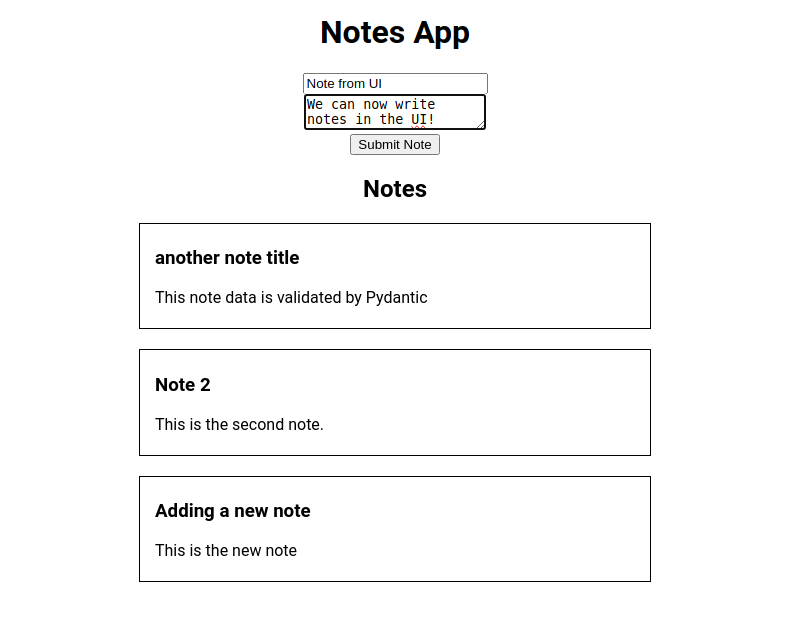
Then when we submit the note the text input boxes are cleared but no new note appears:
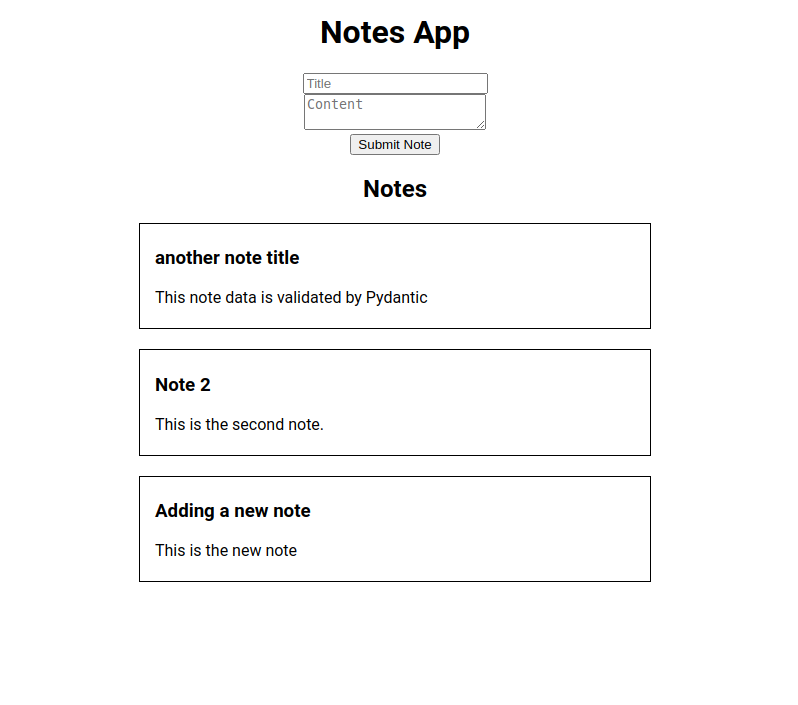
However, we can see the new note after we refresh the page:
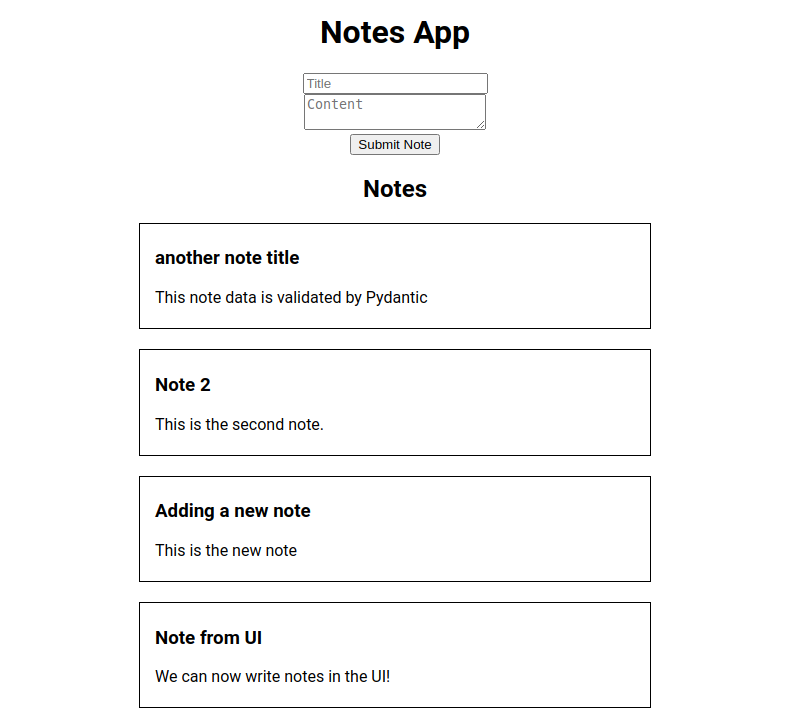
Why does the new note not show up immediately after clicking the submit button? The is reason is because we only call the fetchData function when the page first loads the data won’t be loaded after a submit action. We can change that behavior by also calling the fetchData function in the handleSubmit function after the new note data is sent.
Updating handleSubmit to refresh the list of notes
All we have to do now is call the function for fetching notes in the handleSubmit function. However, because the fetchData function is declared inside of the useEffect function, we can’t call it outside of that scope.
S let’s declare the fetchData function outside of the scope of useEffect. It is also a good idea to change the name of the function to be more descriptive than a generic name like “fetchData“. What data are we fetching? Notes. If our application grows we might end up fetching other data as well so we will need a function for fetching that other data. For readability of the code let’s be specific and call the function fetchNotes:
function App() {
  const [notesData, setNotesData] = useState<NoteData[]>([]);
  const [newNote, setNewNote] = useState<NoteData>({ title: "", content: "" });

  const fetchNotes = async () => {
    try {
      const notes = await BackendService.getNotesData();
      setNotesData(notes);
    } catch (error) {
      console.error("Failed to fetch notes:", error);
    }
  };


  useEffect(() => {
    fetchNotes();
  }, []);

  const handleNoteChange = (
    event: React.ChangeEvent<HTMLInputElement | HTMLTextAreaElement>
  ) => {
    const { name, value } = event.target;
    setNewNote((prevNote) => ({
      ...prevNote,
      [name]: value,
    }));
  };

  const handleSubmit = async (event: React.FormEvent) => {
    event.preventDefault();
    await BackendService.postNoteData(newNote);
    setNewNote({ title: '', content: '' });
    await fetchNotes();
  };
On line 10 the renamed fetchNotes function is declared with just one minor change: the error message was updated.
Then, of course, we should call the fetchNotes functions in useEffect on line 21.
Finally, we call fetchNotes in the handleSubmit function on line 38.
Now when we run our Python and React web app and add a note using the frontend, the notes list should update after the submit action has been completed.
Python backend: Delete and Update notes
We now have some nice interaction in our web app. However, for our Python and React notes web app to become full-featured we still have to implement delete and update functionality.
As always we start by adding new functions to the back end first.
Delete note endpoint
To delete a note we need a way to know which note to delete. We should use some unique identifier so that we only delete the note we want to delete and not accidentally a different note. For example, if we were to delete notes based on title that could cause problems. Because we could have multiple notes with the same title so there is a chance that we delete the wrong one. However, since we have the notes in an ordered list we can simply use the index of the note to find the note we want to delete.
But first a code refactoring side step.
Loading notes function refactoring
To be able to delete data we first have to load the data from the notes-data.json file. We are already loading data in the add_notes function and the get_notes function. While both of these functions use a slightly different code flow, the end result is the same: either the data is loaded or an empty list is returned. So instead of repeating similar data loading code a third time, let’s write a function to consolidate this data loading functionality.
It is a good idea to try to eliminate duplicate code like this as much as possible. Because if we keep duplicating code and something changes in the way data is loaded we would have to change all the duplicate parts in the code. If we instead have one function that is called multiple times we only have to change that one function:
def load_notes_data():
    if not os.path.isfile(DATA_FILENAME):
        print("No data found!")
        return []

    with open(DATA_FILENAME, "r") as note_data_file:
        note_data = json.load(note_data_file)
        return note_data
Let’s move the code from get_notes into a new function load_notes_data on line 32 above the read_root endpoint code.
Next, we should update the get_notes and add_notes functions to use the load_notes_data function:
@app.get("/notes", response_model=List[Note])
async def get_notes():
    return load_notes_data()

@app.post("/notes")
async def add_notes(new_note: Note):

    current_note_data = load_notes_data()
    current_note_data.append(new_note.model_dump())

    with open(DATA_FILENAME, "w") as write_file:
        json.dump(current_note_data, write_file)
Delete note endpoint code
For this endpoint we have to receive an index number from the frontend (client) and then use that index to remove an item from our list of notes.
With FastAPI we can easily specify a parameter in the endpoint path that is then mapped to a variable in our code. Using this notation "/{variable name}". In the case of the delete function the path becomes "/notes/{index}". We want to have "/notes" in the path as well to indicate that we are doing “something” with notes data. And we should specify the HTTP method as DELETE by using @app.delete.
The code:
@app.delete("/notes/{index}", status_code=204)
async def delete_note(index: int):
    current_note_data = load_notes_data()
    current_note_data.pop(index)

    with open(DATA_FILENAME, "w") as write_file:
        json.dump(current_note_data, write_file)
On line 63 we have the endpoint decorator. This time we use the delete method to indicate this endpoint listens for DELETE HTTP requests. The defined path is defined, as explained, with a parameter for the index of the to be deleted note. We also include a status_code=204 here which sets the status code to be returned to the client. The 204 status code means “No Content” and is typically used when the request was processed successfully but no content is returned.
Then on line 64 we define the function signature and the index: int parameter. The name of this function parameter has to match the parameter name in the endpoint path definition.
Then we load the data on line 65.
Next, we use the list object’s pop function to remove an item from the list. If we don’t pass an index, the pop function will just remove the last item in the list. However, if we pass an index number to the function it will remove the item at that index.
Finally, we have to save the list to our note-data.json file so the list without the removed item is stored.
Testing the delete function
Let’s navigate to the Swagger UI for our backend API (http://localhost:8000/docs) and try out the delete endpoint.
Let’s check what notes we have currently using the GET method on the /notes endpoint. For example, currently I have the following notes in my data file:
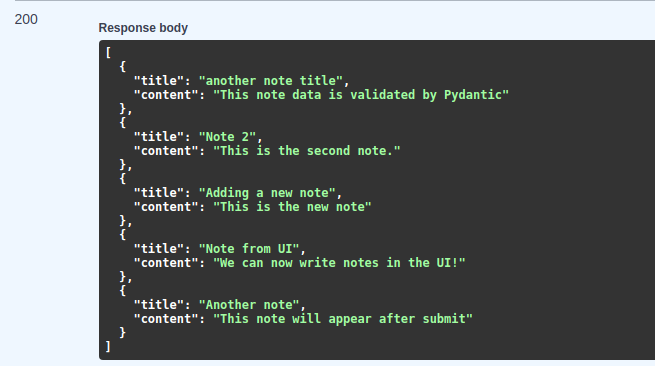
Now when we use the DELETE method on the /notes/{index} endpoint and put in 0 for the index, the first item in the list should disappear:
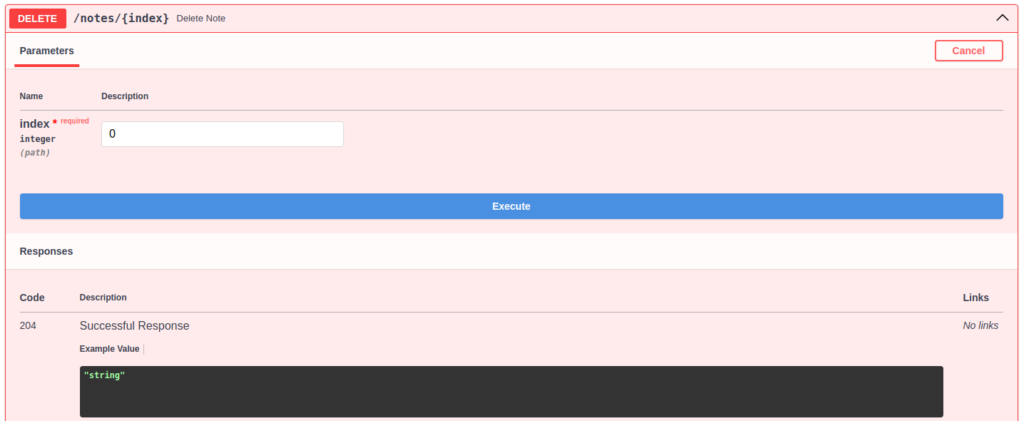
Then since the DELETE endpoint doesn’t return any data we have to check the result with the GET endpoint:
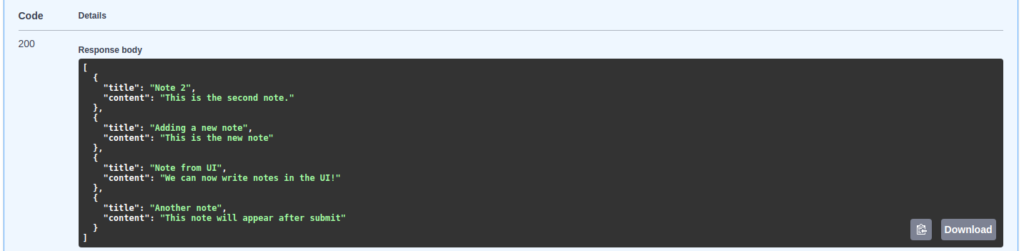
The back end for our Python and React web app can now delete specific notes. But before we update the front end let’s also implement “update note” functionality in the back end.
Implementing an update note endpoint
In this section, we will implement functionality for updating an existing note. This will complete the CRUD functionality for our Python and React notes web app’s back end. The update note endpoint is like a combination of the add_notes endpoint and the delete_note endpoint. We also need to get an index as a parameter to know which note to update and need to be able to receive data to update the note with.
HTTP request Methods for updating a resource
Two HTTP request methods are commonly used for updating a resource. A resource can be some data that is manipulated by the endpoint. The methods are PUT and PATCH. PUT is intended to be used for updating/replacing an entire resource. While PATCH is intended for partial updates of a resource. I say “intended” because that is what the agreed standard is. However, since we are writing the code for the endpoint we can do whatever we want in that function. Although we can do what we want it is better to follow standards like this to avoid causing confusion in the future.
Update note endpoint code using PUT decorator
We will use PUT for this endpoint to keep it simple. Meaning we will essentially replace the existing Note object in our notes data list with a new Note object:
@app.put("/notes/{index}")
async def update_note(index: int, updated_note: Note):
    current_note_data = load_notes_data()
    current_note_data[index] = updated_note.model_dump()

    with open(DATA_FILENAME, "w") as write_file:
        json.dump(current_note_data, write_file)
On line 72, we use the decorate again and this time use put to configure the endpoint to listen to the PUT HTTP request method. Like the delete endpoint we also set a {index} parameter in the endpoint path. And for this endpoint set the response_model to return a list of notes.
On line 73, we have the function signature that has the index parameter as well as the updated_note parameter representing the incoming data.
Then after loading the data we replace the data at the given index with the value from updated_note on line 75.
Finally, we save the updated data to the file on lines 77 and 78.
Testing the update endpoint
Let’s test our latest code update. Here is the new endpoint in the Swagger UI:
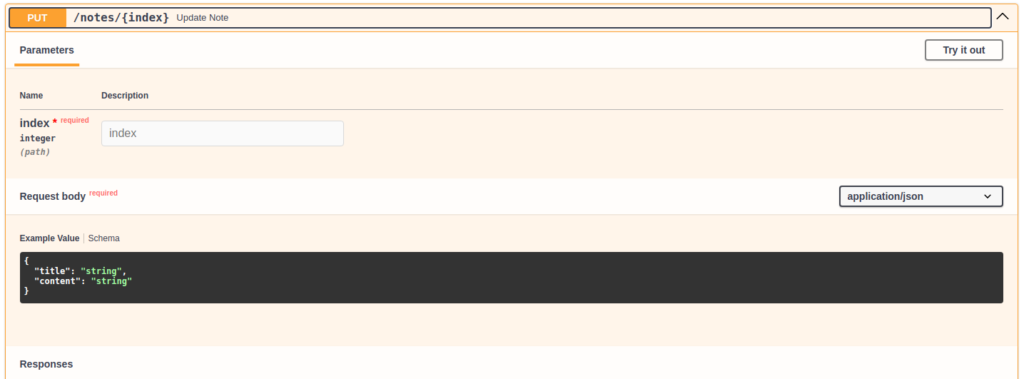
For example, updating the second (index = 1) note:
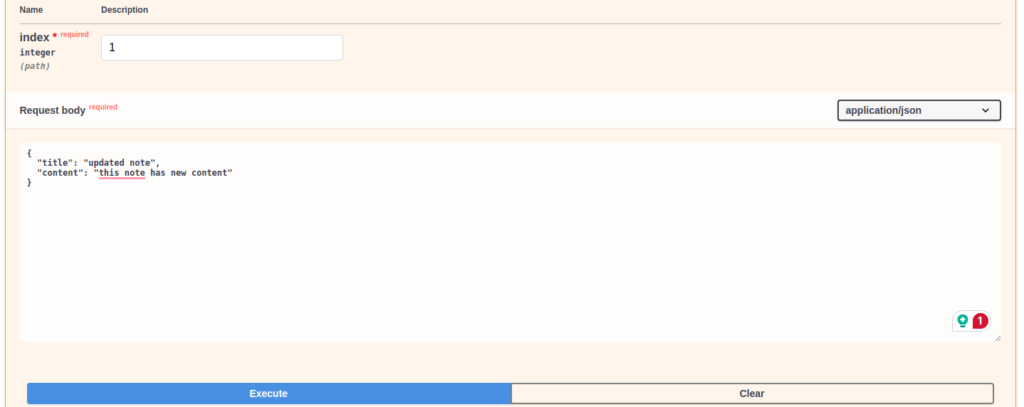
Now that we are done with the endpoint implementations for delete and update we can implement the front end.
React front end: delete notes
In this section, we will implement a new user interface element and functions that will enable users to delete notes. While implementing these features for the back end was relatively easy, the front end needs a bit more work. Since we have to add UI elements as well as functions. However, we will keep it simple:
- A simple button on each note.
- No confirmation popup.
- So we just delete it right away.
Implementing the delete Note BackendService function
In this section, we will implement the function for letting the back end know the users wants to delete a note at the specified index.
The code looks like this:
public async deleteNoteData(index: number): Promise<void> {
    try {
      const response = await fetch(`${this.baseURL}/notes/${index}`, {
        method: 'DELETE'

      });
      if (!response.ok) {
        throw new Error(`Error: ${response.status}`);
      }
    } catch (error) {
      throw new Error('Failed to delete note data in the backend');
    }
  }
Here we are using the parameter index as a unique identifier for the note we want to delete. This function will not return a value so the return value is Promise<void>.
Then on line 55 we call fetch and passing the method 'DELETE', and in the API endpoint path we put the index value so that the back end can pick up this index to remove the note at that index value.
The rest is error handling and the same as previous functions we wrote in the BackendService class.
Next, we have to add a button and a handler function that is called when the button is clicked. This handler function then calls the function deleteNoteData we just wrote in the BackendService class.
Let’s add a new function handleDelete below the handleSubmit function on line 41:
const handleDelete = async (index: number) => {
    try {
      await BackendService.deleteNoteData(index);
      await fetchNotes();
    } catch (error) {
      console.error("Failed to delete and fetch notes:", error);
    }
  }
This handler function takes an index parameter, the index of the note we want to delete.
Then we call the deleteNoteData function on line 44 passing in that index value. Right after that we call the fetchNotes() function to refresh the list of notes so that the deleted note is also visually removed from the web page.
Additionally there is a catch section for error handling.
Adding HTML elements for the delete UI
To complete the delete functionality we also have to add a user interface element so the user can trigger the function and delete a note.
The HTML is simple like the submit button
    <section>
        <h2>Notes</h2>
        {notesData.length > 0 ? (
          <div className="notes-container">
            {notesData.map((note, index) => (
              <div key={index} className="note-card">
                <h3>{note.title}</h3>
                <p>{note.content}</p>
                <section>
                  <button onClick={() => handleDelete(index)}>delete</button>
                </section>
              </div>
            ))}
          </div>
        ) : (
          <p>No notes available</p>
        )}
      </section>
A new section element was added to hold a button element at line 85. This button element is similar to the submit button element we created earlier. However, this button has a onClick property where we specify what should happen if the button is clicked and the onClick event fires. In this case we use an arrow function to call handleDelete with the index variable that is being set by the notesData.map((note, index)) function this whole section is in. This index corresponds to the number position in the list for the note.
Now when we save and run these changes the page should look like this:
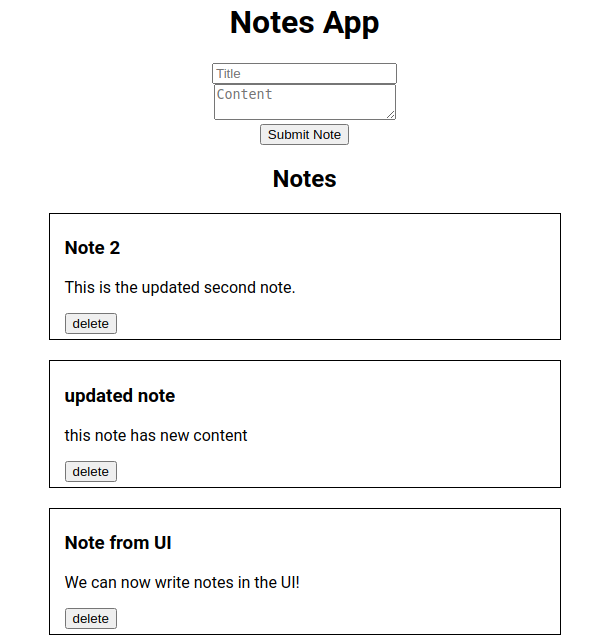
Clicking on the delete button on a note should immediately remove that note from the list. Normally it is better for the user experience to first ask for confirmation from the user before deleting the note. Because the user might have clicked “delete” on accident and the action is not reversible. But that is outside the scope of this tutorial.
React front end: update notes
In this section, we will implement the functionality for updating a note for our Python and React web app. With this the user will be able to go to a specific note and edit its title and contents. We will add a button “edit” which swaps the display of the note with one that contains HTML input elements instead. Similar to the new note form. In fact, we can turn that form into a component and reuse it.
- Add function for sending an update (PUT) request to the back end.
- Turn create note form into a note edit component.
- Update code to use component for creating a note.
- Add function to handle edit note button clicks.
- Use note edit component to allow user to edit a note.
Implementing the update note BackendService function
There are some similarities here with the delete function and the postNoteData function in that we have to pass an index so the back end knows which note to update. On top of that we also have to send a payload with the updated content for the note.
Let’s add a new function to BackendService.ts called updateNoteData by now we should have a grasp on what this will look like:
  public async updateNoteData(index: number, noteData: NoteData): Promise<void> {
    try {
      const response = await fetch(`${this.baseURL}/notes/${index}`, {
        method: 'PUT',
        headers: {
          'Content-Type': 'application/json',
        },
        body: JSON.stringify(noteData),
      });
      if (!response.ok) {
        throw new Error(`Error: ${response.status}`);
      }
    } catch (error) {
      throw new Error('Failed to update note data in the back end');
    }
  }
The parameters for the function are an index and a NoteData object.
Then the fetch call uses the endpoint url for notes with an index value in the path. The method sent is 'PUT' because this is what we implemented in our back end for the HTTP method for updating note data.
Finally, we stringify the NoteData object to be able to send it to the back end.
Turning the note form into a React component
In this section, we will take the code and HTML elements from the create note form and turn it into a React component. Then we will make it so that we can use that component for both creating and editing notes.
Why create a React component?
A React component is a way to take code and HTML elements group them together, and turn them into a reusable component. When we create a component like this it can be reused in different places in a React web app. Instead of creating a component we could write the same form elements and similar code for the edit note form. However, what if we want to add extra information to a note for example a subject tag? That requires adding an extra input field and some code updates also. If we have two forms in different places we would have to add this new functionality in two places. Now if we implemented the form as a single component instead we would only have to change this component.
For more information on React components read my tutorial on React basics here: Create your first React web app: easy basics.
Implementing the noteFormComponent
To keep the project directory organized we’ll put the component code in a new file in a new directory. Let’s at a new directory called components to the project and create a new file in there called noteFormComponent.tsx. The components directory should be under the src directory:
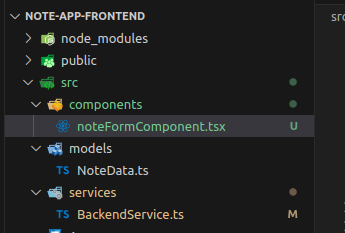
The full code for noteFormComponent.tsx looks like this:
import React, { useState } from "react";
import { NoteData } from "../models/NoteData";
import BackendService from "../services/BackendService";

interface NoteFormProps {
  initialNote: NoteData;
  index: number | null;
  isEdit: boolean;
  onSubmit: () => void;
  onCancel: () => void;
}

const NoteFormComponent: React.FC<NoteFormProps> = ({ initialNote, index, isEdit, onSubmit, onCancel }) => {
  const [note, setNote] = useState<NoteData>(initialNote);

  const handleNoteChange = (
    event: React.ChangeEvent<HTMLInputElement | HTMLTextAreaElement>
  ) => {
    const { name, value } = event.target;
    setNote((prevNote) => ({
      ...prevNote,
      [name]: value,
    }));
  };

  const handleSubmit = async (event: React.FormEvent) => {
    event.preventDefault();
    if (isEdit && index !== null) {
      await BackendService.updateNoteData(index, note);
    } else {
      await BackendService.postNoteData(note);
      setNote({title: '', content: ''});
    }
    onSubmit();
  };

  const handleCancel = () => {
    onCancel();
  }

  return (
    <form onSubmit={handleSubmit}>
      <div>
        <input
          type="text"
          name="title"
          placeholder="Title"
          value={note.title}
          onChange={handleNoteChange}
        />
      </div>
      <div>
        <textarea
          name="content"
          placeholder="Content"
          value={note.content}
          onChange={handleNoteChange}
        />
      </div>
      <section>
      {
        isEdit ? (<button onClick={()=> handleCancel()}>Cancel</button>) : (<></>)
      }
      <button type="submit">{isEdit ? "Update Note" : "Submit Note"}</button>
      </section>
    </form>
  );
};

export default NoteFormComponent;
Let’s go through the code by splitting it up into sections.
Imports and Property interface
First we import the things we need from react and other parts of the code base. Since we’re in a sub directory (components) we have to go up one level with the import path by using ../ and then the path of where the file is is.
import React, { useState } from "react";
import { NoteData } from "../models/NoteData";
import BackendService from "../services/BackendService";

interface NoteFormProps {
  initialNote: NoteData;
  index: number | null;
  isEdit: boolean;
  onSubmit: () => void;
  onCancel: () => void;
}
On line 6 we define a property interface for our component. This interface defines what properties can be set on our component when it is used as a HTML element. The properties are:
initialNote: NoteData: the data that should be used for pre-filling the form input elements. In the case of a new note these will just be empty values. In the case of an edit it will use the note data from the note the user wants to edit.index: number | null: the index number of the note being edited. We designate the type asnumber | null, meaning the value can be a number or null, because if it is a new note there will not be a valid index number so it should be set tonull.isEdit: boolean: Determines if the component is in edit mode. The code’s behavior changes accordingly. For example, ifisEditistruethenBackendService.updateNoteDatawill be called upon submission of the form data instead ofBackendService.postNoteData.onSubmit: () => void: This property is for setting a parent function that the component can call for handling the submit action. For example, calling thefetchNotesfunction inApp.tsxto refresh the list after a submit. However, since we’re building an isolated reusable component we don’t have direct access to code inApp.tsx. We need a way for the parent to give the component a function that it can call at the right time. SoApp.tsxcan pass thefetchNotesfunction into theonSubmitproperty or a different function that ends up callingfetchNotes.onCancel: () => void: same asonSubmitbut used in the case of the user canceling the note edit mode.
NoteFormComponent definition and handleNoteChange
Let’s look at this bit of code that starts at line 12 next:
const NoteFormComponent: React.FC<NoteFormProps> = ({ initialNote, index, isEdit, onSubmit, onCancel }) => {
  const [note, setNote] = useState<NoteData>(initialNote);

  const handleNoteChange = (
    event: React.ChangeEvent<HTMLInputElement | HTMLTextAreaElement>
  ) => {
    const { name, value } = event.target;
    setNote((prevNote) => ({
      ...prevNote,
      [name]: value,
    }));
  };
Here we define the component as a function component type: React.FC we also pass in the properties interface here (<NoteFormProps>) so React know which property definitions to use for this component.
We also have to define the properties in the arrow function’s parameter definition: ({ initialNote, index, isEdit, onSubmit, onCancel }) so they can be referenced further down in the function.
On line 13 we have a useState object definition similar to what we have for newNote in App.tsx. However, in this case we call it just note and setNote because it can also refer to a note the user is editing. We set the default to the initialNote value so it can either have an note with empty properties or a note with properties of the note the user is editing.
Finally, on line 15 we have handleNoteChange this code is the same as in App.tsx because changing note properties works the same if we’re writing a new note or editing one.
The handleSubmit function
Next, we’ll look at the handleSubmit function:
  const handleSubmit = async (event: React.FormEvent) => {
    event.preventDefault();
    if (isEdit && index !== null) {
      await BackendService.updateNoteData(index, note);
    } else {
      await BackendService.postNoteData(note);
      setNote({title: '', content: ''});
    }
    onSubmit();
  };
The handleSubmit function has some added functionality compared to the old handleSubmit function we have in App.tsx. Because we want to handle edit note behavior as well we need to take the edit mode into account as indicated by the isEdit variable.
First, the part that handles “edit mode”, in other words when isEdit is true and index is not null. In this case we simply call the updateNoteData function and pass in the index and note object on line 28. We don’t reset the note to an empty note to clear the form because the UI is displaying this note.
If we are not in edit mode we call the postNoteData function just passing in the note object. There is no index because the note doesn’t exist in the back end yet.
Finally, we always call the onSubmit() function no matter what mode we are in. This will call any function on the parent (in this case App.tsx) that was passed into the onSubmit property. As a way to notify the parent that a note has been submitted.
The handleCancel function
To give the user the option to stop editing without changes we’re implementing a “cancel” button. To keep it simple the function for this button does nothing but call the onCancel() function this will tell the parent page or element to whatever needs to happen when the cancel button is pressed.
  const handleCancel = () => {
    onCancel();
  }
The NoteFormComponent UI elements
Finally, let’s look at the UI elements and logic for the NoteFormComponent component:
  return (
    <form onSubmit={handleSubmit}>
      <div>
        <input
          type="text"
          name="title"
          placeholder="Title"
          value={note.title}
          onChange={handleNoteChange}
        />
      </div>
      <div>
        <textarea
          name="content"
          placeholder="Content"
          value={note.content}
          onChange={handleNoteChange}
        />
      </div>
      <section>
      {
        isEdit ? (<button onClick={()=> handleCancel()}>Cancel</button>) : (<></>)
      }
      <button type="submit">{isEdit ? "Update Note" : "Submit Note"}</button>
      </section>
    </form>
  );
There is a lot here that is the same as the form (<form>) in App.tsx. However, there are some important differences that support the edit mode functionality.
First, there are references to note instead of newNote on lines 48 and 56.
Then there is the section with buttons starting on line 60. When the edit mod is active determined by isEdit we show a “cancel” button, if not we put in an empty tag that will do nothing instead.
Finally, in a similar way we change the text on the submit button depending on the mode we are in on line 64.
Updating the create note form and code in App.tsx
Now that we have a component for the note form, we can replace the create note form and code. Before we add the new update functionality it is a good idea to refactor existing code to make use of the new component and testing to see if the new code behaves the same as the current code.
Removing unneeded code
Now that we have all this note form functionality in a component we no longer need that code in App.tsx.
So let’s open App.tsx and remove handleNoteChange and handleSubmit functions on lines 24 to 39.
Then remove the <form> element on lines 56 to 75.
Use the NoteFormComponent element for creating new notes
First, we have to import the NoteFormComponent function component:
import React, { useState, useEffect } from "react";
import "./App.css";
import BackendService from "./services/BackendService";
import { NoteData } from "./models/NoteData";
import NoteFormComponent from "./components/noteFormComponent";
Then we have to implement a new functions called handleFormSubmit and handleFormCancel. This first function, handleFormSubmit, will simply call fetchNotes() for now. Later, we will update this feature to support editing code flow too.
The handleFormCancel function does nothing for now, since the create form does not have a cancel button. However, we have to pass a function to the onCancel property for the component otherwise we will get an error.
  const handleFormSubmit = async () => {
    await fetchNotes();
  };

  const handleFormCancel = () => {
  }
Now we can add the NoteFormComponent element in the place where the <form> element used to be:
    <section>
          <NoteFormComponent initialNote={newNote} index={null} isEdit={false} onSubmit={handleFormSubmit} onCancel={handleFormCancel} />
      </section>
Now when we save these files and run our Python and React web app, there should be no visible difference to what the page looked like before. The behavior of the form should also be the same. Although we should recognize that our code in App.tsx looks much cleaner now, the real change comes next with the edit UI.
Implementing the edit UI
In this final section, we will implement functions and UI elements for the edit note mode.
First, we will add a variable and function to track the state of the index of the note we are editing:
function App() {
  const [notesData, setNotesData] = useState<NoteData[]>([]);
  const [newNote, setNewNote] = useState<NoteData>({ title: "", content: "" });
  const [editingIndex, setEditingIndex] = useState<number | null>(null);
This should be a number but also be able to set to null in the case that we are not editing a note but creating a new one.
Hide create note form when editing
Now we can hide the create note form if we are in edit mode:
      <section>
        {editingIndex === null && (
          <NoteFormComponent initialNote={newNote} index={null} isEdit={false} onSubmit={handleFormSubmit} onCancel={handleFormCancel} />
        )}
      </section>
Here on line 48 we first check that the user is not editing an existing note. If they are then we don’t render (show) the create note form. Otherwise, we show our new NoteFormComponent element. We have to set all the properties.
In this case initialNote should be newNote so that the form’s input fields are empty and the user can start with a cleared form. The index is, of course, null since we are not editing an existing note. isEdit is set to false so the component knows we are not in edit mode. Finally, we pass in the functions to call for onSubmit and onCancel events.
Set edit mode and index
Then let’s update handleFormSubmit and handleFormCancel to reset this editingIndex to null:
  const handleFormSubmit = async () => {
    setEditingIndex(null);
    await fetchNotes();
  };

  const handleFormCancel = () => {
    setEditingIndex(null);
  }
We also need a function for setting the editingIndex when a user presses the edit button on a note:
const handleEdit = (index: number) => {
    setEditingIndex(index);
  };
Add NoteFormComponent for editing
And the last thing we have to do is update the elements and code for the note. So that the NoteFormComponent element will be shown when editing or if not editing the normal note card is shown.
    <section>
        <h2>Notes</h2>
        {notesData.length > 0 ? (
          <div className="notes-container">
            {notesData.map((note, index) => (
              <div key={index} className="note-card">
              {editingIndex === index ? (
                <NoteFormComponent initialNote={note} index={index} isEdit={true} onSubmit={handleFormSubmit} onCancel={handleFormCancel}/>
              ) : (
                <>
                  <h3>{note.title}</h3>
                  <p>{note.content}</p>
                  <section>
                    <button onClick={() => handleEdit(index)}>Edit</button>
                    <button onClick={() => handleDelete(index)}>Delete</button>
                  </section>
                </>
              )}
            </div>
            ))}
          </div>
        ) : (
          <p>No notes available</p>
        )}
      </section>
On line 63 we check if the current note’s index is the same as the editing index (editingIndex) to see if we need to show the editing form element (NoteFormComponent) or not. If the values are the same the NoteFormComponent is set, configured in edit mode (isEdit={true}) and having the current note as the initialNote.
Otherwise, show the normal note card.
We’ve added an edit button on line 70 that calls handleEdit when the user clicks on it to set the editingIndex and enter edit mode for that particular note.
Completed code for App.tsx:
import React, { useState, useEffect } from "react";
import "./App.css";
import BackendService from "./services/BackendService";
import { NoteData } from "./models/NoteData";
import NoteFormComponent from "./components/noteFormComponent";

function App() {
  const [notesData, setNotesData] = useState<NoteData[]>([]);
  const [newNote, setNewNote] = useState<NoteData>({ title: "", content: "" });
  const [editingIndex, setEditingIndex] = useState<number | null>(null);

  const fetchNotes = async () => {
    try {
      const notes = await BackendService.getNotesData();
      setNotesData(notes);
    } catch (error) {
      console.error("Failed to fetch notes:", error);
    }
  };

  useEffect(() => {
    fetchNotes();
  }, []);

  const handleFormSubmit = async () => {
    setEditingIndex(null);
    await fetchNotes();
  };

  const handleFormCancel = () => {
    setEditingIndex(null);
  }

  const handleEdit = (index: number) => {
    setEditingIndex(index);
  };

  const handleDelete = async (index: number) => {
    try {
      await BackendService.deleteNoteData(index);
      await fetchNotes();
    } catch (error) {
      console.error("Failed to delete and fetch notes:", error);
    }
  }

  return (
    <div className="App">
      <header>
        <h1>Notes App</h1>
      </header>
      <section>
        {editingIndex === null && (
          <NoteFormComponent initialNote={newNote} index={null} isEdit={false} onSubmit={handleFormSubmit} onCancel={handleFormCancel} />
        )}
      </section>
      <section>
        <h2>Notes</h2>
        {notesData.length > 0 ? (
          <div className="notes-container">
            {notesData.map((note, index) => (
              <div key={index} className="note-card">
              {editingIndex === index ? (
                <NoteFormComponent initialNote={note} index={index} isEdit={true} onSubmit={handleFormSubmit} onCancel={handleFormCancel}/>
              ) : (
                <>
                  <h3>{note.title}</h3>
                  <p>{note.content}</p>
                  <section>
                    <button onClick={() => handleEdit(index)}>Edit</button>
                    <button onClick={() => handleDelete(index)}>Delete</button>
                  </section>
                </>
              )}
            </div>
            ))}
          </div>
        ) : (
          <p>No notes available</p>
        )}
      </section>
    </div>
  );
}
export default App;
Testing the edit functionality
After everything is updated and saved we can now test our completed Python and React web app to see if the edit note functionality also works.
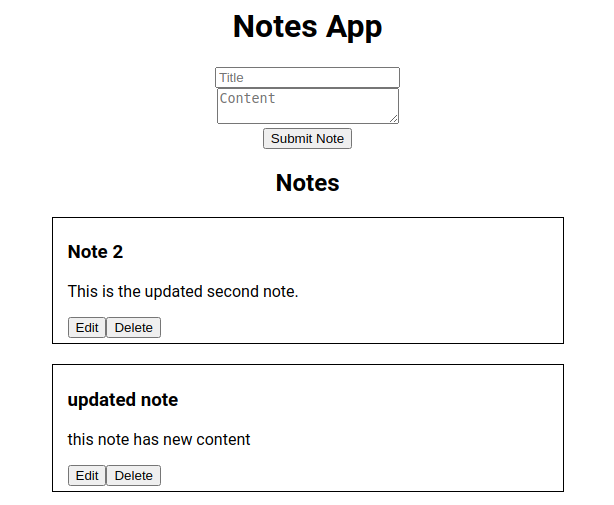
Then after clicking the edit button:
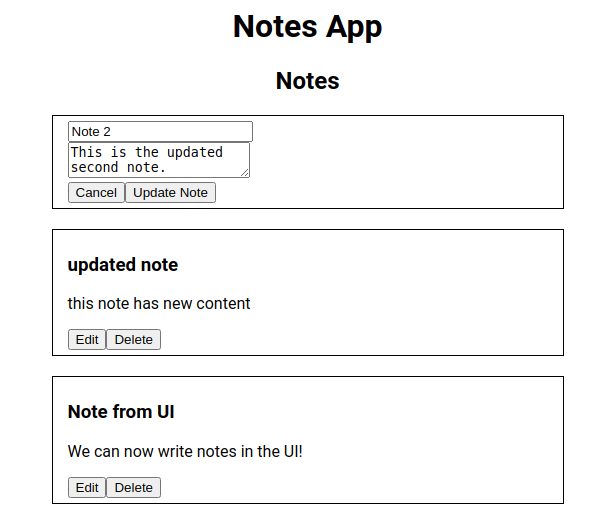
Making a change and clicking on the “Update Note” button should immediately show the updated result:
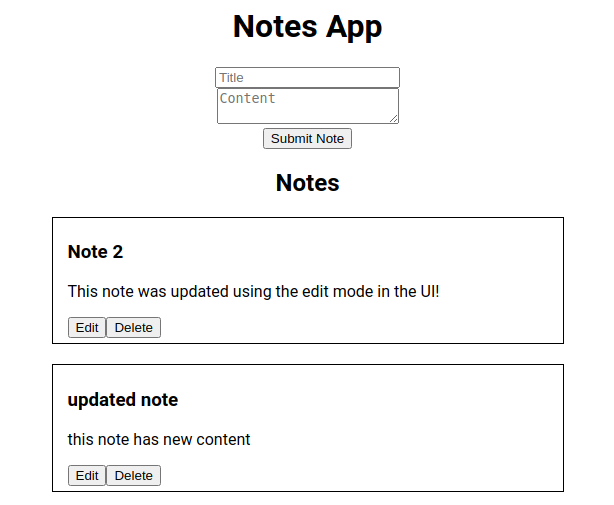
It works! Great job.
Conclusion
In this tutorial we have learned the basics of how to program a Python and React web app. We learned how to write a back end with Python and how to talk to that back end with a front end application built using JavaScript and the React framework. Along the way we also learned about different types of HTTP request methods, CORS configuration, React events and components.
This gives a good foundation of knowledge to start programming your very own Python and React based web app.
Here are links to GitHub repositories with the completed code:
Please follow me on twitter to get notified on the next programming for beginners tutorial:
Follow @tmdev82