In this tutorial, we will build an Ethereum transactions viewer app with Rust. This will be a full-stack Rust application. A benefit of this is that we can share the data model between frontend and backend. For the backend API we will use warp and for the frontend we will use the Rust framework Yew. Our application will make use of the Etherscan API to get data about transactions for a specified wallet address. This data will then be displayed in our Rust/Webassembly frontend.
For this tutorial, we will keep the data we use and the frontend relatively simple. There is a lot of information we can get about transactions. However, we will only display where the transaction came from, the value, the gas price, and the contract address and function name used if there is one.
The completed project’s code can be found on my GitHub here.
Contents
- 1 Prerequisites
- 2 What does the Ethereum transactions viewer look like?
- 3 Ethereum transactions viewer app workspace setup
- 4 Ethereum transactions viewer common component
- 5 Ethereum transactions viewer basic backend and frontend setup
- 6 Ethereum transactions viewer backend component
- 7 Ethereum transactions viewer app frontend
- 8 Completed backend and frontend result
- 9 Conclusion
Prerequisites
To follow this tutorial the following is required:
- A Rust installation.
- Some Rust knowledge.
- Some Yew knowledge. See previous tutorials:
- Some warp framework knowledge. See this previous tutorial:
- Trunk needs to be installed for compiling the frontend.
- An Etherscan API key. The Etherscan API can be used for free in a limited capacity, but registration is required: go here for more information.
What does the Ethereum transactions viewer look like?
Here is a quick preview of what we are going to build. As mentioned in the introduction we are going to build a full stack Rust app: an Ethereum transactions viewer. There are three main components a common library, backend, and frontend.
The frontend will allow users to input a Ethereum wallet address the backend will use this address to make calls to the Etherscan API to retrieve information. Then the backend will use that data to send a response back to our frontend.
Common component
This component will contain code that is common between the backend and the frontend. Namely the data models. We will have data models representing data coming from the Etherscan API and for what we send back to our frontend.
Backend component
Next, the backend is a REST API that we construct using the warp crate. Our backend can receive requests from the frontend. Which in turn will trigger it to retrieve data from the Etherscan API using reqwest, we then transform that data and send it up to the frontend.
Frontend component
This will be a simple UI for the user to put in an Ethereum wallet address and then a simple display of the address’ balance and recent transactions with additional information about the transaction.
Ethereum transactions viewer app workspace setup
In this section, we will setup the initial workspace for this project.
Let’s create the main project directory using the cargo CLI: cargo new fullstack-etherscan-app. We’ll turn this into a workspace. Using cargo workspaces we can more easily manage multiple packages in one project. See more information on workspaces here.
Then let’s change the Cargo.toml to configure the workspace for the full-stack application:
[workspace]

members = [
    "backend",
    "frontend",

    #Internal
    "common"
]
Let’s get rid of the src directory as this workspace project itself will not contain source code.
Next, we are going to add the component projects. Let’s execute the following commands within the fullstack-etherscan-app directory:
- Common:
cargo new --lib common - Backend:
cargo new backend - Frontend:
cargo new frontend
The resulting directory structure should look like this:
fullstack-etherscan-app
+Cargo.toml
+--backend
   +Cargo.toml
   +--src
       +main.rs
+--common
   +Cargo.toml
   +--src
      +lib.rs
+--frontend
   +Cargo.toml
   +--src
      +main.rs
Ethereum transactions viewer common component
In this common component we will define our data models. As in the data structures of the data we receive and send.
As mentioned we are going to make use of the Etherscan API to retrieve transaction data from an address on the blockchain. While we are at it let’s also get balance data from the address. We can find the definitions of the response data in the API documentation.
To get the data we want we have to make requests to the following API endpoints:
- Get Ether Balance for a Single Address
- Get a list of ‘normal’ Transactions By Address
- Get a list of ‘Internal’ Transactions by Address
- Get Contract Source Code for Verified Contract Source Codes
On thing to note right away is that there is poor consistency in naming convention for the data structures. For instance, some are camelCase others are PascalCase.
Common component dependencies
Before we begin writing our data models, let’s first add the required dependencies to our common library.
In the Cargo.toml:
[package]
name = "common"
version = "0.1.0"
edition = "2021"

# See more keys and their definitions at https://doc.rust-lang.org/cargo/reference/manifest.html

[dependencies]
serde = { version = "1.0", features = ["derive"]}
Generic response data model
Etherscan’s response data structures all share some of the same fields:
status: status code for the response.message: message explaining the result.result: the actual data corresponding to the request. This field’s type can differ from endpoint to endpoint (string, list, etc.)
Therefore we can create a generic struct that can be used for all these response data structures. In other words, Rust’s generics can be used to create definitions of structs, functions, etc. that can be used with many concrete data types.
Let’s add a file called models.rs to our common library:
use serde::{Deserialize, Serialize};

#[derive(Deserialize, Serialize, Clone, Debug)]
pub struct EtherScanResult<T> {
    pub status: String,
    pub message: String,
    pub result: T
}
We bring some traits from serde into scope Deserialize and Serialize. When we annotate our struct with serde can easily deserialize and serialize the data represented by this struct.
Balance response data model
Let’s now write the struct for the response for getting Ether balance for a single address. The example looks like this:
{
   "status":"1",
   "message":"OK",
   "result":"40891626854930000000000"
}
In our Rust code we can represent this using our generic struct and an alias like this:
use serde::{Deserialize, Serialize};

pub type AccountBalanceResponse = EtherscanResult<String>;

#[derive(Deserialize, Serialize, Clone, Debug)]
pub struct EtherscanResult<T> {
    pub status: String,
    pub message: String,
    pub result: T,
}
Since the result in this case is the address’ balance represented as a string we can simple create an alias for EtherscanResult<String> for this endpoint’s response.
Normal transactions response model
Next, let’s create the struct for transactions result which we can use to create an alias using EtherscanResult<T> again:
use serde::{Deserialize, Serialize};

pub type AccountBalanceResponse = EtherscanResult<String>;
pub type AccountNormalTransactionsResponse = EtherscanResult<Vec<NormalTransactionResult>>;

#[derive(Deserialize, Serialize, Clone, Debug)]
pub struct EtherscanResult<T> {
    pub status: String,
    pub message: String,
    pub result: T,
}

#[derive(Deserialize, Serialize, Clone, Debug)]
#[serde(rename_all = "camelCase")]
pub struct NormalTransactionResult {
    pub block_number: String,
    pub time_stamp: String,
    pub hash: String,
    pub nonce: String,
    pub block_hash: String,
    pub transaction_index: String,
    pub from: String,
    pub to: String,
    pub value: String,
    pub gas_price: String,
    pub is_error: String,
    #[serde(default)]
    pub txreceipt_status: String,
    pub input: String,
    pub contract_address: String,
    pub cumulative_gas_used: String,
    pub confirmations: String,
    pub method_id: String,
    pub function_name: String,
}
Here we have our struct annotated with #[serde(rename_all = "camelCase")] to ensure fields deserialized by serde are mapped to our struct’s fields with the Rust naming conventions.
However, there is one field that does not conform to a naming convention that can be converted from camelCase and that is txreceipt_status. So we have to annotate that with #[serde(default)] to prevent mapping to/from camelCase.
On line 4 we define our alias. Since the result field in the response is a list of objects we use a Vec<NormalTransactionResult> as the concrete type for the generic field.
Models between backend and frontend
Finally, let’s add some models that will be sent between the backend and frontend of our application to communicate. We’ll add a struct (QueryParams) that represents query parameters for the backend endpoint. For example, to indicate for what address we want to see transactions. Also, we’ll need a struct representing the response to that query: AccountData.
The listing below shows the structs:
#[derive(Deserialize, Serialize, Clone, Debug)]
pub struct QueryParams {
    pub address: String,
    pub page: u32,
    pub offset: u32,
    pub sort: String,
}

#[derive(Deserialize, Serialize, Clone, Debug)]
pub struct AccountData {
    pub address: String,
    pub balance: String,
    pub page: u32,
    pub offset: u32,
    pub sort: String,
    pub normal_transactions: Vec<NormalTransactionResult>,
}
First, QueryParams has the following fields:
address: the address of the wallet we want to see the transactions of.page: what page of the data we want to see, starts at 1.offset: how many results we want to see per page, max 1000.sort: this is the sort direction:ascfor ascending anddescfor descending.
Second, we have the AccountData struct, which represents what our backend will return to the frontend after a request. It had the following fields:
address: the address that was used to get the balance and transaction data.balance: balance of the account in gwei.page: what page of the transactions the records are from.offset: maximum number of records per page.sort: which direction the data was sorted: ascending or descending.normal_transactions: a vec ofNormalTransactionResultdata.
Now that we have the models implemented for our Ethereum transactions viewer app, we can work on the backend component.
Ethereum transactions viewer basic backend and frontend setup
Before we work on the details of the application, let’s create the bare minimum foundation. In this section, we will write a backend with an API endpoint that returns a text and a frontend that sends a request to that endpoint after clicking a button.
Basic Warp backend
Our framework of choice for this tutorial’s backend is warp. We won’t go into a lot of detail on how to set up the REST API endpoints in this tutorial. To see a more detailed tutorial on the subject of REST APIs with Rust please see: How to build a REST API server with Rust and warp.
Backend Dependencies setup
Let’s add the dependencies to the Cargo.toml file in the backend directory. Here we can refer to our own common library using the regular syntax but specifying a relative path as well: common = { version = "0.1.0", path = "../common"}.
[package]
name = "backend"
version = "0.1.0"
edition = "2021"

# See more keys and their definitions at https://doc.rust-lang.org/cargo/reference/manifest.html

[dependencies]
tokio = { version="1.19.2", features= ["macros", "rt-multi-thread"]}
common = { version = "0.1.0", path = "../common"}
warp = "0.3.2"
serde = { version = "1.0.138", features = ["derive"]}
serde_json = "1"
log = "0.4"
log4rs = "1.1.1"
dotenv = "0.15.0"
reqwest = { version = "0.11", features = ["json"]}
We have tokio for the async runtime, warp for the backend framework, serde and serde_json for handling the JSON data, and reqwest for retrieving data from the Etherscan API.
Some optional crates are: we’re adding log4rs for nicer logging and dotenv to easily use a .env file to configure things in our backend, such as the Etherscan API key.
Logging configuration
We are using log4rs to enable configurable logging and color coding of log messages. For more information on what we can do with log4rs, please see my tutorial here: Basic how to log to a file in Rust with log4rs.
Let’s set up our logging configuration using a YAML file logging_config.yml in the root of our backend directory:
appenders:
  my_stdout:
    kind: console
    encoder:
      pattern: "{h({d(%Y-%m-%d %H:%M:%S)(utc)} - {l}: {m}{n})}"
root:
  level: debug
  appenders:
    - my_stdout
This will log a message to stdout with the date and time, the log level, and a message.
Let’s add the following code to main.rs to load the logging configuration and test it:
fn main() {
    log4rs::init_file("logging_config.yml", Default::default()).unwrap();
    log::debug!("Backend running");
}
To run the backend project navigate into the backend directory: cd backend and run the cargo run command: cargo run. The result in the terminal/console will look something like this:

Basic Warp backend and endpoint
In this section, we will write the code to set up a warp server and endpoint. The server will return a text “Ethereum transactions viewer app” when any sends a HTTP GET request to the root URL. In this case the root URL would be http://localhost:5000:
use warp::Filter;

#[tokio::main]
async fn main() {
    log4rs::init_file("logging_config.yml", Default::default()).unwrap();

    let root = warp::path::end().map(|| "Ethereum transactions viewer app");
    let routes = root.with(warp::cors().allow_any_origin());

    warp::serve(routes).run(([127, 0, 0, 1], 5000)).await;
}
After running the backend code again with cargo run, opening the URL http://localhost:5000 in a browser should present us with the previously mentioned text:

The console/terminal output looks something like that:
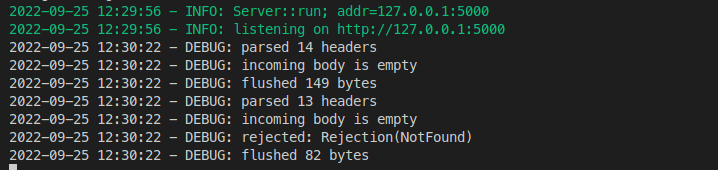
Thanks to our logging configuration we also get information from other crates in our log output. In this case, logging from the warp server code.
Basic Yew frontend
In this next section, we will write code for a very basic frontend using the Yew framework. This frontend will send a request to our backend server upon pressing a button and then present the response on a web page.
Frontend Dependencies setup
Similarly to the backend, let’s add the dependencies to the Cargo.toml file in the frontend directory. Here we should also refer to our own common library using the regular syntax but specifying a relative path as well: common = { version = "0.1.0", path = "../common"}.
[package]
name = "frontend"
version = "0.1.0"
edition = "2021"

# See more keys and their definitions at https://doc.rust-lang.org/cargo/reference/manifest.html

[dependencies]
yew = "0.19"
serde_json = "1"
serde = { version = "1.0.138", features = ["derive"]}
gloo-net = "0.2.3"
wasm-bindgen-futures = "0.4.30"
log = "0.4.17"
wasm-logger = "0.2.0"
web-sys = "0.3.57"
common = { version = "0.1.0", path = "../common"}
Here’s a list of the crates we are including with a short description:
- yew: A framework for making client-side single-page apps.
- serde_json: A JSON serialization file format.
- serde: A generic serialization/deserialization framework.
- gloo-net: HTTP requests library for WASM Apps.
- wasm-bindgen-futures: Bridging the gap between Rust Futures and JavaScript Promises.
- log: A lightweight logging facade for Rust.
- wasm-logger: A logger that sends a message with its Rust source’s line and filename to the browser console.
- web-sys: Bindings for all Web APIs, a procedurally generated crate from WebIDL.
- common: our own common library holding data structure definitions.
Minimal Yew frontend
Because we’re using Yew and Trunk to create the frontend we also have to add an index.html file to the root of the frontend project:
<!DOCTYPE html>
<html lang="en">
<head>
    <meta charset="UTF-8">
    <meta http-equiv="X-UA-Compatible" content="IE=edge">
    <meta name="viewport" content="width=device-width, initial-scale=1.0">
    <title>Ethereum transactions</title>
</head>
<body>

</body>
</html>
Now let’s start by writing the most basic frontend using Yew we can to try it out. Let’s add the following code to main.rs in the frontend/src directory:
use yew::prelude::*;

struct App {}

impl Component for App {
    type Message = ();
    type Properties = ();

    fn create(ctx: &Context<Self>) -> Self {
        Self {}
    }

    fn view(&self, ctx: &Context<Self>) -> Html {
        html! {
            <div>
            <h1>{"Ethereum transactions viewer frontend"}</h1>
            </div>
        }
    }
}

fn main() {
    wasm_logger::init(wasm_logger::Config::default());
    yew::start_app::<App>();
}
Here on line 1 we use the yew prelude to bring all the classes and things into scope that we’re going to use to build the frontend.
Yew is designed around the use of components. And on line 3 we define an empty struct App to represent the main component for our application. Then on lines 5-20 we implement the Component trait. This trait requires implementations for create and view but there are other functions too. We will look at those other functions later.
The view function starting on line 13 determines what should be displayed on the web page. We use the html! macro to type HTML into Rust. There should always be one HTML element at the root. We have a div element here but our HTML can also be surrounded by empty tags like so: <><h1>{"Ethereum transactions viewer frontend"}</h1></>
Then in fn main() on lines 22-25 we initialize a couple of thins:
- the logger: so any logging we do in the frontend code shows up in the dev tools console.
- our yew app:
yew::start_app::<App>();
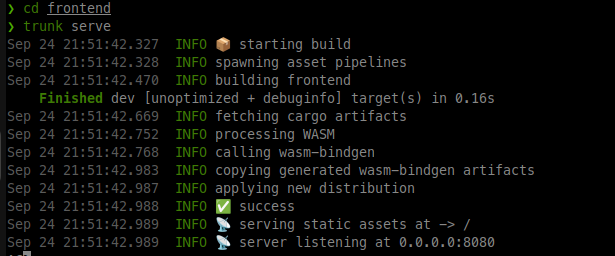
We can run the frontend using the Trunk command: trunk serve, this will compile the project and run a server for the frontend:
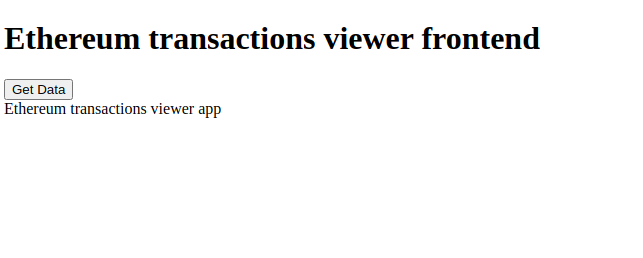
When we navigate to http://localhost:8080 we should see our message.
Communicate with backend using Gloo-net
In this next section, we will use the gloo-net crate to make an HTTP request to our backend.
Let’s add a service.rs file and module to our frontend code:
use gloo_net::http::Request;

const API_URL: &str = "http://localhost:5000";

pub async fn get_data() -> Option<String> {
    let request_url = format!("{}", API_URL);

    log::debug!("request: {}", &request_url);
    let response = Request::get(&request_url).send().await.unwrap();

    let result = if response.ok() {
        let body = response.text().await.unwrap();
        log::debug!("Response: {}", &body);
        Some(body)
    } else {
        None
    };

    result
}
Here we define our backend URL as a const string slice on line 3. This gives us easy access to the backend URL if we were to write multiple functions talking to various endpoints. However, in this tutorial, we will only really have one endpoint.
Next on line 9, we use Request from gloo_net::http to send a HTTP GET request to the backend. The response is then checked for a success code using if response.ok() on line 11.
If the response is ok the text can be retrieved by calling .text() on the response object.
Handle calling an async function and updating the frontend with Yew
Now let’s update our frontend in parts to make use of this service function in main.rs and display the data. First, we need to add mod service; and a message enum for managing the component’s processing, second: a field to store the state of the data:
use yew::prelude::*;

mod service;

pub enum Msg {
    GetData,
    ProcessData(Option<String>),
}

struct App {
    received_data: Option<String>,
}
We have to indicate we use this Msg enum in our impl Component for App code block and also update the create function to set the received_data field to None:
impl Component for App {
    type Message = Msg;
    type Properties = ();

    fn create(ctx: &Context<Self>) -> Self {
        Self {
            received_data: None,
        }
    }
App component update
Then we need to add an update function that can handle these messages:
    fn update(&mut self, ctx: &Context<Self>, msg: Self::Message) -> bool {
        match msg {
            Msg::GetData => {
                log::debug!("Get data");
                ctx.link().send_future(async move {
                    let result = service::get_data().await;

                    Msg::ProcessData(result)
                })
            }
            Msg::ProcessData(data) => {
                log::debug!("Received data: {:?}", data);
                self.received_data = data;
            }
        }
        true
    }
On lines 26-33, we handle the GetData message. Because we have to make a call to our async function service::get_data() and our update function is not async we have to use send_future here on line 28. This function process a future. At the end of the function/closure called by send_future we have to return a Message type. In this case we return Msg::ProcessData and pass in the result from service::get_data().
We pass the result through the message system because we can’t modify our component’s state in the send_future context.
Finally, in the Msg::ProcessData(data) arm of the match we set the component’s received_data field to the incoming value.
The true at the end of the update function means that the component should be redrawn after every update.
App component view
Now let’s update the view function to add a button and display of the received_data field. All the button has to do is call a function that returns the Msg::GetData message:
    fn view(&self, ctx: &Context<Self>) -> Html {
        let link = ctx.link();
        let on_click = link.callback(|_e: MouseEvent| {
            log::debug!("Clicked");
            Msg::GetData
        });

        html! {
            <div>
            <h1>{"Ethereum transactions viewer frontend"}</h1>
            <div>
            <button onclick={on_click}>{"Get Data"}</button>
            </div>
            <div>
                { match self.received_data.clone() {
                    Some(data) => data,
                    _ => "No data received".to_string()
                }}
            </div>
            </div>
        }
    }
We define a callback function for the button click on lines 44-47, as mentioned it simply returns a message: Msg::GetData this be handled by our update function we wrote earlier.
Then we change the HTML portion where we added the button on line 53 and a match to determine what to display taking into account that the value can be None.
Basic web app result
Now that we have connected all the pieces we can run the backend and frontend and have them communicate with each other. Let’s make sure we have both the backend and the frontend running:
- backend: run the
cargo runcommand from the backend directory. - frontend:
trunk servecommand from the frontend directory.
When we navigate to http://localhost:8080 in the browser we should see:

After pressing the button:
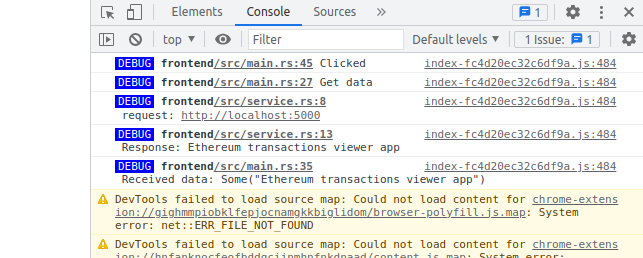
The console in the browsers dev tool shows the log message we wrote:
Now that we have the basics we can look at retrieving and displaying some more complex data structures.
Ethereum transactions viewer backend component
In this section, expand the backend to request data from the Etherscan API. We will also add an endpoint so that the frontend can request the backend to retrieve this data. In this case, the wallet balance and “normal” transactions data.
Let’s first write the code necessary to talk to the Etherscan API.
Etherscan API requests
We will use reqwest to send requests to the Etherscan API. To make use of connection pooling we will instance a Client object and pass it around to our functions that set up the requests.
HTTP client using reqwest
So, let’s add a service.rs module with a function that configures the client object:
use reqwest::{header, Client};

static APP_USER_AGENT: &str = concat!(env!("CARGO_PKG_NAME"), "/", env!("CARGO_PKG_VERSION"));

pub fn get_client() -> Client {
    log::debug!("Construct client.");

    let headers = header::HeaderMap::new();
    let client = Client::builder()
        .default_headers(headers)
        .user_agent(APP_USER_AGENT)
        .build()
        .unwrap();

    client
}
This uses the builder pattern to configure the client. We simply set the headers to empty/default and configure an agent name based on our project’s name and version. Then we return the instance of a Client object at the end of the function.
Etherscan API data retrieval functions
Next, let’s add a new file etherscan.rs to our backend project in backend/src. In this file we will write the functions for retrieving the balance and normal transactions from an address:
use reqwest::Client;

use common as c;

pub async fn get_balance_for_address(
    client: &Client,
    api_url: &str,
    api_key: &str,
    address: &str,
) -> c::models::AccountBalanceResponse {
    let module = "account";
    let action = "balance";
    let tag = "latest";

    let request_url = format!(
        "{}?module={}&action={}&address={}&tag={}&apikey={}",
        api_url, module, action, address, tag, api_key
    );

    let response_text = client
        .get(request_url)
        .send()
        .await
        .unwrap()
        .text()
        .await
        .unwrap();

    let result = serde_json::from_str::<c::models::AccountBalanceResponse>(&response_text).unwrap();

    result
}

pub async fn get_normal_transactions_for_address(
    client: &Client,
    api_url: &str,
    api_key: &str,
    address: &str,
    start_block: u32,
    end_block: u32,
    page: u32,
    offset: u32,
    sort: &str,
) -> c::models::AccountNormalTransactionsResponse {
    let module = "account";
    let action = "txlist";

    let request_url = format!("{}?module={}&action={}&address={}&startblock={}&endblock={}&page={}&offset={}&sort={}&apikey={}",
        api_url, module, action, address, start_block, end_block, page, offset, sort, api_key);

    let result_text = client
        .get(request_url)
        .send()
        .await
        .unwrap()
        .text()
        .await
        .unwrap();

    let result =
        serde_json::from_str::<c::models::AccountNormalTransactionsResponse>(&result_text).unwrap();

    result
}
These functions are very straightforward, for example the get_balance_for_address function:
pub async fn get_balance_for_address(
    client: &Client,
    api_url: &str,
    api_key: &str,
    address: &str,
) -> c::models::AccountBalanceResponse {
    let module = "account";
    let action = "balance";
    let tag = "latest";

    let request_url = format!(
        "{}?module={}&action={}&address={}&tag={}&apikey={}",
        api_url, module, action, address, tag, api_key
    );

    let response_text = client
        .get(request_url)
        .send()
        .await
        .unwrap()
        .text()
        .await
        .unwrap();

    let result = serde_json::from_str::<c::models::AccountBalanceResponse>(&response_text).unwrap();

    result
}
This function’s parameters are pretty much self explanatory:
client: a reference to aClientobject which is the HTTP client that will send our request to the Etherscan API.api_url: the root URL to the API. For example:https://api.etherscan.io/api. We will define this inmain.rsas aconstlater.api_key: security key to be able to use the API.address: The wallet or address we want information from.
On lines 11-13 we have some variables and values that determine what kind of information we get back from the API. In this case we want to do something related to "account" namely getting the "balance". And we want the balance from the "latest" block.
Then we construct the request URL using these pieces of information and send a get request using the client object.
Finally, we deserialize the data from the response body text to a AccountBalanceResponse data struct and return it.
Since this is a simple example tutorial we are not doing any error handling and just unwrap everything.
Our second function get_normal_transactions_for_address is constructed in a similar way, but naturally retrieves other data and returns a AccountNormalTransactionsResponse type which is a Vec of objects.
Warp backend endpoint configuration
In this section, we configure the endpoint that our frontend will send requests to. This endpoint will return the AccountData object, which is both balance and transaction data in one.
Let’s update main.rs to add:
- the client, etherscan, and handlers (that we still have to write) modules.
- URL const for the Etherscan API address.
- a configuration for the
accountendpoint path. - a filter function for passing in the
Clientobject to the handler function for ouraccountendpoint.
Below is the full code listing for main.rs:
use common::models as c_models;
use reqwest::Client;
use std::convert::Infallible;
use warp::{Filter, Rejection};

mod client;
mod etherscan;
mod handlers;

const API_URL: &str = "https://api.etherscan.io/api";

type WarpResult<T> = std::result::Result<T, Rejection>;

#[tokio::main]
async fn main() {
    dotenv::dotenv().ok();
    log4rs::init_file("logging_config.yml", Default::default()).unwrap();

    let http_client = client::get_client();

    let root = warp::path::end().map(|| "Welcome to my api");
    let account_route = warp::path("account")
        .and(warp::get())
        .and(with_http_client(http_client.clone()))
        .and(warp::query::<c_models::QueryParams>())
        .and_then(handlers::get_account_data);

    let routes = root.or(account_route).with(warp::cors().allow_any_origin());

    warp::serve(routes).run(([127, 0, 0, 1], 5000)).await;
}

fn with_http_client(
    client: Client,
) -> impl Filter<Extract = (Client,), Error = Infallible> + Clone {
    warp::any().map(move || client.clone())
}
Let’s look at some of the noteworthy pieces.
On line 16 we call dotenv::dotenv().ok() to set envirnonment variables from a .env file. A .env file is a good place to put our API key. Let’s add a file called .env and add a line with our API Key in there, for example: ETHER_SCAN_KEY=XXXXXXXXXXX. An actual API key can be requested from here.
On line 19 we create an instance of the HTTP Client which we can pass to handler functions. The Client object uses Arc internally which means that if we clone it we will get a reference counted point instead of a copy of the object. Meaning we can use connection pooling if we pass this object to various parts of our code by “cloning” it.
Our account endpoint is defined on lines 22-26:
    let account_route = warp::path("account")
        .and(warp::get())
        .and(with_http_client(http_client.clone()))
        .and(warp::query::<c_models::QueryParams>())
        .and_then(handlers::get_account_data);
Here we define a path: "account", we accept HTTP GET requests on it by calling .and(warp::get()). Next we use the filter with_http_client to pass a “clone” (in this case a reference counted pointer) of the http_client object.
The function with_http_client is defined on lines 33-37:
fn with_http_client(
    client: Client,
) -> impl Filter<Extract = (Client,), Error = Infallible> + Clone {
    warp::any().map(move || client.clone())
}
This function returns something that implements a Filter that extracts a Client object. For more information see the crate documentation here.
Going back to the endpoint configuration, on line 25 we configure that the endpoint accepts parameters mapped to the QueryParams struct we defined in our common library.
Finally, on line 26, we configure what function should handle the incoming request. This function should accept a Client object and QueryParams object as parameters. Let’s write that function next.
Endpoint handler function: get_account_data
In this section, we will write the handler function for our endpoint: get_account_data. This function will call our two functions from the etherscan module and combine the response data into one result namely AccountData.
Let’s crate a file called handlers.rs in the src directory with the following code:
use crate::{c_models, etherscan, WarpResult, API_URL};
use reqwest::Client;
use std::env;
use warp::{http::StatusCode, reply, Reply};

pub async fn get_account_data(
    client: Client,
    params: c_models::QueryParams,
) -> WarpResult<impl Reply> {
    let api_key = env::var("ETHER_SCAN_KEY").unwrap();
    let address = params.address;
    let result = etherscan::get_balance_for_address(&client, API_URL, &api_key, &address).await;

    log::info!("Balance for {}: {}", &address, &result.result);

    let response = etherscan::get_balance_for_address(&client, API_URL, &api_key, &address).await;

    let balance = response.result;

    let start_block = 0;
    let end_block = 99999999;
    let page = params.page;
    let offset = params.offset;
    let sort = params.sort;

    let response = etherscan::get_normal_transactions_for_address(
        &client,
        API_URL,
        &api_key,
        &address,
        start_block,
        end_block,
        page,
        offset,
        &sort,
    )
    .await;

    let normal_transactions = response.result;

    let account_data = c_models::AccountData {
        address: address.into(),
        balance: balance.into(),
        page,
        offset,
        sort: sort.into(),
        normal_transactions,
    };

    Ok(reply::with_status(
        reply::json(&account_data),
        StatusCode::OK,
    ))
}
Let’s look at the code in a few parts:
use crate::{c_models, etherscan, WarpResult, API_URL};
use reqwest::Client;
use std::env;
use warp::{http::StatusCode, reply, Reply};

pub async fn get_account_data(
    client: Client,
    params: c_models::QueryParams,
) -> WarpResult<impl Reply> {
    let api_key = env::var("ETHER_SCAN_KEY").unwrap();
    let address = params.address;
    let result = etherscan::get_balance_for_address(&client, API_URL, &api_key, &address).await;

    log::info!("Balance for {}: {}", &address, &result.result);

    let response = etherscan::get_balance_for_address(&client, API_URL, &api_key, &address).await;

    let balance = response.result;
Our function takes the following parameters:
client: aClientobject instance for making requests to the Etherscan API endpoints.params: aQueryParamsobject instance, representing query string parameters that influence how data ought to be retrieved from the Etherscan API.
The in the next few lines we retrieve the balance data by calling our get_balance_for_address function from our etherscan module.
Next, we call the get_normal_transactions_for_address function to retrieve data on transactions:
    let start_block = 0;
    let end_block = 99999999;
    let page = params.page;
    let offset = params.offset;
    let sort = params.sort;

    let response = etherscan::get_normal_transactions_for_address(
        &client,
        API_URL,
        &api_key,
        &address,
        start_block,
        end_block,
        page,
        offset,
        &sort,
    )
    .await;

    let normal_transactions = response.result;
On lines 22-24, we use values from the params object. We assign the values to new variables to be able to use shorthand notation later.
    let account_data = c_models::AccountData {
        address: address.into(),
        balance: balance.into(),
        page,
        offset,
        sort: sort.into(),
        normal_transactions,
    };

    Ok(reply::with_status(
        reply::json(&account_data),
        StatusCode::OK,
    ))
}
Finally, we take the retrieved data balance and normal_transactions and values from the search parameters and create a new AccountData instance. Which we then wrap in a Ok and reply::with_status as a return value.
This concludes our work for the backend.
Testing the backend
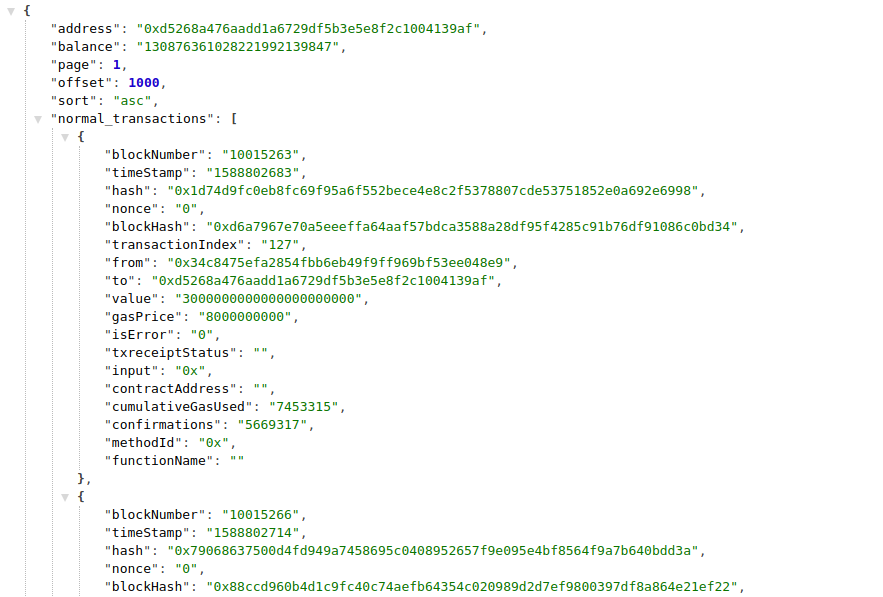
We can now run our backend code and do a little test, assuming we have our Etherscan API key set up. Let’s open a web browser, and navigate to the backend URL making sure to go to the account endpoint and using query parameters. Because all the parameters are required we will not get any results unless we use all of them. For example: http://localhost:5000/account?address=0xd5268a476aadd1a6729df5b3e5e8f2c1004139af&page=1&offset=1000&sort=asc
Ethereum transactions viewer app frontend
In this section, we will update our simple frontend project. There are only a few things we should add to complete our simple Ethereum transactions viewer app:
- Input field for an Ethereum address.
- Table for viewing the data in a nice way.
- Add a
get_account_datafunction to send a request to our backend’s newaccountendpoint.
Adding the get_account_data function
Let’s first add this function to make use of the new account endpoint. Even though we won’t be using it anymore let’s leave the get_data function as it was and add a new function to service.rs:
use common::models as c_models;
use gloo_net::http::Request;
const API_URL: &str = "http://localhost:5000";
pub async fn get_data() -> Option<String> {
let request_url = format!("{}", API_URL);
log::debug!("request: {}", &request_url);
let response = Request::get(&request_url).send().await.unwrap();
let result = if response.ok() {
let body = response.text().await.unwrap();
log::debug!("Response: {}", &body);
Some(body)
} else {
None
};
result
}
pub async fn get_account_data(
params: &common::models::QueryParams,
) -> Option<c_models::AccountData> {
let request_url = format!(
"{}/account?address={}&page={}&offset={}&sort={}",
API_URL, ¶ms.address, params.page, params.offset, ¶ms.sort
);
log::debug!("request: {}", &request_url);
let response = Request::get(&request_url).send().await.unwrap();
let result = if response.ok() {
let body = response.text().await.unwrap();
log::debug!("Response: {}", &body);
let obj = serde_json::from_str::<c_models::AccountData>(&body).unwrap();
Some(obj)
} else {
None
};
result
}
This get_account_data function takes a single parameter: the QueryParams object from our common library. This demonstrates the advantage of being able to write our backend and frontend both in Rust. Doing this allows us to make use of the same data structs in backend and frontend.
We return Option<c_models::AccountData>. Meaning, it can be a None return value as well.
On lines 26-27 we construct the request URL using the API_URL const and the value of the query parameters.
Then we use Request from the gloo_net crate to send a HTTP GET request.
Upon receiving the response and checking to see if it is ok()we finally deserialize the data to a AccountData struct and return it on line 40.
Updating the Ethereum transactions viewer app UI
Now that we can get this account data from the backend we should update our UI to let a user enter an address and then view the data in a table. We should also call our new service function get_account_data at the appropriate time. A lot of pieces need to be updated, first let’s look at the whole of the updated main.rs and then go through it in parts. Here is the full code listing for main.rs:
use common::models as c_models;
use web_sys::HtmlInputElement;
use yew::prelude::*;

mod service;

pub enum Msg {
    GetData,
    ProcessData(Option<c_models::AccountData>),
}

struct App {
    input_ref: NodeRef,
    received_data: Option<c_models::AccountData>,
}

impl Component for App {
    type Message = Msg;
    type Properties = ();

    fn create(_ctx: &Context<Self>) -> Self {
        Self {
            input_ref: NodeRef::default(),
            received_data: None,
        }
    }
fn update(&mut self, ctx: &Context<Self>, msg: Self::Message) -> bool {
match msg {
Msg::GetData => {
log::debug!("Get data");
let input = self.input_ref.cast::<HtmlInputElement>().unwrap();
let address = if input.value().trim().is_empty() {
"".to_string()
} else {
input.value().trim().to_string()
};
input.set_value("");
let params = c_models::QueryParams {
address: address,
page: 1,
offset: 1000,
sort: "asc".to_string(),
};
ctx.link().send_future(async move {
let result = service::get_account_data(¶ms).await;
Msg::ProcessData(result)
});
}
Msg::ProcessData(data) => {
log::debug!("Received data: {:?}", data);
self.received_data = data;
}
}
true
}
    fn view(&self, ctx: &Context<Self>) -> Html {
        let link = ctx.link();
        let on_click = link.callback(|_e: MouseEvent| {
            log::debug!("Clicked");
            Msg::GetData
        });

        html! {
            <div>
            <h1>{"Ethereum transactions viewer frontend"}</h1>
            <div>
                    <input style="width:350px;" type="text" ref={self.input_ref.clone()} />
                    <button onclick={on_click}>{"Get Account Data"}</button>
                </div>
                <div>
                { match self.received_data.clone() {
                    Some(val) => {
                        show_account(&val)
                    },
                    _ => html! {
                        <div>
                            {"Please enter an address"}
                        </div>
                    }
                }}
                </div>
            </div>
        }
    }
}
fn show_account(account: &c_models::AccountData) -> Html {
    let normal_tx = account.normal_transactions.clone();
    let tx_html = normal_tx.into_iter().map(|tx| {
        html! {
            <tr key={tx.hash}>
                <td>{tx.from}</td>
                <td>{tx.value}</td>
                <td>{tx.gas_price}</td>
                <td>{tx.contract_address}</td>
                <td>{tx.function_name}</td>
            </tr>
        }
    });

    html! {
        <div>
            <div>
            { format!("Address: {}, Balance: {}, Normal tx: {}",
            account.address, account.balance, account.normal_transactions.len()
            ) }
            </div>
            <div>
                <table>
                    <thead>
                        <tr>
                        <th>{"From"}</th>
                        <th>{"Value"}</th>
                        <th>{"Gas Price"}</th>
                        <th>{"Contract"}</th>
                        <th>{"Function"}</th>
                        </tr>
                    </thead>
                    <tbody>
                        {for tx_html}
                    </tbody>
                </table>
            </div>
        </div>

    }
}
fn main() {
wasm_logger::init(wasm_logger::Config::default());
yew::start_app::<App>();
}
Enum and App component fields update
First, we update some the Msg enum and the fields that are on our App struct:
use common::models as c_models;
use web_sys::HtmlInputElement;
use yew::prelude::*;
mod service;
pub enum Msg {
GetData,
ProcessData(Option<c_models::AccountData>),
}
struct App {
input_ref: NodeRef,
received_data: Option<c_models::AccountData>,
}
impl Component for App {
type Message = Msg;
type Properties = ();
fn create(_ctx: &Context<Self>) -> Self {
Self {
input_ref: NodeRef::default(),
received_data: None,
}
}
On line 9 we change the enum value ProcessData to take an AccountData object instead of a String.
Then on lines 12-15, we update the App struct to change the received_data field’s type to AccountData. Also we add a field input_ref which represents a reference to a UI element. This field will refer to the input element we will put in our HTML later. Doing this allows us to access this element in our code to get the value, and also change it if we want to.
The input_ref field needs to be initialized in the create function in the impl Component for App block. We do this on line 23.
Update the update function
Next, we’ll look at the update function. This is where we call our function to retrieve data and also handle the response data:
fn update(&mut self, ctx: &Context<Self>, msg: Self::Message) -> bool {
match msg {
Msg::GetData => {
log::debug!("Get data");
let input = self.input_ref.cast::<HtmlInputElement>().unwrap();
let address = if input.value().trim().is_empty() {
"".to_string()
} else {
input.value().trim().to_string()
};
input.set_value("");
let params = c_models::QueryParams {
address: address,
page: 1,
offset: 1000,
sort: "asc".to_string(),
};
ctx.link().send_future(async move {
let result = service::get_account_data(¶ms).await;
Msg::ProcessData(result)
});
}
Msg::ProcessData(data) => {
log::debug!("Received data: {:?}", data);
self.received_data = data;
}
}
true
}
First we are retrieving the value from the HTML input element on lines 32-37. We cast the value of self.input_ref to a HtmlInputElement. We don’t do any error checking here. But we do check if the value is empty or not.
Then we clear the value of the input element on line 39 so the user can easily enter a new value without having to clear the box themselves first.
On lines 40-45 we create an instance of a QueryParams object and set some default values and the address value from the input element.
Finally, we have updated the function called in send_future from get_data to get_account_data passing in the QueryParams object as a reference on line 48.
The ProcessData arm of the match does not need to be updated.
View function update
In the view function, we update our HTML to include an input element. Also we want to have a table that can display our results dynamically (grows/shrinks depending on rows that come back). We construct the table in a separate function that we will look at after looking at the view function:
fn view(&self, ctx: &Context<Self>) -> Html {
let link = ctx.link();
let on_click = link.callback(|_e: MouseEvent| {
log::debug!("Clicked");
Msg::GetData
});
html! {
<div>
<h1>{"Ethereum transactions viewer frontend"}</h1>
<div>
<input style="width:350px;" type="text" ref={self.input_ref.clone()} />
<button onclick={on_click}>{"Get Account Data"}</button>
</div>
<div>
{ match self.received_data.clone() {
Some(val) => {
show_account(&val)
},
_ => html! {
<div>
{"Please enter an address"}
</div>
}
}}
</div>
</div>
}
}
On line 72, we added an input element and set a ref value to the clone of self.input_ref. This allows us to access and manipulate this element in our Rust code.
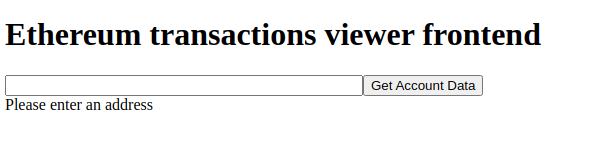
Next on lines 76-85 we check to see if there is any data in self.received_data and call show_account (which we have not coded yet) if there is data to display a table. Otherwise we display "Please enter an address".
Constructing an HTML table dynamically in Rust
Let’s look at the final piece of code where we construct a table for viewing the transaction data and wallet balance. We’ll write a function that returns a Html type. Similarly, we could have written a new component for this, but to keep it simple for now let’s go with just a function:
fn show_account(account: &c_models::AccountData) -> Html {
let normal_tx = account.normal_transactions.clone();
let tx_html = normal_tx.into_iter().map(|tx| {
html! {
<tr key={tx.hash}>
<td>{tx.from}</td>
<td>{tx.value}</td>
<td>{tx.gas_price}</td>
<td>{tx.contract_address}</td>
<td>{tx.function_name}</td>
</tr>
}
});
html! {
<div>
<div>
{ format!("Address: {}, Balance: {}, Normal tx: {}",
account.address, account.balance, account.normal_transactions.len()
) }
</div>
<div>
<table>
<thead>
<tr>
<th>{"From"}</th>
<th>{"Value"}</th>
<th>{"Gas Price"}</th>
<th>{"Contract"}</th>
<th>{"Function"}</th>
</tr>
</thead>
<tbody>
{for tx_html}
</tbody>
</table>
</div>
</div>
}
}
On lines 94-104 we iterate through the normal transactions data using into_iter and map. With map, we can build a new iterator and new values. In this case, we generate new HTML using html! and build the rows for our table.
The key on line 96 is where we should put a unique value associated with the data. This is used for tracking the data/elements through scrolling and updating the table.
Then on lines 106-129, we display the address, balance, and number of transactions and also build the table. We expand the rows using {for tx_html} on line 125.
Completed backend and frontend result
Now that we have finished the backend and frontend we can look at the end result. Let’s make sure both components are running:
- backend: run the
cargo runcommand from the backend directory. - frontend:
trunk servecommand from the frontend directory.
When we navigate to http://localhost:8080 in the browser we should see:
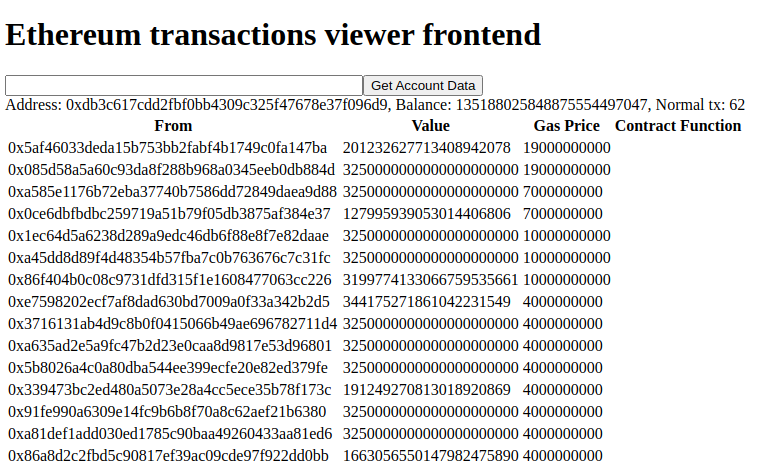
Let’s pick an address from: https://www.coincarp.com/currencies/ethereum/richlist/ so we can be sure we’ll see some transactions come back from the Etherscan API. For example, if we enter 0xdb3c617cdd2fbf0bb4309c325f47678e37f096d9:
Conclusion
In this tutorial, we created an Ethereum transactions viewer app that can search and display transaction data for a specific address. Our application is a full-stack Rust app, both backend and frontend written in Rust. Sharing common data model code between the components. We learned how to use Yew for the frontend and warp for the backend. Also, we learned how to communicate with our backend from the Yew frontend using gloo-net.
The completed project’s code can be found on my GitHub here.
Please follow me on Twitter to get notified of new Rust programming articles:
Follow @tmdev82