In this tutorial, we will build an image input web app with pure Rust and WebAssembly. We are going to use frontend framework Yew. With our Yew UI, a user will be able to select an image and submit it to the frontend app. Our frontend code will then produce an inverted color image and ASCII art based on the image. Just to demonstrate how to process the image data and do things with it.
We will use the Rust front-end framework called Yew to help us create the user interface. For the image manipulation, we will be using the image crate.
The completed project can be found on my GitHub here.
Contents
- 1 Prerequisites
- 2 Project set up
- 3 Basic Yew web app
- 4 Image input with Rust and Yew
- 5 Image input Rust web app displaying an image
- 6 Create a new image with inverted colors
- 7 Creating ASCII art from an image
- 8 Conclusion
Prerequisites
To follow this tutorial the following is required:
- A Rust installation.
- Some Rust knowledge.
- Some Yew knowledge. See previous tutorials:
- Trunk needs to be installed for compiling the frontend.
Project set up
In this section, we are going to set up our Image input Rust web app project. As always the project directory and initials files can be created using cargo. By typing in the following command cargo new yew-image-app.
Then let’s add the required dependencies to our project’s Cargo.toml:
[package]
name = "yew-image-app"
version = "0.1.0"
edition = "2021"

# See more keys and their definitions at https://doc.rust-lang.org/cargo/reference/manifest.html

[dependencies]
yew = "0.19"
log = "0.4.6"
wasm-logger = "0.2.0"
wasm-bindgen = "0.2"
gloo = "0.8.0"
gloo-file = "0.2.1"
web-sys = "0.3.57"
js-sys = "0.3.57"
base64 ="0.13.0"
image = "0.24.2"
Here is a list of short descriptions and links to each crate:
- yew: A framework for making client-side single-page apps.
- log: A lightweight logging facade for Rust.
- wasm-logger: A logger that sends a message with its Rust source’s line and filename to the browser console.
- wasm-bindgen: Easy support for interacting between JS and Rust.
- gloo: A modular toolkit for Rust and WebAssembly. Ergonomic wrappers for browser APIs.
- gloo-file: Convenience crate for working with JavaScript files and blobs.
- web-sys: Bindings for all Web APIs, a procedurally generated crate from WebIDL.
- js-sys: Bindings for all JS global objects and functions in all JS environments like Node.js and browsers, built on `#[wasm_bindgen]` using the `wasm-bindgen` crate.
- base64: encodes and decodes base64 as bytes or utf8.
- image: Imaging library written in Rust. Provides basic filters and decoders for the most common image formats.
Basic Yew web app
Let’s start by setting up a basic Yew web app. Just a simple web page with some text. We will add the image file selection button and image display later.
First, we’ll add an index.html page in the root of our project:
<!DOCTYPE html>
<html lang="en">
<head>
    <meta charset="UTF-8">
    <meta http-equiv="X-UA-Compatible" content="IE=edge">
    <meta name="viewport" content="width=device-width, initial-scale=1.0">
    <title>File manipulation tutorial</title>
    <link data-trunk rel="css" href="/css/style.css">
</head>
<body>

</body>
</html>
We are adding a CSS reference here so that we can add a style that helps display ASCII art properly. So let’s add a directory css to the root of our project and then add a file style.css:
.ascii-art {
    font-family: monospace;
    white-space: pre;
    border: 1px solid black;
}
Next, the Rust code for a barebones Yew web app in main.rs:
use yew::prelude::*;

#[function_component(App)]
fn app() -> Html {
    html! {
        <>
        <div>
            <h1>{"Yew image app"}</h1>
        </div>
        </>
    }
}

fn main() {
    wasm_logger::init(wasm_logger::Config::default());
    yew::start_app::<App>();
}
Here we use a simple function_component annotation to turn a function into a Yew component. Using the html! macro we can write HTML and so set up a simple web page.
When we run the app using the trunk command: trunk serve we should be able to see our text appear when we navigate to http://localhost:8080 using our favorite browser.
For a more detailed explanation on Yew basics, please see my other tutorial here: WebAssembly Rust front-end with Yew: how to P1.
Image input with Rust and Yew
In this section, we are taking a look at how to read image data from a file selected by the user of our app. This file is a file on the user’s system. Using the gloo crates make this fairly easy.
Let’s put the code in a new component called FileDataComponent. This component has a file selection element scoped to image files. Also, we need a set of message enums. With these, we can tell the Yew component when to process a list of file names and then process data from those files.
In the following code for main.rs we add functionality to our image input processing Rust web app for selecting and displaying an image. After this, we will add code to do some extras with the image data for fun.
First, let’s look at the whole code listing and then go through it in smaller parts:
use gloo_file::{callbacks::FileReader, File};
use std::collections::HashMap;
use std::io::{Read, Seek, SeekFrom};
use web_sys::{Event, HtmlInputElement};
use yew::prelude::*;

pub enum Msg {
    LoadedBytes(String, Vec<u8>),
    Files(Vec<File>),
}

pub struct FileDataComponent {
    files: Vec<String>,
    readers: HashMap<String, FileReader>,
}

impl Component for FileDataComponent {
    type Message = Msg;
    type Properties = ();

    fn create(_ctx: &Context<Self>) -> Self {
        Self {
            files: Vec::new(),
            readers: HashMap::default(),
        }
    }

    fn update(&mut self, ctx: &Context<Self>, msg: Self::Message) -> bool {
        match msg {
            Msg::Files(files) => {
                log::info!("Files selected: {}", files.len());
                for file in files.into_iter() {
                    let file_name = file.name();
                    let task = {
                        let file_name = file_name.clone();
                        let link = ctx.link().clone();

                        gloo_file::callbacks::read_as_bytes(&file, move |res| {
                            link.send_message(Msg::LoadedBytes(
                                file_name,
                                res.expect("failed to read file"),
                            ))
                        })
                    };
                    self.readers.insert(file_name, task);
                }
                true
            }
            Msg::LoadedBytes(file_name, data) => {
                log::info!("Processing: {}", file_name);

                let image_data = base64::encode(data);
                self.files.push(image_data);
                self.readers.remove(&file_name);
                true
            }
        }
    }

    fn view(&self, ctx: &Context<Self>) -> Html {
        let on_change = ctx.link().callback(move |e: Event| {
            let mut selected_files = Vec::new();
            let input: HtmlInputElement = e.target_unchecked_into();
            if let Some(files) = input.files() {
                let files = js_sys::try_iter(&files)
                    .unwrap()
                    .unwrap()
                    .map(|v| web_sys::File::from(v.unwrap()))
                    .map(File::from);
                selected_files.extend(files);
            }
            Msg::Files(selected_files)
        });
        html! {
            <div>
                <div>
                    {"Choose a image file:"}
                </div>
                <div>
                    <input type="file" accept="image/png, image/gif" onchange={on_change} multiple=false/>
                </div>
                <div>
                { for self.files.iter().map(|f| Self::view_file(f))}
                </div>
            </div>
        }
    }
}

impl FileDataComponent {
    fn view_file(data: &str) -> Html {
        let img = format!("data:image/png;base64,{}", data.to_string());
        html! {
            <div>
                <img src={img}/>
            </div>
        }
    }
}

#[function_component(App)]
fn app() -> Html {
    html! {
        <>
        <div>
            <h1>{"Yew image app"}</h1>
            <FileDataComponent/>
        </div>
        </>
    }
}

fn main() {
    wasm_logger::init(wasm_logger::Config::default());
    yew::start_app::<App>();
}
We’ve added a lot of extra code to handle selecting, reading, and displaying the image on the web page.
Bringing crates into scope and some struct declarations
We’ll start at the top of the file:
use gloo_file::{callbacks::FileReader, File};
use std::collections::HashMap;
use std::io::{Read, Seek, SeekFrom};
use web_sys::{Event, HtmlInputElement};
use yew::prelude::*;

pub enum Msg {
    LoadedBytes(String, Vec<u8>),
    Files(Vec<File>),
}

pub struct FileDataComponent {
    files: Vec<String>,
    readers: HashMap<String, FileReader>,
}

impl Component for FileDataComponent {
    type Message = Msg;
    type Properties = ();

    fn create(_ctx: &Context<Self>) -> Self {
        Self {
            files: Vec::new(),
            readers: HashMap::default(),
        }
    }
We have brought a bunch of things into scope. These are mostly things that help us access the input element for the file selector and reading the selected file data. We’ll talk about these more when we encounter them in the code.
On lines 7-10 we declare an enum called Msg this represents message types our FileDataComponent can send internally to handle actions taking place.
LoadedBytes(String, Vec<u8>): Actual file data in bytes asVec<u8>and associated file name asString.Files(Vec<File>): Pass a list of selectedFileobjects with file information.
On lines 12-15 we declare a struct for our new component FileDataComponent the fields help us track data:
-
files: list of base 64 encoded image data strings. readers: list ofFileReaderobjects we need to track. These are guard objects that cancel async file reads when dropped. Putting them in a list like this makes sure they don’t go out of scope and the file read does not get dropped.
Then we have part of the implementation of Component for FileDataComponent where we define the Message type and set empty values for the struct’s fields in the create function on lines 21-26.
Image input UI implementation
In this section, we are skipping over the update function for now and we will look at the view function instead.
    fn view(&self, ctx: &Context<Self>) -> Html {
        let on_change = ctx.link().callback(move |e: Event| {
            let mut selected_files = Vec::new();
            let input: HtmlInputElement = e.target_unchecked_into();
            if let Some(files) = input.files() {
                let files = js_sys::try_iter(&files)
                    .unwrap()
                    .unwrap()
                    .map(|v| web_sys::File::from(v.unwrap()))
                    .map(File::from);
                selected_files.extend(files);
            }
            Msg::Files(selected_files)
        });
        html! {
            <div>
                <div>
                    {"Choose a image file:"}
                </div>
                <div>
                    <input type="file" accept="image/png" onchange={on_change} multiple=false/>
                </div>
                <div>
                { for self.files.iter().map(|f| Self::view_file(f))}
                </div>
            </div>
        }
    }
On file input change callback
First, in this view function we declare an on_change callback that will be used by the file input element to call when a change happens.
On line 66 we get the HtmlInputElement from the event. This allows us to get the list of selected files that may or may not be empty. We check that it is a valid FileList on line 64.
Then we attempt to get an iterator over the file list on lines 65-67. Next we use map to map JsValue to a File object.
Ultimately this process gets us an iterator where the items are File objects. We put these in the mutable selected_files Vec we declared earlier.
Finally, when all files have been processed we return a Msg::Files with that list so it can be handled in the update function.
File input HTML element
The rest of view contains the HTML elements that will create the UI. In this case we have an input element with type file declared on line 80. Where we configure the onchange callback and scope the allowed files to image/png.
On line 83, we iterate over the files field of the FileDataComponent object and pass each base 64 encoded string to our view_file function. We will write the view_file function next.
Implement the view_file function
Now let’s quickly implement a function that takes a base 64 encoded string and displays it as an image using the img HTML tag:
impl FileDataComponent {
    fn view_file(data: &str) -> Html {
        let img = format!("data:image/png;base64,{}", data.to_string());
        html! {
            <div>
                <img src={img}/>
            </div>
        }
    }
}
We prefix the data to indicate it is a base 64 encoded png image string. Then just simply return a img tag with the data as src value.
Update function: reading and processing image files input with web Rust
In this section, we have the final piece where the file(s) data actually is read by our code. We read the files and configure an async callback that then sends a Yew message to update for processing the file data that comes back:
    fn update(&mut self, ctx: &Context<Self>, msg: Self::Message) -> bool {
        match msg {
            Msg::Files(files) => {
                log::info!("Files selected: {}", files.len());
                for file in files.into_iter() {
                    let file_name = file.name();
                    let task = {
                        let file_name = file_name.clone();
                        let link = ctx.link().clone();

                        gloo_file::callbacks::read_as_bytes(&file, move |res| {
                            link.send_message(Msg::LoadedBytes(
                                file_name,
                                res.expect("failed to read file"),
                            ))
                        })
                    };
                    self.readers.insert(file_name, task);
                }
                true
            }
            Msg::LoadedBytes(file_name, data) => {
                log::info!("Processing: {}", file_name);

                let image_data = base64::encode(data);
                self.files.push(image_data);
                self.readers.remove(&file_name);
                true
            }
        }
    }
Processing file objects
First, let’s look at the Msg::Files arm. This is where the list of File objects of selected files is processed:
            Msg::Files(files) => {
                for file in files.into_iter() {
                    let file_name = file.name();
                    let task = {
                        let file_name = file_name.clone();
                        let link = ctx.link().clone();

                        gloo_file::callbacks::read_as_bytes(&file, move |res| {
                            link.send_message(Msg::LoadedBytes(
                                file_name,
                                res.expect("failed to read file"),
                                1,
                            ))
                        })
                    };
                    self.readers.insert(file_name, task);
                }
                true
            }
Here we iterate over the incoming Vec<File> to get the file name of the file and to read it. We use the file name as a key to track objects associated with the file like the FileReader object.
On line 40, we use the read_as_bytes function from gloo_file to convert the file into a Vec<u8>. The callback, which we pass into read_as_bytes as a closure is called when the file read is finished.
In the call back on lines 39-42, we send a Yew message, Msg::LoadedBytes, with link.send_mesage. Where we pass in the file’s name and the bytes that were read. This Msg comes back to the update function and is processed.
On line 45, we keep track of the FileReader object that is returned by gloo_file::callbacks::read_as_bytes in order to keep it alive. Otherwise, if the FileReader object goes out of scope, the file read process will get canceled.
We return true so that the element gets redrawn.
Processing bytes of file data
Finally, let’s look at the byte data processing code in the Msg::LoadedBytes arm of the match. Because we are not yet doing anything with the image data except displaying it, this part is relatively short:
            Msg::LoadedBytes(file_name, data) => {
                log::info!("Processing: {}", file_name);

                let image_data = base64::encode(data);
                self.files.push(image_data);
                self.readers.remove(&file_name);
                true
            }
We start on line 52 by encoding the data as a base 64 String. We then push it into the self.files field so it can be used to display an image later.
Finally, we remove an entry from the list that tracks FileReader objects, self.readers as it is no longer needed.
We return true so that the element gets redrawn. To display the image(s).
Image input Rust web app displaying an image
Let’s look at the result. Running the application with trunk serve and navigating to http://localhost:8080 looks like this:
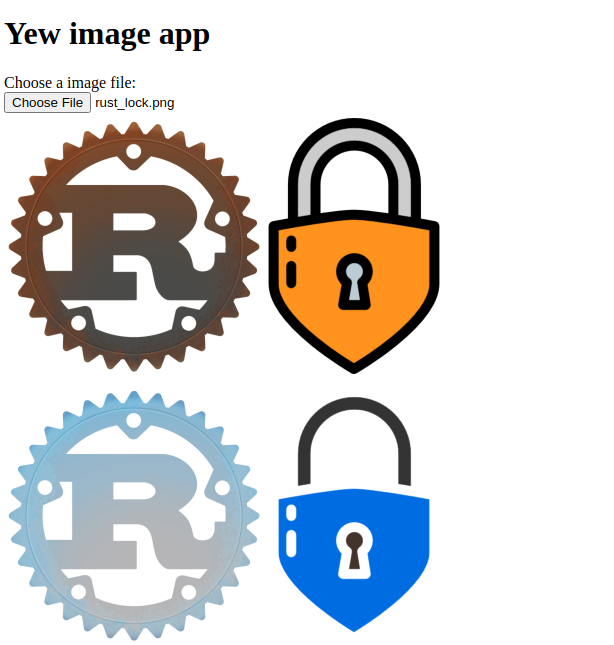
And when we select an image:

With this code, we start by creating a new DynamicImage object from a byte slice on line 51 using image::load_from_memory.
Create a new image with inverted colors
Let’s use the image data from the image we can now select using the image input element in our Rust web app to create a new image. We will create an image with inverted colors.
To be able to do this, we first have to change the data into an DynamicImage object. Then we will clone it so we can keep the original around for something else later. And then we simply invert the colors:
Here are the piece of code we have to update:
use gloo_file::{callbacks::FileReader, File};
use image::DynamicImage;
use std::collections::HashMap;
use std::io::{Read, Seek, SeekFrom};
use web_sys::{Event, HtmlInputElement};
use yew::prelude::*;
And in the update function in the Msg::LoadedBytes arm of the match:
            Msg::LoadedBytes(file_name, data) => {
                log::info!("Processing: {}", file_name);
                let org_image = image::load_from_memory(&data).unwrap();
                let mut inverted_image = org_image.clone();
                inverted_image.invert();

                let mut out = img_to_bytes(inverted_image);

                let image_data = base64::encode(data);
                let inverted_data = base64::encode(&mut out);
                self.files.push(image_data);
                self.files.push(inverted_data);
                self.readers.remove(&file_name);
                true
            }
Here on line 52, we call load_from_memory to convert the Vec<u8> into a DynamicImage object. Then we create a mutable clone on line 53 and call invert() on line 54 to invert the colors.
Next, we have to convert the image to a valid PNG Vec<u8> in order to work with the HTML img display. To do this we wrote a function img_to_bytes:
fn img_to_bytes(img: DynamicImage) -> Vec<u8> {
    let mut cursor = std::io::Cursor::new(Vec::new());
    match img.write_to(&mut cursor, image::ImageFormat::Png) {
        Ok(_c) => {
            log::debug!("write to cursor success!");
        }
        Err(error) => {
            panic!("There was an problem: {:?}", error)
        }
    };

    cursor.seek(SeekFrom::Start(0)).unwrap();
    let mut out = Vec::new();
    cursor.read_to_end(&mut out).unwrap();

    out
}
In this img_to_bytes function we create wrapped buffer with Cursor to provide it with a seek implementation. This allows us to write the image data to memory on line 100.
We then read the buffer into a Vec<u8> and return it on lines 109-113.
The result looks like this:
Creating ASCII art from an image
For the final bit of fun, let’s write a function that turns the image into ASCII art.
Updates for use and structs
First, we have to bring some new things into scope of main.rs and add fields to our FileDataComponent struct:
use gloo_file::{callbacks::FileReader, File};
use image::{imageops, DynamicImage, GenericImageView};
use std::collections::HashMap;
use std::io::{Read, Seek, SeekFrom};
use web_sys::{Event, HtmlInputElement};
use yew::prelude::*;

pub enum Msg {
    LoadedBytes(String, Vec<u8>),
    Files(Vec<File>),
}

pub struct FileDataComponent {
    files: Vec<String>,
    asciis: Vec<String>,
    readers: HashMap<String, FileReader>,
}

impl Component for FileDataComponent {
    type Message = Msg;
    type Properties = ();

    fn create(_ctx: &Context<Self>) -> Self {
        Self {
            files: Vec::new(),
            asciis: Vec::new(),
            readers: HashMap::default(),
        }
    }
Image to ASCII function
Now we can write the image to ASCII function:
fn image_to_ascii(image: DynamicImage, resolution: u32) -> String {
    let pallete: [char; 12] = [' ', '.', ',', ':', ';', 'o', 'x', '9', '$', '%', '#', '@'];
    let mut y = 0;
    let mut ascii_art = String::new();
    let small_img = image.resize(
        image.width() / resolution,
        image.height() / resolution,
        imageops::FilterType::Nearest,
    );
    println!("Transforming image");
    for p in small_img.pixels() {
        if y != p.1 {
            ascii_art.push_str("\n");
            y = p.1;
        }

        let r = p.2 .0[0] as f32;
        let g = p.2 .0[1] as f32;
        let b = p.2 .0[2] as f32;
        let k = r * 0.2126 + g * 0.7152 + b * 0.0722;
        let character = ((k / 255.0) * (pallete.len() - 1) as f32).round() as usize;

        ascii_art.push(pallete[character]);
    }

    ascii_art.push_str("\n");
    ascii_art
}
What this function does is turn the Red, Green, and Blue values from the pixels into a brightness value on lines 145-148.
Then on line 149 the brightness value is mapped to the ASCII palette that was defined on line 130.
Our function also reduces the size of the image on lines 133-137 based on the value of the resolution parameter. The ASCII version of the image can grow in size quite quickly because ASCII characters take up more space than pixels. That’s why we might want to reduce the size of the original image before converting it to ASCII.
Finally, the ascii_art string is returned.
Update view HTML
To display the ASCII art we also have to update the HTML in the view function:
    fn view(&self, ctx: &Context<Self>) -> Html {
        let on_change = ctx.link().callback(move |e: Event| {
            let mut selected_files = Vec::new();
            let input: HtmlInputElement = e.target_unchecked_into();
            if let Some(files) = input.files() {
                let files = js_sys::try_iter(&files)
                    .unwrap()
                    .unwrap()
                    .map(|v| web_sys::File::from(v.unwrap()))
                    .map(File::from);
                selected_files.extend(files);
            }
            Msg::Files(selected_files)
        });
        html! {
            <div>
                <div>
                    {"Choose a image file:"}
                </div>
                <div>
                    <input type="file" accept="image/png" onchange={on_change} multiple=false/>
                </div>
                <div>
                { for self.files.iter().map(|f| Self::view_file(f))}
                </div>
                <div >
                    {for self.asciis.iter().map(|f| {
                        html!{
                            <div class="ascii-art">
                                {f}
                            </div>
                        }
                    })}
                </div>
            </div>
        }
    }
We have to make sure to add the ascii-art class from our CSS so that the ASCII art is displayed correctly.
Updating the update function
The last piece of code we have to update is in the update function and where the image data is processed in Msg::LoadedBytes(file_name, data) =>:
           Msg::LoadedBytes(file_name, data) => {
                log::info!("Processing: {}", file_name);
                let org_image = image::load_from_memory(&data).unwrap();
                let ascii_art = image_to_ascii(org_image.clone(), 4);
                let mut inverted_image = org_image.clone();
                inverted_image.invert();

                let mut out = img_to_bytes(inverted_image);

                let image_data = base64::encode(data);
                let inverted_data = base64::encode(&mut out);
                self.files.push(image_data);
                self.files.push(inverted_data);
                self.asciis.push(ascii_art);
                self.readers.remove(&file_name);
                true
            }
On line 55 we simply call our conversion function. Set the resolution to 4 using the parameter. This means that the image will be 4 times smaller before it is converted to ASCII.
Then on line 65 we add the resulting ASCII art to the list of ASCII are in the component.
ASCII art result
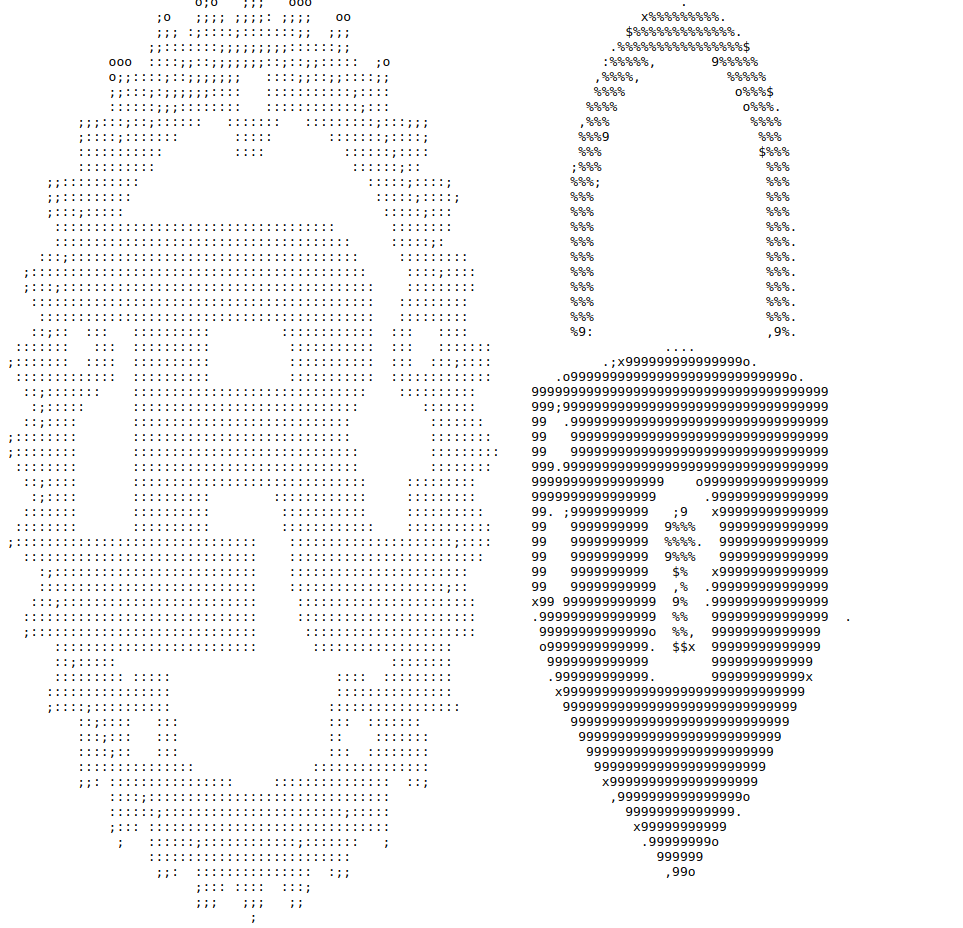
The end result should look something like this:
Conclusion
We learned how to select and read image input data in a web app using Rust code. Thanks to helper crates like gloo, gloo_file and image this was fairly easy! Furthermore, Yew is a fantastic web framework that enables the easy building of an interactive UI. On top of that, we learned how to create ASCII art from an image as well.
The completed project can be found on my GitHub here.
Please follow me on Twitter to get notified of new Rust programming articles:
Follow @tmdev82